This guide is provided by Conductor, the service that powers the QuickBooks
Desktop integration for many business tools, including the one that sent you
here.
Troubleshooting steps
1
Ensure your computer is on, online, and signed in to Windows
The Web Connector requires your computer to be powered on, connected to the internet, and signed in to Windows.
- If your computer is off, turn it on and ensure it has an active internet connection.
- Sign in to Windows with the user that runs QuickBooks Desktop and the Web Connector. If the computer was shut down or restarted, the connection will not resume while Windows is waiting at the sign-in screen.
- Attempt to sync your QuickBooks Desktop data.
2
Ensure the Web Connector is running
The Web Connector should always be running in the background on your computer. If it’s not, launch the program by following these steps:
- Open QuickBooks Desktop with the company file you want to sync.
- In the top menu bar, click “File” → “App Management” → “Update Web Services” to launch the QuickBooks Web Connector.
- Attempt to sync your QuickBooks Desktop data again.
- If the sync is successful, this issue is resolved and you should click “Hide” in the bottom-right corner to keep the Web Connector running in the background. If the error persists, continue to the next step.
If the Web Connector doesn’t restart automatically after reboot and Windows sign-in, Conductor may face difficulties in reliably syncing your QuickBooks Desktop data. To ensure it opens after reboot and Windows sign-in, follow this guide.
3
Confirm Auto-Run is enabled in the Web Connector
From the Web Connector:
- Confirm the box for Auto-Run is enabled for your connection. If not, tick it.
- Attempt to sync your QuickBooks Desktop data again.
- If the sync is successful: This issue is resolved and you should click “Hide” in the bottom-right corner to keep the Web Connector running in the background.
- If the sync fails: Continue to the next step.
4
Confirm the password is saved in the Web Connector
From the Web Connector: Confirm the Password box is not empty and looks like ”********”.
‼️ If the Password box is empty, click HERE for instructions to re-enter it.
‼️ If the Password box is empty, click HERE for instructions to re-enter it.
- Return to the QuickBooks Desktop integration setup flow that you initially used to create this connection. If you do not know where this is, contact the support team of the product that sent you this guide.
- Skip to the page for “Step 4 of 5” and find the section for “Copy the unique password below”. It looks like this:
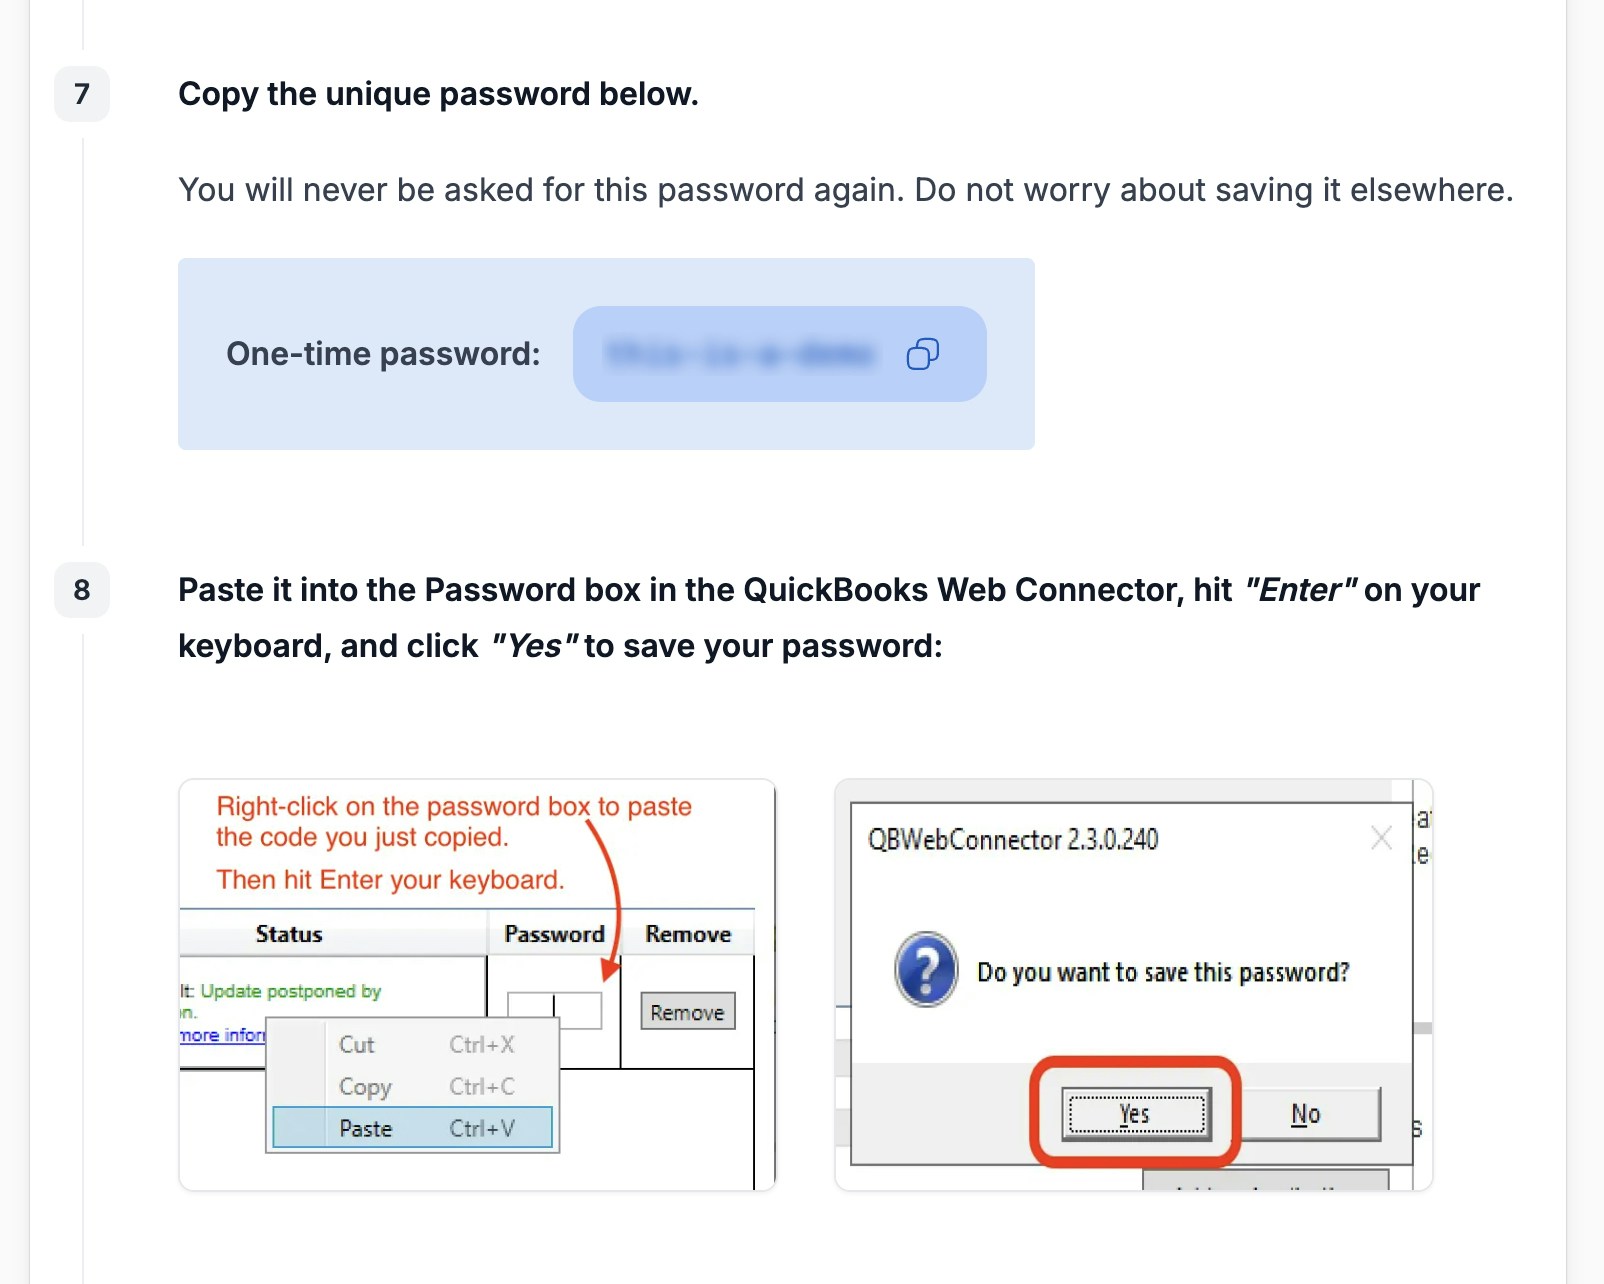
Find this section in the setup guide
- When you paste the password into the Password box, be sure to hit “Enter” on your keyboard and click “Yes” on the dialog box that appears to save the password.
- Continue to the final page of the setup flow to test your connection:
- If the sync is successful: This issue is resolved and you should click “Hide” in the bottom-right corner to keep the Web Connector running in the background.
- If the sync fails: Continue to the next step.
5
Confirm Every-Min is blank in the Web Connector
From the Web Connector: Confirm Every-Min is blank for your connection.
‼️ If Every-Min is not blank, click HERE for instructions to reset it.
‼️ If Every-Min is not blank, click HERE for instructions to reset it.
These steps are the only way to reset the Every-Min value; you cannot directly clear it manually.
- Click “Remove” to the right of the connection in the Web Connector. Click “Yes” to confirm.
- Return to the QuickBooks Desktop integration setup flow that you initially used to create this connection. If you do not know where this is, contact the support team of the product that sent you this guide.
- Complete the same setup flow to add the connection again. But, do not enter a value in the Every-Min field.
- Continue to the final page of the setup flow to test your connection:
- If the sync is successful: This issue is resolved and you should click “Hide” in the bottom-right corner to keep the Web Connector running in the background.
- If the sync fails: Continue to the next step.
6
Ensure only one version of QuickBooks Desktop is installed
For the integration to work, only one version of QuickBooks Desktop can be installed on your Windows computer. Having multiple versions installed can cause the error above and several other issues. Please complete this guide to ensure only one version of QuickBooks Desktop is installed on your computer. If the Web Connector ever crashed when syncing, this is almost certainly the culprit.After completing the guide, try syncing with QuickBooks Desktop again.
7
Delete the Web Connector log file
This is a common solution for various QuickBooks Desktop sync issues.
8
Reboot your computer and sign in to Windows
As a last resort, restarting your computer can resolve hidden issues with the Web Connector and other background processes.
- Save any open work and reboot your computer.
- After the computer restarts, sign in to Windows with the user that runs QuickBooks Desktop and the Web Connector.
- Open QuickBooks Desktop with the company file you want to sync.
- Attempt to sync your QuickBooks Desktop data again.