# What is Conductor?
Source: https://docs.conductor.is/about
The best QuickBooks Desktop integration on the planet.
Conductor is a real-time, fully-typed API for QuickBooks Desktop (sometimes called QuickBooks Enterprise), available via Python, Node.js, TypeScript, and REST. In just a few lines, get real-time access to fetch, create, or update [*any* QuickBooks Desktop object type](/qbd/api#supported-object-types) and receive a fully-typed response.
Conductor, the company, is building a data integration platform for vertical SaaS companies, starting with QuickBooks Desktop. Our team has spent over a decade building companies, scaling vast software systems, and obsessing over quality.
## Key features
* **Any data type:** Query, create, or update any QuickBooks Desktop data type.
* **Real-time**: Get real-time updates on your QuickBooks Desktop data. No queues, no polling.
* **Modern API:** JSON-based REST API, replacing the old XML-based SOAP model.
* **Typed client libraries:** Fully typed libraries in Node.js and Python with autocomplete, inline docs, and type validation for endpoints, parameters, and responses.
* **Request handling:** Invisibly manages queues, timeouts, retries, and pagination.
* **Multi-company support:** Connects to multiple QuickBooks Desktop company files.
* **Validation:** Sanitizes and validates all inputs and outputs.
* **Unified error handling:** Streamlines error handling across the QuickBooks stack.
* **Authentication flow UI:** Simple UI for securely connecting QuickBooks Desktop accounts.
* **Dashboard**: UI to monitor and manage your QuickBooks Desktop connections and data.
* **Error resolution:** Detailed guides and instructions for resolving errors and handling edge cases.
# Create an AuthSession
Source: https://docs.conductor.is/apis/auth-sessions/create
POST /auth-sessions
To launch the authentication flow, create an AuthSession and pass the returned session’s `authFlowUrl` to the client for your end-user to visit in their browser.
# The AuthSession object
Source: https://docs.conductor.is/apis/auth-sessions/object
An AuthSession is the secure way to programmatically launch the client-side Conductor authentication flow that lets your users connect their accounts to your integration.
# Retrieve an AuthSession
Source: https://docs.conductor.is/apis/auth-sessions/retrieve
GET /auth-sessions/{id}
Retrieves the details of an AuthSession that has previously been created.
# Authentication
Source: https://docs.conductor.is/apis/authentication
The Conductor API uses [API keys](/usage/keys) to authenticate requests.
Your secret API keys carry many privileges, so be sure to keep them secure. Do not share your secret API keys in publicly accessible areas such as Git, client-side code, or a public website.
You must make all API calls over HTTPS. Calls that you make over plain HTTP will fail. API requests without authentication will also fail.
Authentication to the API is performed with bearer auth. Provide your API key in the `Authorization` header.
```sh Example authenticated request
curl -X GET https://api.conductor.is/v1/end-users \
-H "Authorization: Bearer {{YOUR_SECRET_KEY}}"
```
Use your API key by setting it in the initial configuration of Conductor. The Node.js library then automatically sends this key in each request.
```ts Example authenticated request
import Conductor from "conductor-node";
const conductor = new Conductor("{{YOUR_SECRET_KEY}}");
const endUsers = await conductor.endUsers.list();
```
# Create an EndUser
Source: https://docs.conductor.is/apis/end-users/create
POST /end-users
Creates an EndUser.
# Delete an EndUser
Source: https://docs.conductor.is/apis/end-users/delete
DELETE /end-users/{id}
Permanently deletes an EndUser object and all of its connections.
# List all EndUsers
Source: https://docs.conductor.is/apis/end-users/list
GET /end-users
Returns a list of your EndUsers.
# The EndUser object
Source: https://docs.conductor.is/apis/end-users/object
An EndUser represents a user of your application. Use it to connect integrations.
# Send a passthrough request to an EndUser's integration connection
Source: https://docs.conductor.is/apis/end-users/passthrough
POST /end-users/{id}/passthrough/{integrationSlug}
Sends a request directly to the specified integration connection (e.g., QuickBooks Desktop) on behalf of the end-user.
# Ping an EndUser's connection
Source: https://docs.conductor.is/apis/end-users/ping
GET /end-users/{id}/ping/{integrationSlug}
Checks whether the specified IntegrationConnection can connect and process requests end-to-end. This is useful for showing a "connection status" indicator in your app.
# Retrieve an EndUser
Source: https://docs.conductor.is/apis/end-users/retrieve
GET /end-users/{id}
Retrieves an EndUser object.
# The ConductorError object
Source: https://docs.conductor.is/apis/errors/object
Every error returned by the Conductor API takes the form of a `ConductorError` object.
### Attributes
The developer error message for your logs.
The user-friendly error message, written specifically for displaying to your end-users in your app's UI.
This value exists for *every* error. E.g., for a QBD connection error, it might recommend the end-user to confirm their QuickBooks Desktop is open and that they're logged in. But if a Conductor API key is expired, e.g., this message will just say *"An internal server error occurred. Please try again later."*.
Categorizes the error. See the possible [error types](/usage/error-handling#error-types).
This value is the same as the subclass name. E.g., `"ConductorIntegrationError"` or `"ConductorInvalidRequestError"`.
The unique error code from Conductor, which is useful for adding special handling for specific errors. E.g., `"RESOURCE_MISSING"`, `"API_KEY_INVALID"`, or `"QBD_REQUEST_ERROR"`.
In contrast, `type` is more general and categorizes the error.
The HTTP status code of the response that included the error.
The unique error code supplied by the third-party integration for errors returned by the integration (i.e., `ConductorIntegrationError`) or integration connector (i.e., `ConductorIntegrationConnectorError`). This is useful for adding special handling for specific errors from the third-party integration or connector.
The integration's corresponding error message for this code is in `error.message`.
The third-party integrations' error codes are not standardized, so you should not rely on this code to be the same across integrations.
The unique identifier for the request that caused the error.
If you need to contact us about a specific request, providing the request identifier will ensure the fastest possible resolution.
```json Example ConductorError object
{
"error": {
"message": "QBD Connection Error (0x80040420): The QuickBooks user
has denied access.",
"userFacingMessage": "We could not connect to QuickBooks Desktop
because we must re-authorize our connection. To fix this, open
QuickBooks Desktop, log in as Admin, navigate to 'Edit >
Preferences > Integrated Applications', click 'Company Preferences',
select our app, click 'Properties...', ensure 'Allow this
application to log in automatically' is checked, then click 'OK'.
Then try again.",
"type": "INTEGRATION_CONNECTION_ERROR",
"code": "QBD_CONNECTION_ERROR",
"httpStatusCode": 502,
"integrationCode": "0x80040420",
"requestId": "req_1234567890"
}
}
```
# Pagination
Source: https://docs.conductor.is/apis/pagination
Split your requests into smaller chunks to avoid overwhelming QuickBooks Desktop.
Some QuickBooks Desktop users have unexpectedly large amounts of data. In addition, QuickBooks Desktop is slow and memory-intensive. Without proper limits or pagination, a request might inadvertently retrieve tens of thousands of rows, which can take many minutes to return. To avoid overwhelming QuickBooks Desktop, you may need to split your requests into smaller chunks. This process is called **pagination**.
## Pagination via the Node.js client library
Cursor-based pagination is not yet supported in the Node.js client library. Instead, we recommend batching your requests by date range and concatenating the results. This will avoid overwhelming QuickBooks Desktop by requesting only a subset of the data at a time.
For example, the following fetches all invoices from the provided date range in yearly batches:
```ts Fetch invoices in yearly batches
import Conductor, { QbdTypes } from "conductor-node";
async function getQbdInvoices(
endUserId: string,
startDate: string,
): Promise {
const conductor = new Conductor("{{YOUR_SECRET_KEY}}");
const startYear = new Date(startDate).getFullYear();
const endYear = new Date().getFullYear();
// Fetch invoices in yearly batches to avoid overwhelming QuickBooks Desktop
// because some users have tens of thousands of invoices.
const allInvoices: QbdTypes.InvoiceRet[] = [];
for (let year = startYear; year <= endYear; year++) {
const yearStartDate = year === startYear ? startDate : `${year}-01-01`;
const yearEndDate = `${year}-12-31`;
const yearInvoices = await conductor.qbd.invoice.query(endUserId, {
TxnDateRangeFilter: {
FromTxnDate: yearStartDate,
ToTxnDate: yearEndDate,
},
});
allInvoices.push(...yearInvoices);
}
return allInvoices;
}
```
## Pagination via the REST API
If you are using the REST API directly, you can paginate requests by following the instructions below.
### Initiating pagination
To paginate a QuickBooks Desktop query, include the `MaxReturned` parameter in your request body, specifying the maximum number of records you want to receive in a single response. If the total number of records exceeds `MaxReturned`, the response will include two additional fields:
1. `IteratorID`: A unique identifier for the current query.
2. `IteratorRemainingCount`: The number of records remaining to be fetched.
Here's an example of a pagination request:
```sh Start pagination request with MaxReturned
curl -X POST https://api.conductor.is/v1/end-users/{{END_USER_ID}}/passthrough/quickbooks_desktop \
-H "Content-Type: application/json" \
-H "Authorization: Bearer {{YOUR_SECRET_KEY}}" \
-d '{
"InvoiceQueryRq": {
"MaxReturned": 2
}
}'
```
And here's an example of a pagination response:
```json Example pagination response with IteratorID and IteratorRemainingCount
{
"InvoiceQueryRs": {
"IteratorID": "fce6b40f-9700-435b-949c-f2587af31536",
"IteratorRemainingCount": 0,
"InvoiceRet": [
{
"TxnID": "4E4-1703631996",
"TimeCreated": "2021-01-01T00:00:00Z",
"CustomerRef": {
"ListID": "80000020-1703631977",
"FullName": "Alice"
},
"RefNumber": "INV-1",
"IsPaid": true,
"TotalAmount": 100
},
{
"TxnID": "4E4-1703631997",
"TimeCreated": "2021-01-02T00:00:00Z",
"CustomerRef": {
"ListID": "80000020-1703631978",
"FullName": "Bob"
},
"RefNumber": "INV-2",
"IsPaid": false,
"TotalAmount": 200
}
]
}
}
```
### Continuing pagination
**If `IteratorRemainingCount` is greater than 0**, send another request with the same request body as the previous request, but include the `IteratorID` parameter on the root level of the request body, set to the value from the previous response.
The parameter `IteratorID` goes on the root level of the request body, not
inside the query object.
```sh Continue pagination request with IteratorID
curl -X POST https://api.conductor.is/v1/end-users/{{END_USER_ID}}/passthrough/quickbooks_desktop \
-H "Content-Type: application/json" \
-H "Authorization: Bearer {{YOUR_SECRET_KEY}}" \
-d '{
// ❗ `IteratorID` is at root level of the request body
"IteratorID": "fce6b40f-9700-435b-949c-f2587af31536",
"InvoiceQueryRq": {
"MaxReturned": 1000
}
}'
```
### Considerations
* **The iterator can only be used within the same QuickBooks Web Connector session, which we keep open for 10 seconds.** If the iterator is not used within that time, you will receive an error. Therefore, you must implement the pagination logic programmatically in your backend to ensure that the iterator is used within the 3-second window.
* The short expiry is due to how the QuickBooks Web Connector handles pagination. Upon the initial request, the QuickBooks Web Connector requests the entire result set from QuickBooks Desktop, stores it in local memory, and returns only the first batch. As a result, the first request will take longer because QBD must process and assemble the entire result set. Subsequent requests will return immediately.
* If you attempt to use the iterator after the previous request returned `IteratorRemainingCount` of `0`, you will receive an error.
# Request IDs
Source: https://docs.conductor.is/apis/request-ids
Each API request has an associated unique identifier. This identifier is returned in the response headers as `Conductor-Request-Id`. You can use this identifier to track the request in the logs. If you need to contact us about a specific request, providing the request identifier will ensure the fastest possible resolution.
# Timeouts
Source: https://docs.conductor.is/apis/timeouts
When you send a request to QuickBooks Desktop through Conductor, Conductor will wait up to **four minutes** for QuickBooks Desktop to process the request and return a response.
If you prefer a different timeout period, you can customize it by setting the
`Conductor-Timeout-Seconds` request header to your desired value.
While the four-minute timeout might seem long, **it is necessary** for the following reasons:
1. **Large Data Requests:** Without paginating your requests (via the `MaxReturned` or other range-based parameters), you may unintentionally request tens of thousands of records in a single call. Processing such a large volume of data can take several minutes in QuickBooks Desktop.
2. **Sequential Processing:** QuickBooks Desktop can only process one request at a time. If multiple requests are sent concurrently, they are placed in a queue and processed sequentially, requiring sufficient time for each request to complete before the next one can begin.
3. **Potential Program Startup:** If QuickBooks Desktop is not open but the user’s computer is on, Conductor will automatically launch the program when a request is made. Given that QuickBooks Desktop can take at least 30 seconds to start, adding considerably to the response time.
If QuickBooks Desktop is already offline when you send the request, Conductor
will immediately return an error **without** initiating the timeout period.
# Product updates
Source: https://docs.conductor.is/changelog/overview
New updates and improvements.
* **Improved:** Released the new [Node.js SDK](/qbd-api/sdks#nodejs-sdk) behind an NPM `@beta` tag.
* **Improved:** Beautified READMEs for the Node.js and Python SDKs.
* **Improved:** Trigger Mintlify docs refresh when updating OpenAPI spec.
* **Improved:** Upgrade guide for the Node.js SDK to API v2.
* **Improved:** Adjust auth-flow to exclaim the importance of never changing the Web Connector settings.
* **Improved:** Add step for resetting the Every-Min value in the Web Connector to the [Connection not active](/help/connection-errors/connection-not-active) help guide.
* **Fixed:** Remove several unneeded docs pages for the old API v1.
* **Added:** JavaScript and Python code samples for every API v2 endpoint using our new SDKs.
* **Added:** Company logos to the auth flow, using the organization's email domain (set in the dashboard's Organization settings) or the organization's name.
* **Added:** [Upgrade guide](/qbd-api/upgrade-node) for the Node.js SDK to API v2.
* **Improved:** Enable new customers to purchase a subscription from the dashboard.
* **Improved:** Upgrade message in the current Node.js SDK links users to the upgrade guide.
* **Improved:** Added dropdown menu in dashboard's Auth Session modal to easily select expiry times (e.g. "30 minutes", "1 day") instead of requiring manual input in minutes.
* **Added:** Support for QBD [discount items](/qbd-api/discount-items) in API v2.
* **Added:** Intro docs for the [Node.js SDK](/qbd-api/sdks#nodejs-sdk) and [Python SDK](/qbd-api/sdks#python-sdk).
* **Improved:** Upgrade docs config to Mintlify's new `docs.json` format.
* **Improved:** Internal error tracking.
* **Improved:** Quickstart guide now includes a section for the Node.js SDK beta using API v2.
* **Improved:** Dashboard now visually distinguishes between QuickBooks Desktop connections that have been reset versus those that have never been connected.
* **Fixed:** Always parse `EIN` field as a string in API v1.
* **Added:** [`lastSuccessfulRequestAt`](/apis/end-users/object#schema-integration-connections-last-successful-request-at) to the `IntegrationConnection` resource.
* **Added:** Support for QBD [inventory adjustments](/qbd-api/inventory-adjustments) in API v2.
* **Improved:** The server will gracefully shutdown during deployments by letting in-process requests complete.
* **Added:** Support for QBD [sales representatives](/qbd-api/sales-representatives) in API v2.
* **Improved:** Count all connections in test projects as test users.
* **Improved:** Move source ID from the end-user table to the expanded view in the dashboard.
* **Fixed:** QBD `JournalEntry.debitLines` now return `account` as a nullable field to reflect data from the wild.
* **Fixed:** QBD `Employee.address` now supports all address fields.
* **Added:** Help guide for [QBD admin required error](/help/connection-errors/qbd-admin-required).
* **Improved:** Redesigned end-user table in the dashboard.

* **Added:** Support for QBD [employees](/qbd-api/employees) in API v2.
* **Added:** Support for QBD [payroll wage items](/qbd-api/payroll-wage-items) in API v2.
* **Improved:** Internal framework for defining OpenAPI schemas.
* **Added:** Released the [Python SDK](https://pypi.org/project/conductor-py/) on PyPI, now available in stable release.
* **Improved:** Pagination guide for API v2.
* **Improved:** Quickstart guide now recommends installing SDKs instead of using the API Playground.
* **Improved:** Quickstart guide no longer shows how to create end-users and an auth session via code.
* **Fixed:** Prevented unnecessary retries in SDKs when receiving definitive error responses.
* **Added:** Support for deleting QBD transaction types, such as [invoices](/qbd-api/invoices/delete), in API v2.
* **Added:** Documentation on [cursor-based pagination](/qbd-api/pagination) in API v2.
* **Added:** Automated internal SDK generator pipeline for faster release cycles.
* **Added:** Ability to generate QuickBooks Desktop authentication links directly from the dashboard.
* **Added:** Ability to configure expiry and redirect URL for auth sessions in the dashboard.
* **Added:** Quick "Generate auth link" button in the dashboard for end-users that haven't connected yet.
* **Added:** No-code Conductor quickstart guide.
* **Improved:** Auth session is now automatically generated in the dashboard after creating a new end-user.
* **Improved:** Restyled dashboard modals.
* **Added:** Validation of `publishableKey` against the authenticated project during auth session creation.
* **Improved:** Moved the action menu in the dashboard's end-user table to the left side for better visibility.
* **Added:** Company logos to the dashboard for organizations and end-users.
* **Added:** Ability to delete end-users from the dashboard.
* **Added:** Ability to edit end-user properties from the dashboard.
* **Added:** This changelog page.
* **Added:** Support for QBD [vendor credits](/qbd-api/vendor-credits) in API v2.
* **Added:** Support for QBD [subtotal items](/qbd-api/subtotal-items) in API v2.
* **Added:** Support for QBD [credit memos](/qbd-api/credit-memos) in API v2.
# FAQ
Source: https://docs.conductor.is/faq
The fundamentals of Conductor.
## Conductor basics
Conductor is a web service that securely connects your app to one or more QuickBooks Desktop instances. It provides a RESTful API and fully-typed client libraries that you can use to read and write data to/from QuickBooks Desktop.
Behind the scenes, Conductor uses the QuickBooks Web Connector, which is a Windows SOAP-based program that comes preinstalled with QuickBooks Desktop on your end-users' computers. This program always runs invisibly in the background, waiting for requests from Conductor. When you send a request to Conductor, it forwards the request to the Web Connector, which then forwards the request to QuickBooks Desktop. The response follows the same path in reverse. Between each of those steps, there are many layers of error handling, validation, and data transformation.
Conductor abstracts away multiple layers of complexity, idiosyncrasies, and fragility of working with QuickBooks Desktop so that interfacing with this tragically outdated technology is as easy and wonderful as using Stripe's API.
Conductor leverages a program called QuickBooks Web Connector, which comes preinstalled with all versions of QuickBooks Desktop and runs invisibly in the background on the Windows computer to maintain the connection. To connect, the QuickBooks Desktop users will step through Conductor's [authentication flow](/usage/auth-flow), which has them download a config file that Conductor generates, open it in the Web Connector, authenticate, and connect to Conductor (and thereby to your application). Here is a [demo of the auth flow](https://connect.conductor.is/qbd/demo).
Conductor is priced at **\$49 month for each active QuickBooks Desktop company file connection**. A connection is considered active if *both* of the following conditions are met within the same monthly billing period:
1. Conductor receives a heartbeat from the QuickBooks Desktop instance.
2. Your application makes a Conductor API call to that connection.
NOTE: Connections used for testing and development are free. Connections using data from an active production environment are not.
Volume discounts are available for enterprises requiring a large number of connections.
Integrating with QuickBooks Desktop from scratch is a painful nightmare. It's a decades-old API that hasn't been modernized and is riddled with edge cases, idiosyncrasies, and bugs that are incredibly difficult to work with. Conductor solves all of these problems and takes only a fraction of the time to implement with none of the maintenance headaches. We have obsessed over the edge cases and performance. Beyond the significant time savings, **Conductor preserves your team's mental well-being**.
## Data handling and security
No, every Conductor API call is a real-time direct request to/from QuickBooks Desktop. If you make a request when the end-user's computer is off or QuickBooks Desktop is inaccessible, Conductor will return an error message with instructions for how the end-user can resolve the issue.
By design, Conductor has no cache layer because it causes all sorts of problems when data is out-of-sync. E.g., you modify data on one end that has already been removed on the other.
Ideally, the computer running QuickBooks Desktop is always on and accessible. If that is not possible for some end-users, this design has still worked well because if such an end-user triggers a sync while using your app, they likely did so from the same computer as where QuickBooks Desktop is already running.
No, Conductor does not retain any of your end-users' QuickBooks Desktop data on a permanent basis. For operational purposes, API request logs, which includes QuickBooks Desktop data, are temporarily, securely stored in a SOC 2 and GDPR-compliant log manager for 14 days before permanent deletion. Access to these logs is strictly limited to authorized Conductor engineers, who use them solely for debugging, offering customer support, and product improvement purposes. This approach ensures both the confidentiality of your data and compliance with the highest standards of data protection.
No, Conductor's APIs currently only support working with a single object at a time because QuickBooks Desktop itself only resolves requests serially. If you want to create 50 invoices, for example, you will need to call the create-invoice API 50 times. However, you can send multiple requests in parallel; for example, you can use `await Promise.all([ ... ])` in JavaScript with multiple requests, but you cannot send multiple requests in a single HTTPS request.
## QuickBooks Desktop and Web Connector
The QuickBooks Web Connector is a Windows program that comes preinstalled with QuickBooks Desktop that Conductor uses to securely communicate with QuickBooks Desktop. This program runs invisibly in the background on the end-user's computer, waiting for requests from Conductor. The only time your end-user should see the Web Connector is when they first set up their QuickBooks Desktop connection with Conductor; other than that, it should be invisible to them.
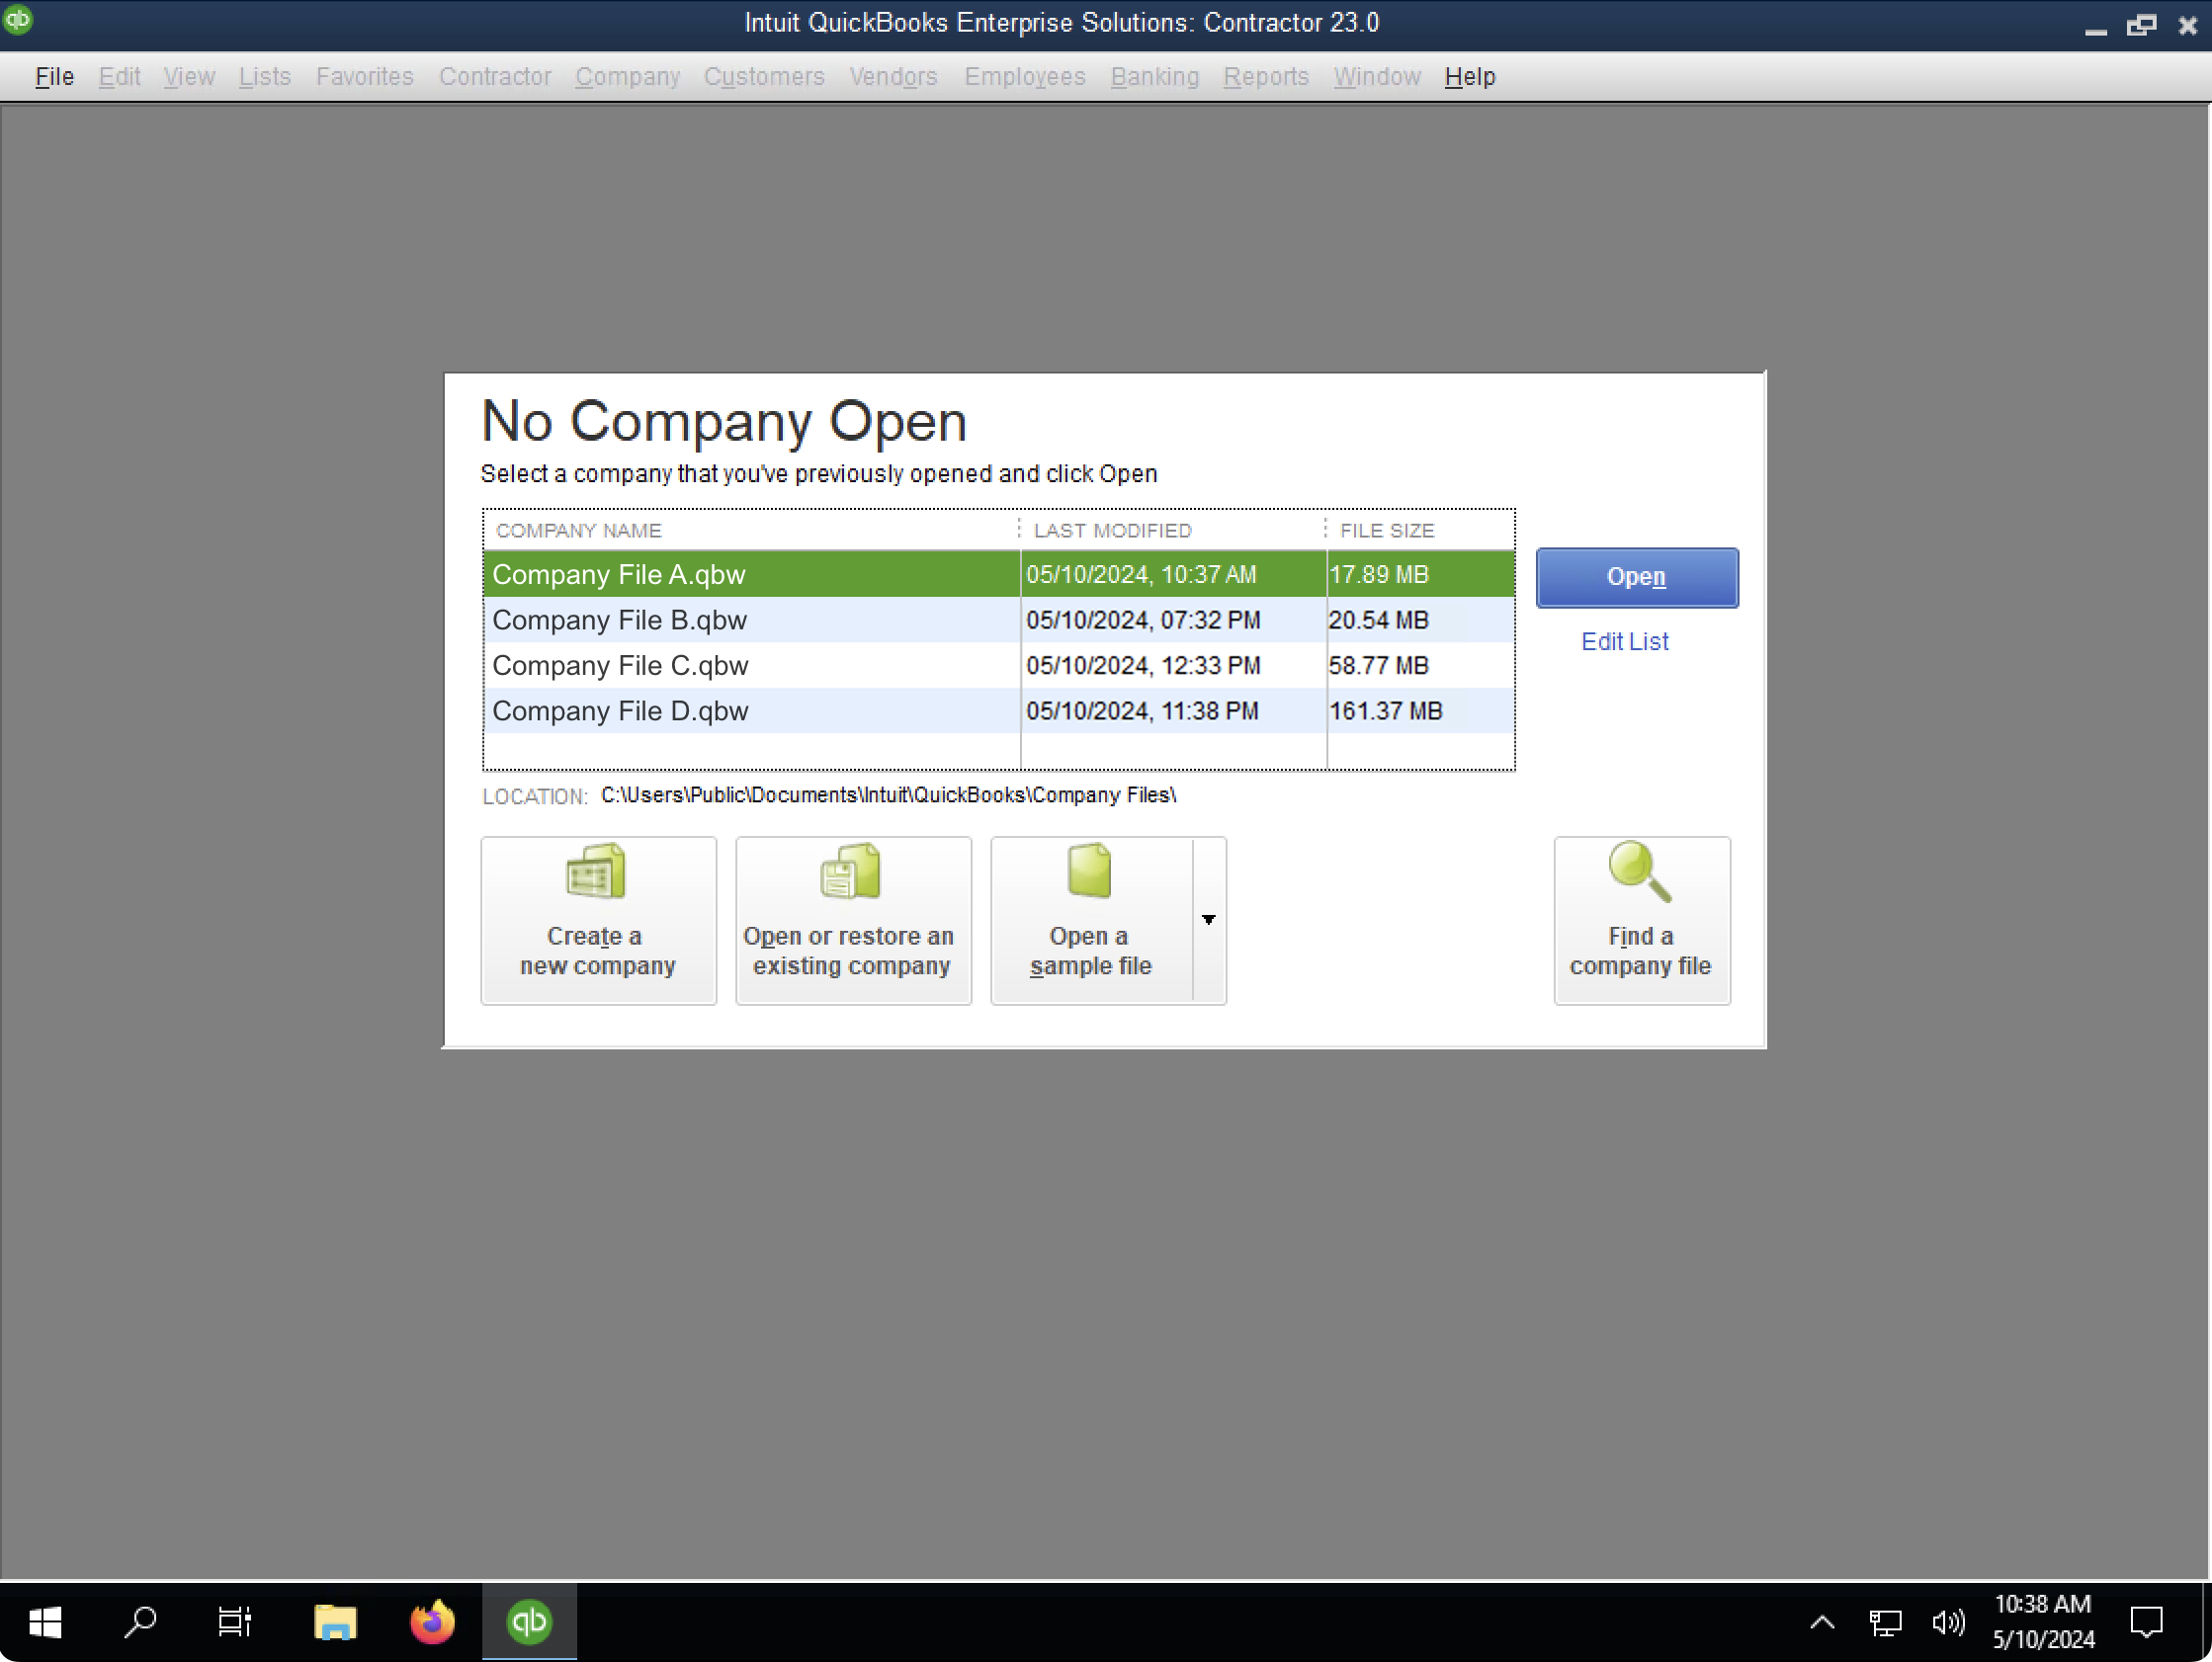
In the world of QuickBooks Desktop, a "company file" is the main local file for all the financial data for a specific company. Typically, a QuickBooks Desktop user will have only one company file: the one they use to manage their business. However, some users manage multiple company files on one computer and actively switch between them. For example, an accounting firm might manage the books for multiple clients, each with their own QuickBooks Desktop company file.
Each Conductor connection is tied to a specific company file. If you need to connect to multiple company files, you will need to create multiple end-users in Conductor, each with their own connection. See this [guide](/help/guides/multiple-connections-one-computer) for more information.
Conductor supports every version, variant, and edition of QuickBooks Desktop since 2018, including:
* **QuickBooks Enterprise Solutions - any version or year**
* Any edition: Accountant, Contractor, Manufacturing and Wholesale, Nonprofit, Professional Services, Retail.
* **QuickBooks Premier (Plus) - 2018 or later**
* Any edition: Accountant, Contractor, Manufacturing and Wholesale, Nonprofit, Professional Services, Retail.
* **QuickBooks Desktop Pro (Plus) - 2018 or later**
* **QuickBooks Accountant Desktop (Plus) - 2018 or later**
No, QuickBooks Desktop is not being discontinued.
1. **Ongoing Support:** Intuit continues to support all existing versions of QuickBooks Desktop for current customers.
2. **Continued Sales:** Intuit is still actively selling "QuickBooks Enterprise", the main version of QuickBooks Desktop tailored for medium to large businesses, to new customers.
3. **Product Changes:** Intuit will soon cease sales of "QuickBooks Desktop Pro/Premier Plus" – a less popular variant primarily used by small family businesses – to *new* customers (existing customers will still be supported).
While Intuit has encouraged users to migrate to QuickBooks Online, Desktop users consistently tell us that it doesn't fully meet their business needs. Consequently, the base of existing QuickBooks Desktop users, including both "Enterprise" and "Pro/Premier" versions, remains robust. Conductor continues to support these users and their ongoing reliance on QuickBooks Desktop.
## Compatibility and connectivity
Yes, you can set up Web Connector connections on multiple computers for the same QuickBooks Desktop company file. This is applicable if your company shares the same company file across multiple computers on your office network. This setup can serve as a backup in case one computer is offline. However, we haven't seen any Conductor users needing this approach so far, but we have confirmed that it works.
No, there is no way to access QuickBooks Desktop instances when the user's computer is off because QuickBooks Desktop data is not stored online. Instead, QuickBooks Desktop is a local application that runs on a user's computer. As a result, this means an active Conductor connection is always direct and real-time. Conductor intentionally avoids using a cache layer to prevent potential data conflicts when data is out-of-sync.
While this may seem limiting to many developers, we find that typical QuickBooks Desktop users do not mind:
1. **User Availability:** When a user is interacting with your application that syncs data with QuickBooks Desktop, they are typically at their computer anyway, which means that QuickBooks Desktop is accessible.
2. **User Control:** Many QuickBooks Desktop users are protective of their data and prefer to manually initiate data syncs rather than rely on automatic background processes. This approach gives them greater control over their data and ensures that no syncs occur without their explicit consent.
No, QuickBooks Desktop does not need to be actively open. As long as the computer itself is powered on, Conductor can send a request to QuickBooks Desktop, which will then automatically launch in the background, process the request, and close itself once completed.
**Important Note:** Launching QuickBooks Desktop in the background adds approximately 30 seconds to the request processing time due to the software's startup process. For optimal faster response times, we recommend keeping QuickBooks Desktop open while using Conductor.
Yes, please see this [guide](/help/guides/multiple-connections-one-computer) for more information.
Yes, Conductor is fully compatible with Rightworks. Users can establish the connection just as they would with a typical Windows instance running QuickBooks Desktop.
However, there is an important consideration: Rightworks users must sign in to their remote desktop session each time they wish to sync with QuickBooks Desktop. This requirement exists because Rightworks terminates inactive instances once the connection is closed, preventing background processes from running when the user is signed out. Despite this, most users find this process manageable because signing in to Rightworks is a routine part of their workflow. It is worth noting that, based on our experience, remote QuickBooks Desktop hosts like Rightworks account for fewer than 2% of all QuickBooks Desktop companies.
Please see [this guide](/help/guides/rightworks) for setting up a Conductor connection with a Rightworks QuickBooks Desktop instance.
# How to fix: "Your QuickBooks Desktop connection is not active"
Source: https://docs.conductor.is/help/connection-errors/connection-not-active
export const Image = ({src, alt, width, align = "center", noShadow = false, noBorder = false, noZoom = false}) =>  ;
This guide is provided by Conductor, the service that powers the QuickBooks
Desktop integration for many business tools, including the one that sent you
here.
If Conductor is unable to sync your QuickBooks Desktop data, you may see the following error:
```
Your QuickBooks Desktop connection is not active. It was last active...
```
This error indicates that Conductor cannot establish a connection with the QuickBooks Web Connector on your computer. The Web Connector is an essential component that comes pre-installed with QuickBooks Desktop. It runs silently in the background, facilitating secure synchronization of your QuickBooks Desktop data with Conductor.
Follow these troubleshooting steps to resolve the issue:
## Troubleshooting steps
The Web Connector requires your computer to be powered on and connected to the internet. If your computer is off, turn it on and ensure it has an active internet connection before attempting to sync again.
If the error persists, proceed to the next step.
The Web Connector should always be running in the background on your computer. If it's not, launch the program by following these steps:
1. Open QuickBooks Desktop with the company file you want to sync.
2. In the top menu bar, click "**File**" > "**App Management**" > "**Update Web Services**" to launch the QuickBooks Web Connector.
3. In the window that appears, click "**Hide**" in the bottom-right corner to keep the Web Connector running in the background.
After completing these steps, attempt to sync your QuickBooks Desktop data again.
If the error persists, continue to the next step.
If the Web Connector doesn't start automatically with your computer, Conductor may face difficulties in reliably syncing your QuickBooks Desktop data. To ensure automatic startup, [follow this guide](/help/guides/ensure-web-connector-opens-at-startup).
Reopen the Web Connector (following the steps in Step 2) and confirm:
1. **Auto-Run is enabled** for your connection. If not, tick it.
2. **Every-Min is blank** for your connection. If not, follow these steps to reset it. *(These steps are the only way to reset the Every-Min value; you cannot directly clear it manually.)*
1. Click "**Remove**" to the right of the connection in the Web Connector. Click "**Yes**" to confirm.
2. Click "**Add an Application**" in the bottom-right corner of the Web Connector. Select the same "**.qwc**" file from your **Downloads folder** that you previously opened.
3. Re-enter the **password from the QBD setup guide** that you initially used to create this connection. If you do not have this link, contact the support team of the product that sent you this guide.
**Never change these settings!** These settings are required to for a stable connection to your QuickBooks Desktop.
After fixing these settings, click "**Hide**" in the bottom-right corner to keep the Web Connector running in the background. Then, attempt to sync your QuickBooks Desktop data once more.
If you continue to receive the "Your QuickBooks Desktop connection is not active" error after completing these steps, please contact our support team at [support@conductor.is](mailto:support@conductor.is?subject=QuickBooks%20Desktop%20Connection%20Issue).
# How to fix: "Could not start QuickBooks"
Source: https://docs.conductor.is/help/connection-errors/could-not-start-quickbooks
export const Image = ({src, alt, width, align = "center", noShadow = false, noBorder = false, noZoom = false}) => ;
This guide is provided by Conductor, the service that powers the QuickBooks
Desktop integration for many business tools, including the one that sent you
here.
If you were directed to this page, it was likely because you encountered the following error attempting to sync with your QuickBooks Desktop:
```
We could not connect to your QuickBooks Desktop because either QuickBooks
Desktop is closed and we could not start it, or an error popped up on your
Windows computer.
```
Alternatively, you might have been directed to this page for the following error *(which is the exact same error; the message above is merely Conductor's user-friendly version)*:
```
(0x80040408): Could not start QuickBooks.
```
Follow these troubleshooting steps to resolve the issue:
## Troubleshooting steps
Having multiple versions of QuickBooks Desktop installed on your Windows computer can cause the error above and several other issues. Please [complete this guide to ensure](/help/guides/ensure-only-one-version-installed) only one version of QuickBooks Desktop is installed on your computer. Then, try syncing with QuickBooks Desktop again.
If you continue to see the same error when syncing, you may need to recreate the Web Connector log file. Please [complete this guide to delete the log file](/help/connection-errors/there-was-a-problem-with-the-log-file#delete-the-web-connector-log-file). Then, try syncing with QuickBooks Desktop again.
If you still see the same error when syncing, check if the dialog box shown below appears on your Windows computer. If so, please [complete this guide to resolve that issue](/help/connection-errors/do-you-want-to-allow-this-app-to-make-changes-to-your-device). Then, try syncing with QuickBooks Desktop again.
If you continue to see the error above after trying all of the solutions above, please email us at [support@conductor.is](mailto:support@conductor.is?subject=QuickBooks%20Desktop%20Help). We want to help you resolve this issue and use your experience to improve this guide for others.
# How to fix: "Do you want to allow this app to make changes to your device?"
Source: https://docs.conductor.is/help/connection-errors/do-you-want-to-allow-this-app-to-make-changes-to-your-device
export const Image = ({src, alt, width, align = "center", noShadow = false, noBorder = false, noZoom = false}) => ;
This guide is provided by Conductor, the service that powers the QuickBooks
Desktop integration for many business tools, including the one that sent you
here.
If you ever see the Windows prompt shown below whenever you attempt to sync with QuickBooks Desktop, it is preventing Conductor from syncing with QuickBooks Desktop. To resolve this issue, you must configure QuickBooks Desktop and the QuickBooks Web Connector to run as an administrator. Please follow all of the steps in this guide to resolve this issue.
{/* NOTE: The following solution is identical to `there-was-a-problem-with-the-log-file.mdx` */}
## Solution
To prevent Windows from showing you the prompt above, which blocks Conductor from syncing QuickBooks Desktop, you must configure QuickBooks Desktop and the QuickBooks Web Connector to run as an administrator. To do so, follow the steps below:
### 1. Run QuickBooks Desktop as an administrator
Using Windows search (usually located in the bottom-left corner of your
screen), type "**QuickBooks Desktop**", right-click on the QuickBooks
Desktop result, and select "**Open file location**". If you have QuickBooks
Desktop pinned to your taskbar or on your desktop, you can right-click on
the icon there instead.
In the folder that opens, right-click on the QuickBooks Desktop icon and
select "**Properties**" to open the Properties window.
In the Properties window, navigate to the "**Compatibility**" tab.
Check the box labeled "**Run this program as an administrator**" under the
Settings section.
Click "**Apply**" to save the changes, then click "**OK**" to close the
Properties window.
If QuickBooks Desktop is currently open, close it completely and then
re-open it.
### 2. Run the QuickBooks Web Connector as an administrator
Using Windows search (usually located in the bottom-left corner of your
screen), type "**Web Connector**", right-click on the Web Connector result,
and select "**Open file location**".
In the folder that opens, right-click on the Web Connector icon and select
"**Properties**" to open the Properties window.
In the Properties window, navigate to the "**Compatibility**" tab.
Check the box labeled "**Run this program as an administrator**" under the
Settings section.
Click "**Apply**" to save the changes, then click "**OK**" to close the
Properties window.
Restart your computer to ensure the changes take effect.
By following these steps, QuickBooks Desktop and the Web Connector will always run with administrator privileges, preventing the error from occurring.
If you're still encountering the error after completing all the steps in this guide, please email us at [support@conductor.is](mailto:support@conductor.is?subject=QuickBooks%20Desktop%20Help) for further assistance.
# How to fix: "QBWC1039: This application has not accessed this QuickBooks company data file before"
Source: https://docs.conductor.is/help/connection-errors/qbd-admin-required
export const Image = ({src, alt, width, align = "center", noShadow = false, noBorder = false, noZoom = false}) => ;
This guide is provided by Conductor, the service that powers the QuickBooks
Desktop integration for many business tools, including the one that sent you
here.
When setting up the QuickBooks Desktop integration, you might encounter the following error after attempting to open the downloaded config file:
**This error occurs because you did not correctly sign in to QuickBooks Desktop using the built-in "Admin" user before starting the setup process.** Even if your current user has administrative privileges, the username must specifically be "Admin" - this is a QuickBooks Desktop requirement that cannot be bypassed.
## Solution: Sign in as the "Admin" user
Sign in using the QuickBooks built-in "Admin" user. **The username must be exactly "Admin"** - not any other user, even if it has administrative privileges.
Signing in as the "Admin" user is only needed for this one-time setup process. After setup is complete, you can return to using your regular QuickBooks Desktop user account.
Re-open the QuickBooks config file again from your Downloads folder (it has the file extension `.qwc`). This is the file you just downloaded from the QuickBooks Desktop setup guide. Now, QuickBooks Desktop should no longer show the error shown above and you can continue setting up the connection.
After you complete the setup process, you can return to using your regular QuickBooks Desktop user account.
If this guide did not resolve your issue, please contact our support team at [support@conductor.is](mailto:support@conductor.is?subject=QuickBooks%20Desktop%20Setup%20Issue).
# How to fix: "QBWC1085: There was a problem with the log file"
Source: https://docs.conductor.is/help/connection-errors/there-was-a-problem-with-the-log-file
export const Image = ({src, alt, width, align = "center", noShadow = false, noBorder = false, noZoom = false}) => ;
This guide is provided by Conductor, the service that powers the QuickBooks
Desktop integration for many business tools, including the one that sent you
here.
When connecting to QuickBooks Desktop with Conductor, you might encounter the error shown below, which prevents syncing your QuickBooks Desktop data with Conductor. Follow the steps below to resolve this issue.
## Solution: Delete the Web Connector log file
A corrupted QuickBooks Web Connector log file can cause this error. Typically, this file was already in this corrupted state even before setting up the connection. Deleting the log file will force the Web Connector to generate a new one. To do so, follow these steps:
Ensure QuickBooks Desktop is completely closed.
Terminate the QuickBooks Web Connector process to ensure it is not running in the background:
1. Open the Windows Task Manager by searching for "Task Manager" in the Windows search bar (usually located in the bottom-left corner of your screen).
2. In the Task Manager, find "QuickBooks Web Connector", right-click it, and select "**End Task**". You may need to click "**More details**" at the bottom of the Task Manager window to see all running processes.
3. Close the Task Manager.
Open File Explorer and navigate to the QuickBooks Web Connector log directory by copying and pasting the following path into the address bar:
```
C:\ProgramData\Intuit\QBWebConnector\log
```
In the log directory, locate the file named `QWCLog.txt`, right-click on it, and select "**Delete**".
Restart QuickBooks Desktop and the QuickBooks Web Connector to generate a new log file:
1. Open QuickBooks Desktop with the company file you want to sync.
2. In the top menu bar, click "**File**" > "**App Management**" > "**Update Web Services**" to launch the QuickBooks Web Connector.
3. In the window that appears, click "**Hide**" in the bottom-right corner to keep the Web Connector running in the background.
After completing these steps, attempt to sync your QuickBooks Desktop data again. If you continue to encounter the error, please email us at [support@conductor.is](mailto:support@conductor.is?subject=QuickBooks%20Desktop%20Help) for further assistance.
# How to fix: "Unable to cast COM object of type System.__ComObject..."
Source: https://docs.conductor.is/help/connection-errors/unable-to-cast-com-object
export const Image = ({src, alt, width, align = "center", noShadow = false, noBorder = false, noZoom = false}) => ;
This guide is provided by Conductor, the service that powers the QuickBooks
Desktop integration for many business tools, including the one that sent you
here.
If a Conductor error message directed you to this page, it's because we encountered the following error when attempting to connect to QuickBooks Desktop on your computer:
```
Unable to cast COM object of type 'System.__ComObject' to interface type
'Interop.QBXMLRP2.RequestProcessor2'. This operation failed because the
QueryInterface call on the COM component for the interface with IID
'{8DB91B17-D5A2-41DB-80A7-CC6F1E449A05}' failed due to the following error:
No such interface supported (Exception from HRESULT: 0x80004002 (E_NOINTERFACE)).
```
## Solution
Complete the following steps to re-register the QuickBooks Desktop components to resolve this issue:
Ensure QuickBooks Desktop is completely closed.
Using Windows search (usually located in the bottom-left corner of your screen), type "**cmd**", right-click on the "**Command Prompt**" result, and select "**Run as administrator**".
In the PowerShell window, paste the following command and press Enter:
```shell
regsvr32 "C:\Program Files (x86)\Common Files\Intuit\QuickBooks\QBXMLRP2.dll"
```
If the command was successful, restart your computer to ensure the changes take effect. After restarting, try connecting to QuickBooks Desktop again.
If you're still encountering the same error after following these steps, please email us at [support@conductor.is](mailto:support@conductor.is?subject=QuickBooks%20Desktop%20Help).
# How to fix: "QBWC1039: Unique OwnerID/FileID pair value required"
Source: https://docs.conductor.is/help/connection-errors/unique-owner-id-file-id-pair-required
export const Image = ({src, alt, width, align = "center", noShadow = false, noBorder = false, noZoom = false}) => ;
This guide will walk you through resolving the following error that occurs when attempting to add a connection to the QuickBooks Web Connector:
This error typically occurs when:
* You previously added a connection to the QuickBooks Web Connector, removed it, and are now attempting to add it again for the same QuickBooks company file.
* You previously added the connection to the QuickBooks Web Connector *on another computer* for the same QuickBooks company file, removed it, and are now attempting to add it *on a different computer*.
#### If you are also getting the "Unhandled exception has occurred" error
In addition to the error above, some users also encounter the following error *at the same time:*
If you are encountering this error as well, we must first force-quit the QuickBooks Web Connector before we can fix the other error at the top of this page. To do this, follow the steps below.
1. Open the Windows Task Manager by searching for "Task Manager" in the Windows search bar (usually located in the bottom-left corner of your screen).
2. In the Task Manager, find the QuickBooks Web Connector, right-click it, and select "**End Task**". You may need to click "**More details**" at the bottom of the Task Manager window to see all running processes.
After force-quitting the QuickBooks Web Connector, continue to the next section to fix the original error for *"Unique OwnerID/FileID pair value required"*.
## Solution
Complete the following steps to fix the error shown above for *"Unique OwnerID/FileID pair value required"*.
Download the [QBWC CP3 tool](https://http-download.intuit.com/http.intuit/CP3Tool/QBWC_CP3Tool.exe?_ga=2.67283025.1765810068.1652776906-1422200743.1652776904), created by Intuit (the makers of QuickBooks Desktop), to address this issue. Open the program ("QBWC\_CP3Tool.exe") from your downloads folder.
In the window that opens, as shown below, click "**Select File**", locate the QWC file that you attempted to open earlier which resulted in the error, and click "**Open**". This file is often found in your downloads folder.
QuickBooks Desktop will prompt you to grant permission to the CP3 Tool to make the necessary changes:
1. In the QuickBooks Application Certificate window that appears, click "**Yes**", then "**Continue**".
2. On the Access Confirmation window, select "**Done**".
3. Follow the instructions, then select "**OK**".
You should receive a confirmation that the Owner ID was removed. Select "**OK**" and close the CP3 tool.
Attempt to open the same QWC file you tried opening earlier. This time, it should work without any errors, and you should see the connection added to the QuickBooks Web Connector.
If you continue to encounter the error after completing these steps or have trouble with any step, please email us at [support@conductor.is](mailto:support@conductor.is?subject=QuickBooks%20Desktop%20Help) for further assistance.
# QuickBooks Desktop FAQ for end-users
Source: https://docs.conductor.is/help/faq/end-user-faq
An FAQ guide written for the end-users of Conductor's QuickBooks Desktop integration.
This guide is provided by Conductor, the service that powers the QuickBooks
Desktop integration for many business tools, including the one that sent you
here.
This FAQ is designed to answer any questions you may have about your QuickBooks Desktop connection and Conductor, the technology provider that powers it.
### How does the integration connect with QuickBooks Desktop?
The integration uses the QuickBooks Web Connector, an built-in feature of QuickBooks Desktop designed for secure data synchronization. This method is officially recommended by QuickBooks and involves robust user authentication and SSL (Secure Socket Layer) encryption. This ensures that your data is encrypted during transmission, protecting it from unauthorized access.
### Do you store any of my QuickBooks Desktop data?
**No, we do not store any of your QuickBooks Desktop data.** The integration acts as a secure conduit, facilitating the transfer of information between your QuickBooks Desktop and the software you are using, without retaining any of that information on our systems.
### What is the QuickBooks Desktop Web Connector?
The QuickBooks Web Connector is a program that comes preinstalled with QuickBooks Desktop that the integration uses to securely sync your data. This program always runs invisibly in the background on your computer and starts automatically whenever you start your computer. If it does not start automatically, the integration cannot reliably sync your data. The only time you should ever see the Web Connector is when you first set up your QuickBooks Desktop connection with the integration; other than that, it should be invisible.
### What security measures does the integration implement to secure data?
Our QuickBooks Desktop integration adheres to the industry's top security practices, including:
* **SSL Encryption:** For secure data transmission.
* **Encrypted API Keys:** Unique keys that ensure only authorized software can access your data.
* **Zero Data Storage Policy:** We don't store your QuickBooks data, maintaining your privacy.
* **Continuous Monitoring:** Our systems are monitored continuously for any unusual activity to prevent unauthorized access.
### Does the integration impact the speed or performance of QuickBooks Desktop?
No, the integration does not slow down QuickBooks Desktop. Here's why:
* The integration is powered by QuickBooks Desktop's built-in Web Connector. When the Web Connector is running in the background, it operates independently of QuickBooks Desktop, much like any other Windows program. In this idle state, it simply waits for new requests without interacting with QuickBooks Desktop.
* Even when processing a request, QuickBooks Desktop's performance would only be impacted if more than 5,000 records were being retrieved at once, however, we prevent this by limiting requests to 500 records at a time.
* The Web Connector is lightweight and only checks for new requests every 10 seconds, making it unlikely to slow down the Windows system as a whole.
* We have never observed or received reports of the integration affecting system performance.
### Which data from QuickBooks Desktop can the integration access?
The integration can read and write most data types in your QuickBooks Desktop, ***excluding* sensitive personal information like Social Security Numbers and customer credit card details**. This broad access is necessary because the QuickBooks Web Connector does not support limited permissions for selective data access.
### Does my computer need to be powered on to sync my QuickBooks Desktop data?
Yes, your computer must be powered on to sync your QuickBooks Desktop data.
### Can I connect to multiple QuickBooks Desktop company files on the same computer?
Yes, you can connect to multiple company files on a single computer, but it requires maintaining a specific setup to work correctly. Please see our [guide on connecting multiple company files](/help/guides/multiple-connections-one-computer) for critical setup instructions and best practices.
### Does QuickBooks Desktop need to be open to sync my data?
No, we can sync your QuickBooks Desktop data even if QuickBooks Desktop is not open. However, if QuickBooks Desktop is open to a different company file, we will return an error.
### Does my computer need to sign in as the Admin user to sync my data?
No, signing in as the Admin user is only required for the initial setup process. After the setup is complete, you can switch back to your regular QuickBooks Desktop user.
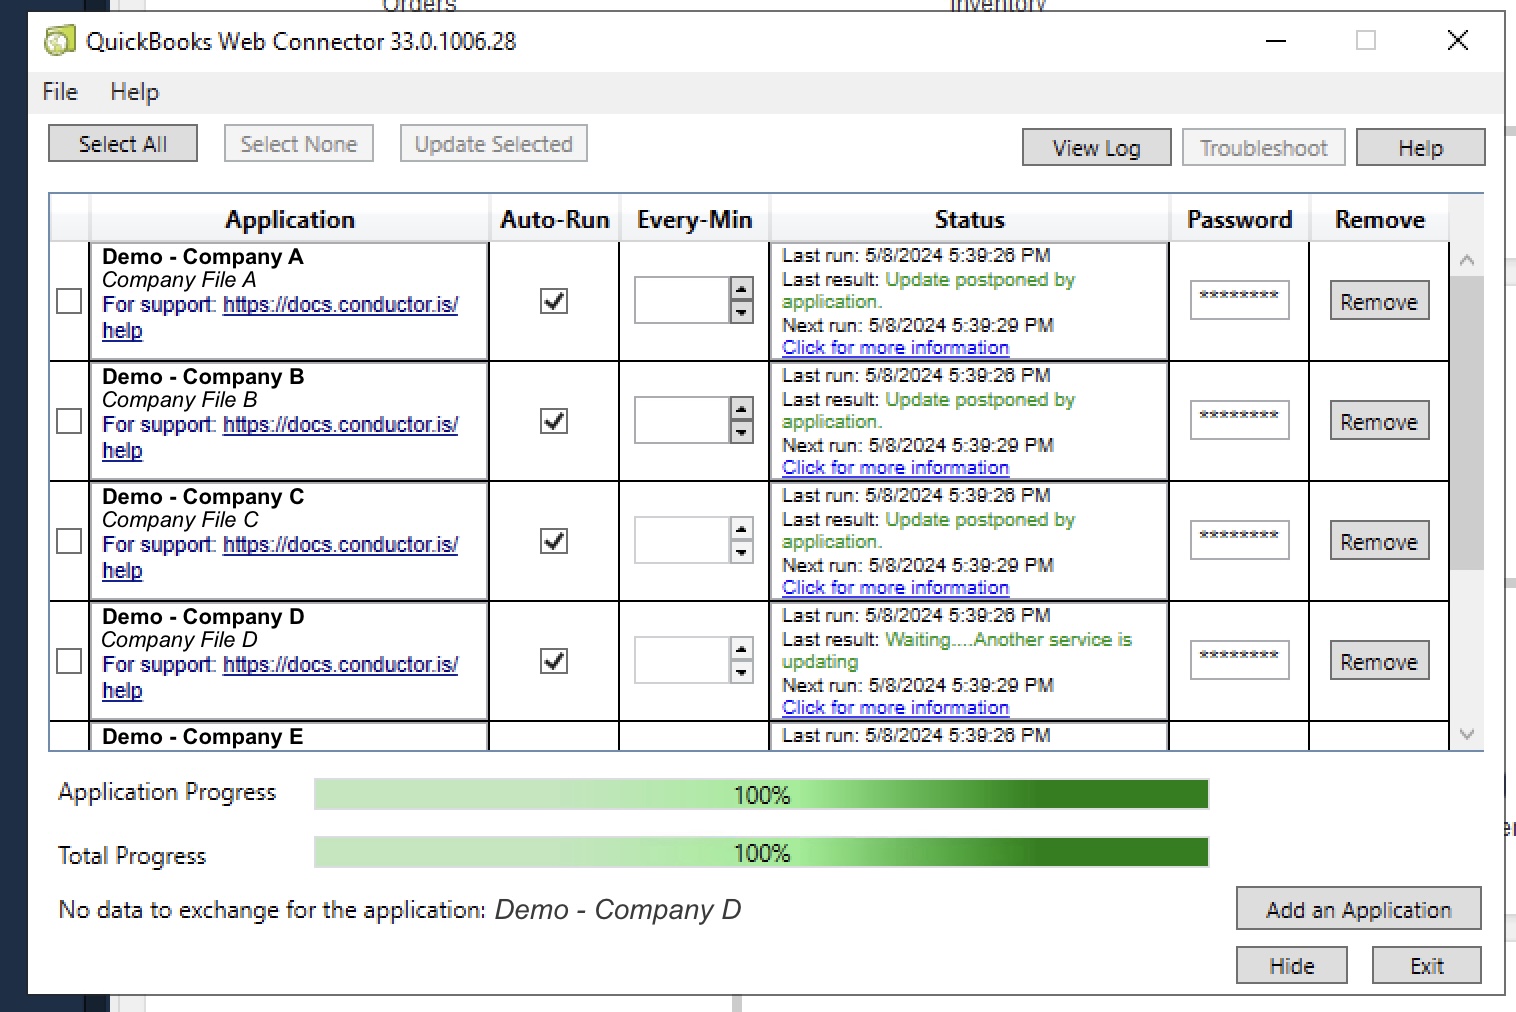
### Is it a problem if the Web Connector says "Update postponed by application"?
No, there is no problem at all if you see this message. It means that things are working correctly. This message indicates that the Web Connector has checked for updates, but no sync is necessary at the moment.
### How often does the integration access my QuickBooks data?
The frequency of data access is determined by the software you are using. Typically, data syncs occur when you initiate them (e.g., clicking a "sync" button in your software). For specifics, please contact your software provider.
### Does the integration support Rightworks (formerly called Right Networks)?
Yes, the integration fully supports QuickBooks Desktop when hosted on Rightworks. For setup instructions, please see our [Connecting to Rightworks guide](/help/guides/rightworks).
### How can I disable the QuickBooks Desktop connection?
Please follow [this guide](/help/guides/disable-connection) to disable the QuickBooks Desktop connection.
### Who is Conductor?
Conductor is a technology provider that powers the QuickBooks Desktop integration for the software you're using. We specialize in creating secure, reliable connections between different software platforms, ensuring your data flows smoothly and safely from QuickBooks Desktop to your business application.
### Any other questions?
If you have any other questions, please check the other guides in the sidebar on the left, contact your software provider, or email us at [support@conductor.is](mailto:support@conductor.is).
# How to disable the QuickBooks Desktop connection
Source: https://docs.conductor.is/help/guides/disable-connection
Learn how to disable the QuickBooks Desktop connection in the QuickBooks Web Connector.
export const Image = ({src, alt, width, align = "center", noShadow = false, noBorder = false, noZoom = false}) => ;
This guide is provided by Conductor, the service that powers the QuickBooks
Desktop integration for many business tools, including the one that sent you
here.
Follow the steps below to disable a QuickBooks Desktop connection in the QuickBooks Web Connector.
1. Open QuickBooks Desktop.
2. In the top menu bar, click "**File**" > "**App Management**" > "**Update Web Services**" to launch the QuickBooks Web Connector.
In the Web Connector window that opens, find the connection for the product or service you want to disconnect, and uncheck the box in the "**Auto-Run**" column for that connection.
We recommend disabling "Auto-Run" instead of clicking "Remove" because the "Remove" button is known to cause issues. Plus, it is convenient to save the old connection's configuration in case you want to restore this connection later.
Finally, click "**Hide**" in the bottom-right corner of the window to close the Web Connector.
Conductor's QuickBooks Desktop connection will no longer run on your computer.
If you encountered any unexpected issues while following these steps, please email us at [support@conductor.is](mailto:support@conductor.is?subject=QuickBooks%20Desktop%20Help).
# Ensure only one version of QuickBooks Desktop is installed
Source: https://docs.conductor.is/help/guides/ensure-only-one-version-installed
Conductor will not function properly if multiple versions of QuickBooks Desktop are installed on the same computer.
export const Image = ({src, alt, width, align = "center", noShadow = false, noBorder = false, noZoom = false}) => ;
This guide is provided by Conductor, the service that powers the QuickBooks
Desktop integration for many business tools, including the one that sent you
here.
Having multiple versions of QuickBooks Desktop installed on the same computer can cause issues with Conductor. Often, this prevents the QuickBooks Web Connector from connecting to QuickBooks Desktop or causes it to crash. Please follow the steps below to ensure only one version of QuickBooks Desktop is installed on your computer.
Using Windows search (usually located in the bottom-left corner of your screen), search for "Control Panel", and open it.
In the Control Panel, click on "**Programs and Features**" or "**Uninstall a program**" (exact wording may vary depending on your version of Windows).
In the list of installed programs, look for any versions of QuickBooks Desktop. If you see multiple versions, such as in the example below, continue to the next step. If you only see one version, you can stop here.
Before uninstalling any versions of QuickBooks Desktop, make sure QuickBooks Desktop is completely closed.
Back in the Control Panel window, right-click on the older version(s) of QuickBooks Desktop in the list of installed programs and click "**Uninstall**". Follow the prompts to uninstall the program. For example:
After uninstalling the older version(s), reopen QuickBooks Desktop and follow any prompts for updates.
1. If QuickBooks Desktop asks you to fix the installation, click "**Continue**".
2. If QuickBooks Desktop asks you to reboot after fixing the installation, click "**OK**".
By following these steps, you can ensure only one version of QuickBooks Desktop is installed on your computer, which will help prevent issues with Conductor.
# Ensure the QuickBooks Web Connector opens at startup
Source: https://docs.conductor.is/help/guides/ensure-web-connector-opens-at-startup
Set up the QuickBooks Web Connector to automatically launch and run in the background whenever you start your computer.
export const Image = ({src, alt, width, align = "center", noShadow = false, noBorder = false, noZoom = false}) => ;
This guide is provided by Conductor, the service that powers the QuickBooks
Desktop integration for many business tools, including the one that sent you
here.
The QuickBooks Web Connector is a program that comes preinstalled with QuickBooks Desktop that Conductor uses to securely sync your data. This program always runs invisibly in the background on your computer and starts automatically whenever you start your computer. If it does not start automatically, Conductor cannot reliably sync your data.
If you are having trouble syncing your data, please follow the steps below to ensure that the Web Connector starts automatically when you start your computer. If we discover it does not, we will configure the Windows Task Scheduler to start the Web Connector automatically.
## 1. Check if the Web Connector starts automatically when you start your computer
First, let's check whether the Web Connector starts automatically when you start your computer:
Restart your computer so we can check in the next step whether the Web Connector automatically starts when your computer starts.
After your computer finishes booting up, the Web Connector should automatically start invisibly in the background. Let's check if it is running:
1. Open the Windows Task Manager by searching for "Task Manager" in the Windows search bar (usually located in the bottom-left corner of your screen).
2. If you see a "More details" button in the bottom-left corner of the Task Manager window, click it to expand the Task Manager.
3. Navigate to the "Details" tab and scroll down until you see the "QBWebConnector.exe" process which should look like the screenshot below. **If you see it, you can skip the rest of this guide. Otherwise, continue to the section below.**
## 2. Configure the Web Connector to start automatically using the Windows Task Scheduler
After confirming that the Web Connector does not start automatically when you start your computer in the previous section, we will now configure the Windows Task Scheduler to start the Web Connector automatically.
Open the Windows Task Scheduler by searching for "Task Scheduler" in the Windows search bar (usually located in the bottom-left corner of your screen).
In the Task Scheduler, go to the "Action" menu and select "**Create Task**".
In the "General" tab of the new task window:
1. Enter any name for your task, such as "Open QuickBooks Web Connector".
2. Check the option "**Run with highest privileges**" near the bottom to ensure the task runs with administrator rights.
Go to the "**Triggers**" tab and click "**New**".
1. Under "Begin the task", select "**At startup**" from the dropdown menu.
2. Set a delay for 1 minute by checking "Delay task for" and choose "1 minute".
Finally, click "**OK**".
1. Using Windows search (usually located in the bottom-left corner of your screen), type "**Web Connector**", right-click on the Web Connector result, and select "**Open file location**".
2. In the folder that opens, you should see a shortcut for the Web Connector. Right-click on the Web Connector icon and select "**Properties**" from the context menu to open the Properties window.
3. In the Properties window, as shown below, copy the file path in the "**Target**" field. You can do this by selecting the text and pressing `Ctrl + C` on your keyboard. Then click "**Cancel**" to close the Properties window.
Go back to the Task Scheduler window and go to the "Actions" tab. Click "**New**" and paste the file path you copied in the previous step into the "**Program/script**" field by right-clicking and selecting "**Paste**" from the context menu. Then click "**OK**".
In the "Settings" tab, check the option "**If the task fails, restart every**" and set the value to "**1 minute**" and the "**Attempt to restart up to**" value to "**3 times**". Then click "**OK**".
Click "**OK**" to save your new task. You might be prompted to enter an administrator password at this point.
Finally, test your task by restarting your computer, waiting one minute, and confirming that the QuickBooks Web Connector opened automatically after startup using [the same steps as in the first section of this guide](/help/guides/ensure-web-connector-opens-at-startup#1-check-if-the-web-connector-starts-automatically-when-you-start-your-computer).
By following these steps, the QuickBooks Web Connector will now always start automatically whenever you start your computer.
If you're still having trouble after completing all steps, please email us at [support@conductor.is](mailto:support@conductor.is?subject=QuickBooks%20Desktop%20Help).
# Move your QuickBooks Desktop connection to a different computer
Source: https://docs.conductor.is/help/guides/move-computers
Learn how to transfer your QuickBooks Desktop connection to a different computer for the same company file.
export const Image = ({src, alt, width, align = "center", noShadow = false, noBorder = false, noZoom = false}) => ;
This guide is provided by Conductor, the service that powers the QuickBooks
Desktop integration for many business tools, including the one that sent you
here.
Before setting up the new connection, follow [this guide to disable the existing connection](/help/guides/disable-connection) on your **current** computer.
It is essential that you complete this step first to avoid synchronization conflicts with your new computer's connection.
1. Launch QuickBooks Desktop on your **new** computer.
2. Open the company file you want to connect.
3. Log in using your QuickBooks **Admin** user credentials.
Ensure you're using the exact same company file as before. The file path can be different, but it must be the same QuickBooks company file.
Return to the setup guide, click **"Download config file"**, and then the downloaded configuration file.
QuickBooks Desktop might *not* show the permissions prompt when adding the new connection because you previously authorized access to this company file on your old computer. This is normal and doesn't indicate any problem with the setup.
Follow the remaining steps in the setup guide. When complete, the final step of the guide will confirm that the connection is successful.
You have now successfully moved your connection to a different computer.
If you encountered any unexpected issues while following these steps, please email us at [support@conductor.is](mailto:support@conductor.is?subject=QuickBooks%20Desktop%20Help).
# Connect to multiple QuickBooks company files on a single computer
Source: https://docs.conductor.is/help/guides/multiple-connections-one-computer
How to connect to multiple QuickBooks Desktop company files on a single computer.
This guide is provided by Conductor, the service that powers the QuickBooks
Desktop integration for many business tools, including the one that sent you
here.
In QuickBooks Desktop, a **company file** is the primary local file that stores all financial data for a specific company. While most QuickBooks Desktop users have only one company file, some users, such as accounting firms managing finances for multiple clients, work with several company files on a single computer. This guide will walk you through connecting Conductor (which powers your integration) to multiple company files on a single computer, as well as best practices and performance considerations.
## Important requirement
Companies managing multiple company files typically host them all on a dedicated Windows server. **You will want to set up the Conductor connections on this Windows server**, adhering to the following requirement:
**QuickBooks Desktop must always remain open *without* any company file loaded
when connecting to multiple company files on a single computer.** This setup
allows the Web Connector to open the correct company file when it receives a
request from your QuickBooks Desktop integration.
### Why is this necessary?
The [QuickBooks Web Connector](/help/faq/end-user-faq#what-is-the-quickbooks-desktop-web-connector) has certain limitations when working with multiple company files on a single computer:
1. It can only communicate with one company file at a time.
2. It can only communicate with the company file that is currently open in QuickBooks Desktop.
3. It cannot switch between company files if QuickBooks Desktop already has a different company file open (to avoid disrupting an active user).
Despite these limitations, **the Web Connector can open a specified company file if no other company file is currently open, fulfill the request, and then close the company file** without fully closing QuickBooks Desktop. Therefore, keeping QuickBooks Desktop open without any company file loaded allows the Web Connector to open and process requests for the correct company file as needed.
### How to close a company file
To ensure QuickBooks Desktop is open without any company file loaded:
1. Open **QuickBooks Desktop**.
2. Go to the "**File**" menu.
3. Select "**Close Company**".
If you or someone else opens a company file *on this machine* without returning QuickBooks Desktop to this state, you may encounter an error stating that the wrong company file is open.
## How to set up connections to multiple company files
To connect to multiple company files on one computer, you must complete the setup process **for each company file**, as each requires its own connection and authentication.
1. Open **QuickBooks Desktop**.
2. Open the company file you wish to connect.
3. Sign in as the **Admin** user.
4. Complete the setup guide *while* the corresponding company file is open.
5. Repeat steps 1-4 for each company file.
Once complete, each company file will have a separate connection in the Web Connector, resembling the state shown below:
## Best practices
* **Use a dedicated Windows server:** Most users managing multiple company files already have a Windows server dedicated to managing their QuickBooks Desktop company files. Set up the Conductor Web Connector connection on this server. On this server, keep QuickBooks Desktop open without a company file loaded so that it is ready to receive requests and open the correct company file. This setup is preferable to sharing a personal computer used for other tasks, where the Web Connector cannot fulfill requests if the wrong company file is open.
* **Add QuickBooks Desktop to Windows startup:** Adding QuickBooks Desktop to the computer's startup programs ensures it is always open and ready to receive requests whenever you restart the computer. The Web Connector already automatically starts in the background when the computer boots up and can open QuickBooks Desktop if it receives a request from Conductor while QuickBooks Desktop is closed; however, doing so will delay the request because QuickBooks Desktop takes a while to launch.
## Performance considerations
* **Increased request time:** Keeping QuickBooks Desktop open without a company file loaded adds 20-40 seconds to each request due to the time it takes to load a company file. However, when you send numerous Conductor requests for the same company file in quick succession, the Web Connector will resolve the sequence rapidly because Conductor keeps the company file open between these requests.
* **Serial processing:** The Web Connector can only process requests for one company file at a time because it can only communicate with QuickBooks Desktop when one company file is loaded. Therefore, Conductor manages your requests in a queue, ensuring that the Web Connector processes them serially, opening and closing the appropriate company file for each request.
# Rebuild and verify Data in QuickBooks Desktop
Source: https://docs.conductor.is/help/guides/rebuild-verify-data
Learn how to use the Rebuild and Verify Data utilities to fix and identify data issues in your QuickBooks Desktop company file.
export const Image = ({src, alt, width, align = "center", noShadow = false, noBorder = false, noZoom = false}) => ;
This guide is provided by Conductor, the service that powers the QuickBooks
Desktop integration for many business tools, including the one that sent you
here.
Over time, your QuickBooks Desktop company file may accumulate data issues that can lead to unexpected behavior or errors. QuickBooks provides built-in tools—**Rebuild Data** and **Verify Data**—to help fix and identify these issues. This guide will walk you through the steps to rebuild and verify your company file to ensure data integrity.
**When to use these utilities:** Use the **Rebuild Data** utility if you
experience symptoms like missing transactions, program crashes, balance sheet
discrepancies, or other unexpected behaviors. After rebuilding your data, use
the **Verify Data** utility to confirm that all issues have been resolved.
Use the Rebuild Data utility to fix data issues in your company file:
1. Open QuickBooks Desktop.
2. Go to the "**File**" menu, hover over "**Utilities**", and select "**Rebuild Data**".
3. When prompted to back up your company file, click "**OK**". QuickBooks will ask you to create a backup before rebuilding to prevent data loss.
4. Choose a location to save the backup, then click "**OK**".
5. QuickBooks will begin rebuilding your data. This may take some time, depending on the size of your company file.
6. Once the rebuild is complete, click "**OK**" when you see the message "Rebuild has completed".
After rebuilding your data, use the Verify Data utility to confirm that all issues have been resolved:
1. Go to the "**File**" menu, hover over "**Utilities**", and select "**Verify Data**".
2. QuickBooks will begin scanning your company file. This may take a few minutes.
After the verification process completes, QuickBooks will display a message:
* **If you see "QuickBooks detected no problem with your data":** Your company file is now repaired and in good shape.
* **If you see "Your data has lost integrity":** Data issues still exist, repeat the rebuild process.
* **If you see a specific error message or code:** Note the details as they may be helpful if you need to contact support.
**Note:** If errors continue after rebuilding your data multiple times, your company file may be damaged beyond repair through these utilities. Please contact Intuit support for further assistance.
By following these steps, you've ensured that your QuickBooks Desktop company file is free of data issues. If you encounter any problems during this process or need additional assistance, please contact our support team at [support@conductor.is](mailto:support@conductor.is?subject=QuickBooks%20Desktop%20Help).
# Connecting to QuickBooks Desktop on Rightworks
Source: https://docs.conductor.is/help/guides/rightworks
How to set up the QuickBooks Web Connector when using Rightworks (formerly Right Networks) to host QuickBooks Desktop.
export const Image = ({src, alt, width, align = "center", noShadow = false, noBorder = false, noZoom = false}) => ;
This guide is provided by Conductor, the service that powers the QuickBooks
Desktop integration for many business tools, including the one that sent you
here.
Rightworks (formerly Right Networks) hosts QuickBooks Desktop in the cloud, allowing you to access it remotely. While we fully support connecting to Rightworks, there is **one important limitation you must remember**:
**Important:** To sync data with your QuickBooks Desktop, you must be actively
connected to your Rightworks remote desktop session with QuickBooks Desktop
open. This is because Rightworks stops all background programs when you
disconnect from your session.
## Step 1: Verify or install the QuickBooks Web Connector
Connecting to QuickBooks Desktop on Rightworks requires the QuickBooks Web Connector to be installed on your Rightworks remote desktop. The Web Connector is a small program that enables secure communication between QuickBooks Desktop and external applications. Let's first verify that it's installed on your Rightworks computer.
1. Connect to your Rightworks remote desktop.
2. Click the Windows Start menu.
3. Type "Web Connector".
4. Look for "QuickBooks Web Connector" in the search results.
If you find it, skip to the next section of this guide. If not, continue with the installation step below.
If you don't find the Web Connector in your Start menu, you can install it from the Rightworks Dashboard:
1. Log in to your [Rightworks Dashboard](https://login.rightworks.com).
2. Select "My Apps" in the left sidebar.
3. In the search bar, type "Web Connector".
4. Locate "QuickBooks Web Connector" in the results.
5. Click the "+" button next to it to add it to your account.
6. Wait 5-10 minutes for the installation to complete.
7. Connect to your Rightworks remote desktop and verify the Web Connector is now installed using the steps above.
## Step 2: Configure the Web Connector to start automatically
Now that we've confirmed the Web Connector is installed, we must ensure both QuickBooks Desktop and the Web Connector start automatically when you log into Rightworks.
You must contact Rightworks support to configure the Web Connector to start automatically. This cannot be done on your own. Visit [Rightworks Support](https://helpdesk.rightnetworks.com) to begin.
Rightworks support is available Monday - Friday, 8:00 AM - 8:00 PM ET.
On the Rightworks support page, click the yellow "Chat" bubble in the bottom-right corner to start a live chat (there is no email or phone support available for this task).
In the chat window, **provide the full name and email address** associated with your Rightworks account. This is typically the information for the person at your company who set up your Rightworks account.
**Copy and paste this exact message** to the Rightworks support agent:
```
Hello! Could you please configure our Rightworks account to ensure
that BOTH of the following applications are added to our startup
items and automatically launch in the background every time we sign
into our Rightworks instance?
1. QuickBooks Web Connector
2. QuickBooks Desktop
We need BOTH applications to launch automatically.
Please apply this setting for ALL USERS on our Rightworks account.
```
1. Wait for the support agent to confirm that the Web Connector has been added to your startup programs.
2. Sign out and sign back into your Rightworks desktop session for the changes to take effect.
That's it! From now on, the QuickBooks Web Connector will automatically start every time you connect to Rightworks, ensuring a stable connection to your QuickBooks Desktop company file.
# Upgrade the QuickBooks Web Connector
Source: https://docs.conductor.is/help/guides/upgrade-web-connector
Learn how to upgrade the QuickBooks Web Connector to ensure compatibility with Conductor.
export const Image = ({src, alt, width, align = "center", noShadow = false, noBorder = false, noZoom = false}) => ;
This guide is provided by Conductor, the service that powers the QuickBooks
Desktop integration for many business tools, including the one that sent you
here.
The QuickBooks Web Connector is a vital component that comes pre-installed with QuickBooks Desktop. Conductor uses this tool to securely sync your data. To use Conductor, you must have at least **version 2.3.0.20** of the QuickBooks Web Connector installed. In our experience, fewer than 1% of users have an older version. If you're using an outdated version, you might see an error message like this:
Follow these steps to upgrade the QuickBooks Web Connector to the latest version:
Ensure that QuickBooks Desktop is completely closed before proceeding.
Close the QuickBooks Web Connector process to ensure it's not running in the background:
1. Open the Windows Task Manager by pressing `Ctrl + Shift + Esc` or by searching for "Task Manager" in the Windows search bar.
2. In the Task Manager, locate "QuickBooks Web Connector". Right-click it and select "**End Task**". If you don't see it, click "**More details**" at the bottom of the Task Manager window to view all running processes.
3. Close the Task Manager.
To upgrade, you must first delete the current installation:
1. Open File Explorer and navigate to `C:\Program Files (x86)\Common Files\Intuit\QuickBooks`.
2. Delete the folder named `QBWebConnector` and, if present, the folder named `QBWebConnector3.0`.
Visit Intuit's [official download page](https://developer.intuit.com/app/developer/qbdesktop/docs/get-started/get-started-with-quickbooks-web-connector#download-and-install-the-quickbooks-web-connector) to get the latest version of the QuickBooks Web Connector. Always download the most recent version, even if you're using an older version of QuickBooks Desktop.
Once the download is complete, open the downloaded file and follow the installation wizard's instructions.
1. Open QuickBooks Desktop.
2. In the top menu bar, click "**File**" > "**App Management**" > "**Update Web Services**" to launch the QuickBooks Web Connector.
3. In the window that appears, click "**Hide**" in the bottom-right corner to keep the Web Connector running in the background.
You have now successfully upgraded to the latest version of the QuickBooks Web Connector and can proceed with setting up your connection to Conductor. If you encounter any issues during this process, please don't hesitate to contact our support team at [support@conductor.is](mailto:support@conductor.is?subject=QuickBooks%20Desktop%20Help).
# Create an account
Source: https://docs.conductor.is/qbd-api/accounts/create
POST /quickbooks-desktop/accounts
Creates a new financial account.
# List all accounts
Source: https://docs.conductor.is/qbd-api/accounts/list
GET /quickbooks-desktop/accounts
Returns a list of accounts. NOTE: QuickBooks Desktop does not support pagination for accounts; hence, there is no `cursor` parameter. Users typically have few accounts.
# The Account object
Source: https://docs.conductor.is/qbd-api/accounts/object
An account in QuickBooks Desktop represents a financial account used to track money and transactions. It can be customized with features like hierarchical sub-accounts, account numbers, and opening balances. Accounts form the foundation of the chart of accounts and can represent various types like bank accounts, credit cards, income, expense, and other financial categories.
# Retrieve an account
Source: https://docs.conductor.is/qbd-api/accounts/retrieve
GET /quickbooks-desktop/accounts/{id}
Retrieves an account by ID.
# Update an account
Source: https://docs.conductor.is/qbd-api/accounts/update
POST /quickbooks-desktop/accounts/{id}
Updates an existing financial account.
# Create a bill check payment
Source: https://docs.conductor.is/qbd-api/bill-check-payments/create
POST /quickbooks-desktop/bill-check-payments
Creates a new bill check payment.
# Delete a bill check payment
Source: https://docs.conductor.is/qbd-api/bill-check-payments/delete
DELETE /quickbooks-desktop/bill-check-payments/{id}
Permanently deletes a a bill check payment. The deletion will fail if the bill check payment is currently in use or has any linked transactions that are in use.
# List all bill check payments
Source: https://docs.conductor.is/qbd-api/bill-check-payments/list
GET /quickbooks-desktop/bill-check-payments
Returns a list of bill check payments. Use the `cursor` parameter to paginate through the results.
# The Bill Check Payment object
Source: https://docs.conductor.is/qbd-api/bill-check-payments/object
A bill check payment records a payment made by check to pay off one or more vendor bills. It reduces accounts payable and decreases the bank account balance. This transaction links the original bill(s) with the payment, allowing QuickBooks to track which bills have been paid and maintain accurate vendor balances.
# Retrieve a bill check payment
Source: https://docs.conductor.is/qbd-api/bill-check-payments/retrieve
GET /quickbooks-desktop/bill-check-payments/{id}
Retrieves a bill check payment by ID.
# Update a bill check payment
Source: https://docs.conductor.is/qbd-api/bill-check-payments/update
POST /quickbooks-desktop/bill-check-payments/{id}
Updates an existing bill check payment.
# Create a bill credit card payment
Source: https://docs.conductor.is/qbd-api/bill-credit-card-payments/create
POST /quickbooks-desktop/bill-credit-card-payments
Creates a new bill credit card payment.
# Delete a bill credit card payment
Source: https://docs.conductor.is/qbd-api/bill-credit-card-payments/delete
DELETE /quickbooks-desktop/bill-credit-card-payments/{id}
Permanently deletes a a bill credit card payment. The deletion will fail if the bill credit card payment is currently in use or has any linked transactions that are in use.
# List all bill credit card payments
Source: https://docs.conductor.is/qbd-api/bill-credit-card-payments/list
GET /quickbooks-desktop/bill-credit-card-payments
Returns a list of bill credit card payments. Use the `cursor` parameter to paginate through the results.
# The Bill Credit Card Payment object
Source: https://docs.conductor.is/qbd-api/bill-credit-card-payments/object
A bill credit card payment records a payment made via credit card to pay off one or more vendor bills. It reduces accounts payable and increases the credit card account balance. This transaction links the original bill(s) with the payment, allowing QuickBooks to track which bills have been paid and maintain accurate vendor balances.
# Retrieve a bill credit card payment
Source: https://docs.conductor.is/qbd-api/bill-credit-card-payments/retrieve
GET /quickbooks-desktop/bill-credit-card-payments/{id}
Retrieves a bill credit card payment by ID.
# Create a bill
Source: https://docs.conductor.is/qbd-api/bills/create
POST /quickbooks-desktop/bills
Creates a new bill.
# Delete a bill
Source: https://docs.conductor.is/qbd-api/bills/delete
DELETE /quickbooks-desktop/bills/{id}
Permanently deletes a a bill. The deletion will fail if the bill is currently in use or has any linked transactions that are in use.
# List all bills
Source: https://docs.conductor.is/qbd-api/bills/list
GET /quickbooks-desktop/bills
Returns a list of bills. Use the `cursor` parameter to paginate through the results.
# The Bill object
Source: https://docs.conductor.is/qbd-api/bills/object
A bill represents an obligation to pay a vendor for goods or services received. It records the amount owed, due date, and payment terms, and increases accounts payable. Bills can be partially paid over time and may be linked to purchase orders or item receipts.
# Retrieve a bill
Source: https://docs.conductor.is/qbd-api/bills/retrieve
GET /quickbooks-desktop/bills/{id}
Retrieves a bill by ID.
# Update a bill
Source: https://docs.conductor.is/qbd-api/bills/update
POST /quickbooks-desktop/bills/{id}
Updates an existing bill.
# Create a check
Source: https://docs.conductor.is/qbd-api/checks/create
POST /quickbooks-desktop/checks
Creates a new check.
# Delete a check
Source: https://docs.conductor.is/qbd-api/checks/delete
DELETE /quickbooks-desktop/checks/{id}
Permanently deletes a a check. The deletion will fail if the check is currently in use or has any linked transactions that are in use.
# List all checks
Source: https://docs.conductor.is/qbd-api/checks/list
GET /quickbooks-desktop/checks
Returns a list of checks. Use the `cursor` parameter to paginate through the results.
# The Check object
Source: https://docs.conductor.is/qbd-api/checks/object
A check represents a payment made from a bank account, typically via paper check. It records the withdrawal of funds paid to a vendor, employee, or other payee. The transaction reduces the balance of the specified bank account and can be linked to bills or other transactions being paid.
# Retrieve a check
Source: https://docs.conductor.is/qbd-api/checks/retrieve
GET /quickbooks-desktop/checks/{id}
Retrieves a check by ID.
# Update a check
Source: https://docs.conductor.is/qbd-api/checks/update
POST /quickbooks-desktop/checks/{id}
Updates an existing check.
# Create a class
Source: https://docs.conductor.is/qbd-api/classes/create
POST /quickbooks-desktop/classes
Creates a new class.
# List all classes
Source: https://docs.conductor.is/qbd-api/classes/list
GET /quickbooks-desktop/classes
Returns a list of classes. NOTE: QuickBooks Desktop does not support pagination for classes; hence, there is no `cursor` parameter. Users typically have few classes.
# The Class object
Source: https://docs.conductor.is/qbd-api/classes/object
A class is a category used to group QuickBooks objects into meaningful categories. For example, classes can be used to classify transactions by department, location, or type of work.
# Retrieve a class
Source: https://docs.conductor.is/qbd-api/classes/retrieve
GET /quickbooks-desktop/classes/{id}
Retrieves a class by ID.
# Update a class
Source: https://docs.conductor.is/qbd-api/classes/update
POST /quickbooks-desktop/classes/{id}
Updates an existing class.
# Create a credit card charge
Source: https://docs.conductor.is/qbd-api/credit-card-charges/create
POST /quickbooks-desktop/credit-card-charges
Creates a new credit card charge for the specified account.
# Delete a credit card charge
Source: https://docs.conductor.is/qbd-api/credit-card-charges/delete
DELETE /quickbooks-desktop/credit-card-charges/{id}
Permanently deletes a a credit card charge. The deletion will fail if the credit card charge is currently in use or has any linked transactions that are in use.
# List all credit card charges
Source: https://docs.conductor.is/qbd-api/credit-card-charges/list
GET /quickbooks-desktop/credit-card-charges
Returns a list of credit card charges. Use the `cursor` parameter to paginate through the results.
# The Credit Card Charge object
Source: https://docs.conductor.is/qbd-api/credit-card-charges/object
A credit card charge is a general charge incurred when a QuickBooks user makes a purchase using a credit card. Credit card charges for purchases can be tracked as expenses (in expense accounts) or as items.
# Retrieve a credit card charge
Source: https://docs.conductor.is/qbd-api/credit-card-charges/retrieve
GET /quickbooks-desktop/credit-card-charges/{id}
Retrieves a credit card charge by ID.
# Update a credit card charge
Source: https://docs.conductor.is/qbd-api/credit-card-charges/update
POST /quickbooks-desktop/credit-card-charges/{id}
Updates an existing credit card charge.
# Create a credit card credit
Source: https://docs.conductor.is/qbd-api/credit-card-credits/create
POST /quickbooks-desktop/credit-card-credits
Creates a new credit card credit for the specified account.
# Delete a credit card credit
Source: https://docs.conductor.is/qbd-api/credit-card-credits/delete
DELETE /quickbooks-desktop/credit-card-credits/{id}
Permanently deletes a a credit card credit. The deletion will fail if the credit card credit is currently in use or has any linked transactions that are in use.
# List all credit card credits
Source: https://docs.conductor.is/qbd-api/credit-card-credits/list
GET /quickbooks-desktop/credit-card-credits
Returns a list of credit card credits. Use the `cursor` parameter to paginate through the results.
# The Credit Card Credit object
Source: https://docs.conductor.is/qbd-api/credit-card-credits/object
A credit card credit represents a credit or refund received from a vendor for returned merchandise, billing adjustment, or other credit. It reduces the balance owed on the credit card account.
# Retrieve a credit card credit
Source: https://docs.conductor.is/qbd-api/credit-card-credits/retrieve
GET /quickbooks-desktop/credit-card-credits/{id}
Retrieves a credit card credit by ID.
# Update a credit card credit
Source: https://docs.conductor.is/qbd-api/credit-card-credits/update
POST /quickbooks-desktop/credit-card-credits/{id}
Updates an existing credit card credit.
# Create a credit memo
Source: https://docs.conductor.is/qbd-api/credit-memos/create
POST /quickbooks-desktop/credit-memos
Creates a new credit memo.
# Delete a credit memo
Source: https://docs.conductor.is/qbd-api/credit-memos/delete
DELETE /quickbooks-desktop/credit-memos/{id}
Permanently deletes a a credit memo. The deletion will fail if the credit memo is currently in use or has any linked transactions that are in use.
# List all credit memos
Source: https://docs.conductor.is/qbd-api/credit-memos/list
GET /quickbooks-desktop/credit-memos
Returns a list of credit memos. Use the `cursor` parameter to paginate through the results.
# The Credit Memo object
Source: https://docs.conductor.is/qbd-api/credit-memos/object
A credit memo records an amount owed to a customer (such as for returns, over-payments, or pre-payments), reducing their outstanding balance. The credit remains available (tracked in the `creditRemaining` field) until it's applied to other transactions (such as invoices or sales receipts) through a receive-payment's `applyToTransactions.applyCredits` field.
# Retrieve a credit memo
Source: https://docs.conductor.is/qbd-api/credit-memos/retrieve
GET /quickbooks-desktop/credit-memos/{id}
Retrieves a credit memo by ID.
# Update a credit memo
Source: https://docs.conductor.is/qbd-api/credit-memos/update
POST /quickbooks-desktop/credit-memos/{id}
Updates an existing credit memo.
# Create a customer
Source: https://docs.conductor.is/qbd-api/customers/create
POST /quickbooks-desktop/customers
Creates a new customer.
# List all customers
Source: https://docs.conductor.is/qbd-api/customers/list
GET /quickbooks-desktop/customers
Returns a list of customers. Use the `cursor` parameter to paginate through the results.
# The Customer object
Source: https://docs.conductor.is/qbd-api/customers/object
A customer record in QuickBooks Desktop represents either a business or individual who purchases goods or services, or a specific job/project being performed for that customer. Jobs are treated as sub-customers and inherit billing information from their parent customer while allowing for job-specific details to be tracked.
# Retrieve a customer
Source: https://docs.conductor.is/qbd-api/customers/retrieve
GET /quickbooks-desktop/customers/{id}
Retrieves a customer by ID.
# Update a customer
Source: https://docs.conductor.is/qbd-api/customers/update
POST /quickbooks-desktop/customers/{id}
Updates an existing customer.
# Create a date-driven term
Source: https://docs.conductor.is/qbd-api/date-driven-terms/create
POST /quickbooks-desktop/date-driven-terms
Creates a new date-driven term.
# List all date-driven terms
Source: https://docs.conductor.is/qbd-api/date-driven-terms/list
GET /quickbooks-desktop/date-driven-terms
Returns a list of date-driven terms. NOTE: QuickBooks Desktop does not support pagination for date-driven terms; hence, there is no `cursor` parameter. Users typically have few date-driven terms.
# The Date-Driven Term object
Source: https://docs.conductor.is/qbd-api/date-driven-terms/object
A date-driven term shows the day of the month by which payment is due and can include a discount for early payment.
# Retrieve a date-driven term
Source: https://docs.conductor.is/qbd-api/date-driven-terms/retrieve
GET /quickbooks-desktop/date-driven-terms/{id}
Retrieves a date-driven term by ID.
# Create a discount item
Source: https://docs.conductor.is/qbd-api/discount-items/create
POST /quickbooks-desktop/discount-items
Creates a new discount item.
# List all discount items
Source: https://docs.conductor.is/qbd-api/discount-items/list
GET /quickbooks-desktop/discount-items
Returns a list of discount items. Use the `cursor` parameter to paginate through the results.
# The Discount Item object
Source: https://docs.conductor.is/qbd-api/discount-items/object
A discount item applies a percentage or fixed amount reduction to the total or subtotal of the line directly above it. Items must be subtotaled first because discounts only affect the preceding line. Unlike discounts for early payments, which use standard-terms or date-driven-terms. Important: Never specify a quantity in a transaction when using a discount item.
# Retrieve a discount item
Source: https://docs.conductor.is/qbd-api/discount-items/retrieve
GET /quickbooks-desktop/discount-items/{id}
Retrieves a discount item by ID.
# Update a discount item
Source: https://docs.conductor.is/qbd-api/discount-items/update
POST /quickbooks-desktop/discount-items/{id}
Updates an existing discount item.
# Create an employee
Source: https://docs.conductor.is/qbd-api/employees/create
POST /quickbooks-desktop/employees
Creates a new employee.
# List all employees
Source: https://docs.conductor.is/qbd-api/employees/list
GET /quickbooks-desktop/employees
Returns a list of employees. Use the `cursor` parameter to paginate through the results.
# The Employee object
Source: https://docs.conductor.is/qbd-api/employees/object
An employee represents a person employed by the company. It stores personal information, employment details, and payroll data used for personnel management and payroll processing.
# Retrieve an employee
Source: https://docs.conductor.is/qbd-api/employees/retrieve
GET /quickbooks-desktop/employees/{id}
Retrieves an employee by ID.
# Update an employee
Source: https://docs.conductor.is/qbd-api/employees/update
POST /quickbooks-desktop/employees/{id}
Updates an existing employee.
# Create an estimate
Source: https://docs.conductor.is/qbd-api/estimates/create
POST /quickbooks-desktop/estimates
Creates a new estimate.
# Delete an estimate
Source: https://docs.conductor.is/qbd-api/estimates/delete
DELETE /quickbooks-desktop/estimates/{id}
Permanently deletes a an estimate. The deletion will fail if the estimate is currently in use or has any linked transactions that are in use.
# List all estimates
Source: https://docs.conductor.is/qbd-api/estimates/list
GET /quickbooks-desktop/estimates
Returns a list of estimates. Use the `cursor` parameter to paginate through the results.
# The Estimate object
Source: https://docs.conductor.is/qbd-api/estimates/object
An estimate is a formal proposal detailing costs and terms for goods or services to a customer. It can be called a "bid" or "proposal" and uses similar fields to invoices in QuickBooks. As a non-posting transaction, it serves as a planning tool that can be converted to an invoice upon customer acceptance.
# Retrieve an estimate
Source: https://docs.conductor.is/qbd-api/estimates/retrieve
GET /quickbooks-desktop/estimates/{id}
Retrieves an estimate by ID.
# Update an estimate
Source: https://docs.conductor.is/qbd-api/estimates/update
POST /quickbooks-desktop/estimates/{id}
Updates an existing estimate.
# Create an inventory adjustment
Source: https://docs.conductor.is/qbd-api/inventory-adjustments/create
POST /quickbooks-desktop/inventory-adjustments
Creates a new inventory adjustment.
# Delete an inventory adjustment
Source: https://docs.conductor.is/qbd-api/inventory-adjustments/delete
DELETE /quickbooks-desktop/inventory-adjustments/{id}
Permanently deletes a an inventory adjustment. The deletion will fail if the inventory adjustment is currently in use or has any linked transactions that are in use.
# List all inventory adjustments
Source: https://docs.conductor.is/qbd-api/inventory-adjustments/list
GET /quickbooks-desktop/inventory-adjustments
Returns a list of inventory adjustments. NOTE: QuickBooks Desktop does not support pagination for inventory adjustments; hence, there is no `cursor` parameter. Users typically have few inventory adjustments.
# The Inventory Adjustment object
Source: https://docs.conductor.is/qbd-api/inventory-adjustments/object
An inventory adjustment records changes to inventory item quantities and values in QuickBooks Desktop, typically used to correct discrepancies between physical counts and system records, or to account for damage, theft, or other inventory changes that aren't related to purchases or sales.
# Retrieve an inventory adjustment
Source: https://docs.conductor.is/qbd-api/inventory-adjustments/retrieve
GET /quickbooks-desktop/inventory-adjustments/{id}
Retrieves an inventory adjustment by ID.
# Update an inventory adjustment
Source: https://docs.conductor.is/qbd-api/inventory-adjustments/update
POST /quickbooks-desktop/inventory-adjustments/{id}
Updates an existing inventory adjustment.
# Create an inventory assembly item
Source: https://docs.conductor.is/qbd-api/inventory-assembly-items/create
POST /quickbooks-desktop/inventory-assembly-items
Creates a new inventory assembly item.
# List all inventory assembly items
Source: https://docs.conductor.is/qbd-api/inventory-assembly-items/list
GET /quickbooks-desktop/inventory-assembly-items
Returns a list of inventory assembly items. Use the `cursor` parameter to paginate through the results.
# The Inventory Assembly Item object
Source: https://docs.conductor.is/qbd-api/inventory-assembly-items/object
An inventory assembly item is an item that is assembled or manufactured from inventory items. The items and/or assemblies that make up the assembly are called components.
# Retrieve an inventory assembly item
Source: https://docs.conductor.is/qbd-api/inventory-assembly-items/retrieve
GET /quickbooks-desktop/inventory-assembly-items/{id}
Retrieves an inventory assembly item by ID.
# Update an inventory assembly item
Source: https://docs.conductor.is/qbd-api/inventory-assembly-items/update
POST /quickbooks-desktop/inventory-assembly-items/{id}
Updates an existing inventory assembly item.
# Create an inventory item
Source: https://docs.conductor.is/qbd-api/inventory-items/create
POST /quickbooks-desktop/inventory-items
Creates a new inventory item.
# List all inventory items
Source: https://docs.conductor.is/qbd-api/inventory-items/list
GET /quickbooks-desktop/inventory-items
Returns a list of inventory items. Use the `cursor` parameter to paginate through the results.
# The Inventory Item object
Source: https://docs.conductor.is/qbd-api/inventory-items/object
An inventory item is any merchandise or part that a business purchases, tracks as inventory, and then resells.
# Retrieve an inventory item
Source: https://docs.conductor.is/qbd-api/inventory-items/retrieve
GET /quickbooks-desktop/inventory-items/{id}
Retrieves an inventory item by ID.
# Update an inventory item
Source: https://docs.conductor.is/qbd-api/inventory-items/update
POST /quickbooks-desktop/inventory-items/{id}
Updates an existing inventory item.
# Create an inventory site
Source: https://docs.conductor.is/qbd-api/inventory-sites/create
POST /quickbooks-desktop/inventory-sites
Creates a new inventory site.
# List all inventory sites
Source: https://docs.conductor.is/qbd-api/inventory-sites/list
GET /quickbooks-desktop/inventory-sites
Returns a list of inventory sites. NOTE: QuickBooks Desktop does not support pagination for inventory sites; hence, there is no `cursor` parameter. Users typically have few inventory sites.
# The Inventory Site object
Source: https://docs.conductor.is/qbd-api/inventory-sites/object
An inventory site is a location where inventory is stored. For example, a company might have a warehouse, a stockroom, and a showroom, each of which is an inventory site. NOTE: Inventory sites require QuickBooks Enterprise with an Advanced Inventory subscription.
# Retrieve an inventory site
Source: https://docs.conductor.is/qbd-api/inventory-sites/retrieve
GET /quickbooks-desktop/inventory-sites/{id}
Retrieves an inventory site by ID.
# Update an inventory site
Source: https://docs.conductor.is/qbd-api/inventory-sites/update
POST /quickbooks-desktop/inventory-sites/{id}
Updates an existing inventory site.
# Create an invoice
Source: https://docs.conductor.is/qbd-api/invoices/create
POST /quickbooks-desktop/invoices
Creates a new invoice.
# Delete an invoice
Source: https://docs.conductor.is/qbd-api/invoices/delete
DELETE /quickbooks-desktop/invoices/{id}
Permanently deletes a an invoice. The deletion will fail if the invoice is currently in use or has any linked transactions that are in use.
# List all invoices
Source: https://docs.conductor.is/qbd-api/invoices/list
GET /quickbooks-desktop/invoices
Returns a list of invoices. Use the `cursor` parameter to paginate through the results.
# The Invoice object
Source: https://docs.conductor.is/qbd-api/invoices/object
An invoice is a commercial document issued to customers that itemizes and records a transaction between buyer and seller. It lists the products or services provided, their quantities, prices, payment terms, and the total amount due. In QuickBooks, invoices are used to track accounts receivable and record sales transactions where payment was not made in full at the time of purchase.
# Retrieve an invoice
Source: https://docs.conductor.is/qbd-api/invoices/retrieve
GET /quickbooks-desktop/invoices/{id}
Retrieves an invoice by ID.
# Update an invoice
Source: https://docs.conductor.is/qbd-api/invoices/update
POST /quickbooks-desktop/invoices/{id}
Updates an existing invoice.
# Create a journal entry
Source: https://docs.conductor.is/qbd-api/journal-entries/create
POST /quickbooks-desktop/journal-entries
Creates a new journal entry.
# Delete a journal entry
Source: https://docs.conductor.is/qbd-api/journal-entries/delete
DELETE /quickbooks-desktop/journal-entries/{id}
Permanently deletes a a journal entry. The deletion will fail if the journal entry is currently in use or has any linked transactions that are in use.
# List all journal entries
Source: https://docs.conductor.is/qbd-api/journal-entries/list
GET /quickbooks-desktop/journal-entries
Returns a list of journal entries. Use the `cursor` parameter to paginate through the results.
# The Journal Entry object
Source: https://docs.conductor.is/qbd-api/journal-entries/object
A journal entry is a direct way to record financial transactions by their debit and credit impacts on accounts, typically used for recording depreciation, adjusting entries, or other transactions that can't be entered through standard forms like bills or invoices.
# Retrieve a journal entry
Source: https://docs.conductor.is/qbd-api/journal-entries/retrieve
GET /quickbooks-desktop/journal-entries/{id}
Retrieves a journal entry by ID.
# Update a journal entry
Source: https://docs.conductor.is/qbd-api/journal-entries/update
POST /quickbooks-desktop/journal-entries/{id}
Updates an existing journal entry.
# Create a non-inventory item
Source: https://docs.conductor.is/qbd-api/non-inventory-items/create
POST /quickbooks-desktop/non-inventory-items
Creates a new non-inventory item.
# List all non-inventory items
Source: https://docs.conductor.is/qbd-api/non-inventory-items/list
GET /quickbooks-desktop/non-inventory-items
Returns a list of non-inventory items. Use the `cursor` parameter to paginate through the results.
# The Non-Inventory Item object
Source: https://docs.conductor.is/qbd-api/non-inventory-items/object
A non-inventory item is any material or part that a business buys but does not keep on hand as inventory.
There are two types of non-inventory items: 1. Materials or parts that are part of the business's overhead (for example, office supplies) 2. Materials or parts that the business buys to finish a specific job and then charges back to the customer.
# Retrieve a non-inventory item
Source: https://docs.conductor.is/qbd-api/non-inventory-items/retrieve
GET /quickbooks-desktop/non-inventory-items/{id}
Retrieves a non-inventory item by ID.
# Update a non-inventory item
Source: https://docs.conductor.is/qbd-api/non-inventory-items/update
POST /quickbooks-desktop/non-inventory-items/{id}
Updates an existing non-inventory item.
# Pagination
Source: https://docs.conductor.is/qbd-api/pagination
Learn how to efficiently retrieve large datasets in API v2 from QuickBooks Desktop using cursor-based pagination.
Conductor's QuickBooks Desktop API v2 uses cursor-based pagination to handle large datasets efficiently, allowing you to retrieve results in manageable chunks. This guide explains how to implement pagination and its key limitations.
## How pagination works
For list endpoints that support pagination (indicated by the presence of a `cursor` query parameter in the API specification), the process works as follows:
1. Make your initial request to the list endpoint without a cursor.
* Use the `limit` query parameter to control how many items are returned per page.
* The default and maximum value is `150` items per page. We enforce this limit to prevent overloading QuickBooks Desktop.
2. The response will contain the following pagination fields:
* `nextCursor` - The cursor value to use when requesting the next page of results. This field is `null` if there are no more pages.
* `hasMore` - Indicates whether there are more pages of results available.
* `remainingCount` - The number of remaining items that can be retrieved in subsequent pages.
3. To fetch the next page, make another request with the `cursor` query parameter set to the `nextCursor` value from the previous response.
**You must make subsequent pagination requests within 10 seconds of
receiving the previous response.** If you exceed this time limit, you'll
receive an error.
* This limitation is inherent to QuickBooks Desktop's design.
* While this is not an issue when using code to automatically fetch pages in sequence (e.g., in a loop), it may affect manual API testing where you're copying and pasting cursor values between requests.
4. Repeat until `hasMore` is `false`.
5. Attempting to request another page when `hasMore` is `false` will result in an error.
## Important limitations
### Same `cursor` value used for all pages
The `cursor` value remains constant throughout the entire pagination sequence. This means you should reuse the same cursor value for all subsequent requests in the sequence, which is a design characteristic inherent to the QuickBooks Desktop system.
### No custom sorting available
The order of results is determined entirely by QuickBooks Desktop, and no information about the ordering is provided in the response. Due to this limitation, custom sorting of results is not supported through the API.
### Non-paginated endpoints
Some QuickBooks Desktop list APIs do not support pagination due to limitations in QuickBooks Desktop itself. These endpoints can be identified by the absence of the `cursor` parameter in their API specification. This typically applies to endpoints where the end-user is highly unlikely to have a large set of objects of that type, so the absence of pagination will not impact performance.
## Pagination in Conductor SDKs
Our official client libraries handle pagination automatically, making it easier to work with paginated responses. Check out their documentation for implementation details:
* [Node.js SDK](https://github.com/conductor-is/quickbooks-desktop-node?tab=readme-ov-file#auto-pagination)
* [Python SDK](https://github.com/conductor-is/quickbooks-desktop-python?tab=readme-ov-file#pagination)
## Example
1. Initial request:
```http
GET https://api.conductor.is/v1/quickbooks_desktop/customers
```
```json Example initial response
{
"data": [...],
"nextCursor": "abc123",
"hasMore": true,
"remainingCount": 99
}
```
2. Next page request with `cursor` query parameter:
```http
GET https://api.conductor.is/v1/quickbooks_desktop/customers?cursor=abc123
```
```json Example next page response
{
"data": [...],
"nextCursor": "abc123",
"hasMore": false,
"remainingCount": 0
}
```
3. Requesting another page after `hasMore` is `false` will result in an error:
```http
GET https://api.conductor.is/v1/quickbooks_desktop/customers?cursor=abc123
```
```json Example error response
{
"error": {
"message": "No more results available"
// ...
}
}
```
# Create a payroll wage item
Source: https://docs.conductor.is/qbd-api/payroll-wage-items/create
POST /quickbooks-desktop/payroll-wage-items
Creates a new payroll wage item.
# List all payroll wage items
Source: https://docs.conductor.is/qbd-api/payroll-wage-items/list
GET /quickbooks-desktop/payroll-wage-items
Returns a list of payroll wage items. Use the `cursor` parameter to paginate through the results.
# The Payroll Wage Item object
Source: https://docs.conductor.is/qbd-api/payroll-wage-items/object
A payroll wage item defines a type of payment scheme in QuickBooks Desktop, such as Regular Pay or Overtime Pay, that specifies how employee wages are calculated and tracked.
# Retrieve a payroll wage item
Source: https://docs.conductor.is/qbd-api/payroll-wage-items/retrieve
GET /quickbooks-desktop/payroll-wage-items/{id}
Retrieves a payroll wage item by ID.
# Create a purchase order
Source: https://docs.conductor.is/qbd-api/purchase-orders/create
POST /quickbooks-desktop/purchase-orders
Creates a new purchase order.
# Delete a purchase order
Source: https://docs.conductor.is/qbd-api/purchase-orders/delete
DELETE /quickbooks-desktop/purchase-orders/{id}
Permanently deletes a a purchase order. The deletion will fail if the purchase order is currently in use or has any linked transactions that are in use.
# List all purchase orders
Source: https://docs.conductor.is/qbd-api/purchase-orders/list
GET /quickbooks-desktop/purchase-orders
Returns a list of purchase orders. Use the `cursor` parameter to paginate through the results.
# The Purchase Order object
Source: https://docs.conductor.is/qbd-api/purchase-orders/object
A purchase order represents a formal request for goods or services sent to a vendor. Since it is a non-posting transaction, it serves as a commitment to purchase but does not impact the company's financial statements.
# Retrieve a purchase order
Source: https://docs.conductor.is/qbd-api/purchase-orders/retrieve
GET /quickbooks-desktop/purchase-orders/{id}
Retrieves a purchase order by ID.
# Update a purchase order
Source: https://docs.conductor.is/qbd-api/purchase-orders/update
POST /quickbooks-desktop/purchase-orders/{id}
Updates an existing purchase order.
# Create a receive-payment
Source: https://docs.conductor.is/qbd-api/receive-payments/create
POST /quickbooks-desktop/receive-payments
Creates a new receive-payment.
# Delete a receive-payment
Source: https://docs.conductor.is/qbd-api/receive-payments/delete
DELETE /quickbooks-desktop/receive-payments/{id}
Permanently deletes a a receive-payment. The deletion will fail if the receive-payment is currently in use or has any linked transactions that are in use.
# List all receive-payments
Source: https://docs.conductor.is/qbd-api/receive-payments/list
GET /quickbooks-desktop/receive-payments
Returns a list of receive-payments. Use the `cursor` parameter to paginate through the results.
# The Receive-Payment object
Source: https://docs.conductor.is/qbd-api/receive-payments/object
A receive-payment records when a payment is received from a customer *not* at the time of sale. It can be used for one or more of these purposes: (1) record a customer's payment against one or more invoices, (2) set a discount (e.g., for early payment), or (3) set a credit (e.g., from returned merchandise). Note: If full payment is received at the time of sale, use a sales receipt instead.
# Retrieve a receive-payment
Source: https://docs.conductor.is/qbd-api/receive-payments/retrieve
GET /quickbooks-desktop/receive-payments/{id}
Retrieves a receive-payment by ID.
# Update a receive-payment
Source: https://docs.conductor.is/qbd-api/receive-payments/update
POST /quickbooks-desktop/receive-payments/{id}
Updates an existing receive-payment.
# Create a sales order
Source: https://docs.conductor.is/qbd-api/sales-orders/create
POST /quickbooks-desktop/sales-orders
Creates a new sales order.
# Delete a sales order
Source: https://docs.conductor.is/qbd-api/sales-orders/delete
DELETE /quickbooks-desktop/sales-orders/{id}
Permanently deletes a a sales order. The deletion will fail if the sales order is currently in use or has any linked transactions that are in use.
# List all sales orders
Source: https://docs.conductor.is/qbd-api/sales-orders/list
GET /quickbooks-desktop/sales-orders
Returns a list of sales orders. Use the `cursor` parameter to paginate through the results.
# The Sales Order object
Source: https://docs.conductor.is/qbd-api/sales-orders/object
A sales order tracks inventory that is on back order for a customer. In QuickBooks, sales orders and invoices use similar fields, and a sales order can be "converted" into an invoice (by linking the invoice to the sales order) once the inventory is in stock.
# Retrieve a sales order
Source: https://docs.conductor.is/qbd-api/sales-orders/retrieve
GET /quickbooks-desktop/sales-orders/{id}
Retrieves a sales order by ID.
# Update a sales order
Source: https://docs.conductor.is/qbd-api/sales-orders/update
POST /quickbooks-desktop/sales-orders/{id}
Updates an existing sales order.
# Create a sales receipt
Source: https://docs.conductor.is/qbd-api/sales-receipts/create
POST /quickbooks-desktop/sales-receipts
Creates a new sales receipt.
# Delete a sales receipt
Source: https://docs.conductor.is/qbd-api/sales-receipts/delete
DELETE /quickbooks-desktop/sales-receipts/{id}
Permanently deletes a a sales receipt. The deletion will fail if the sales receipt is currently in use or has any linked transactions that are in use.
# List all sales receipts
Source: https://docs.conductor.is/qbd-api/sales-receipts/list
GET /quickbooks-desktop/sales-receipts
Returns a list of sales receipts. Use the `cursor` parameter to paginate through the results.
# The Sales Receipt object
Source: https://docs.conductor.is/qbd-api/sales-receipts/object
A sales receipt records a sale where complete payment is received at the time of the transaction, whether by cash, check, or credit card. It combines the sale and payment into a single transaction. For situations requiring partial or delayed payments, use an invoice with receive-payments instead.
# Retrieve a sales receipt
Source: https://docs.conductor.is/qbd-api/sales-receipts/retrieve
GET /quickbooks-desktop/sales-receipts/{id}
Retrieves a sales receipt by ID.
# Update a sales receipt
Source: https://docs.conductor.is/qbd-api/sales-receipts/update
POST /quickbooks-desktop/sales-receipts/{id}
Updates an existing sales receipt.
# Create a sales representative
Source: https://docs.conductor.is/qbd-api/sales-representatives/create
POST /quickbooks-desktop/sales-representatives
Creates a new sales representative.
# List all sales representatives
Source: https://docs.conductor.is/qbd-api/sales-representatives/list
GET /quickbooks-desktop/sales-representatives
Returns a list of sales representatives. NOTE: QuickBooks Desktop does not support pagination for sales representatives; hence, there is no `cursor` parameter. Users typically have few sales representatives.
# The Sales Representative object
Source: https://docs.conductor.is/qbd-api/sales-representatives/object
A sales representative is a person who can be assigned to sales transactions in QuickBooks Desktop. The sales representative corresponds to a separate employee, vendor, or other-name entity in QuickBooks.
# Retrieve a sales representative
Source: https://docs.conductor.is/qbd-api/sales-representatives/retrieve
GET /quickbooks-desktop/sales-representatives/{id}
Retrieves a sales representative by ID.
# Update a sales representative
Source: https://docs.conductor.is/qbd-api/sales-representatives/update
POST /quickbooks-desktop/sales-representatives/{id}
Updates an existing sales representative.
# Create a sales-tax code
Source: https://docs.conductor.is/qbd-api/sales-tax-codes/create
POST /quickbooks-desktop/sales-tax-codes
Creates a new sales-tax code.
# List all sales-tax codes
Source: https://docs.conductor.is/qbd-api/sales-tax-codes/list
GET /quickbooks-desktop/sales-tax-codes
Returns a list of sales-tax codes. NOTE: QuickBooks Desktop does not support pagination for sales-tax codes; hence, there is no `cursor` parameter. Users typically have few sales-tax codes.
# The Sales-Tax Code object
Source: https://docs.conductor.is/qbd-api/sales-tax-codes/object
A sales tax code helps categorize items on a sales form as taxable or non-taxable, detailing reasons and associating tax codes with customers, items, or transactions.
# Retrieve a sales-tax code
Source: https://docs.conductor.is/qbd-api/sales-tax-codes/retrieve
GET /quickbooks-desktop/sales-tax-codes/{id}
Retrieves a sales-tax code by ID.
# Update a sales-tax code
Source: https://docs.conductor.is/qbd-api/sales-tax-codes/update
POST /quickbooks-desktop/sales-tax-codes/{id}
Updates an existing sales-tax code.
# Create a sales-tax item
Source: https://docs.conductor.is/qbd-api/sales-tax-items/create
POST /quickbooks-desktop/sales-tax-items
Creates a new sales-tax item.
# List all sales-tax items
Source: https://docs.conductor.is/qbd-api/sales-tax-items/list
GET /quickbooks-desktop/sales-tax-items
Returns a list of sales-tax items. Use the `cursor` parameter to paginate through the results.
# The Sales-Tax Item object
Source: https://docs.conductor.is/qbd-api/sales-tax-items/object
A sales-tax item is an item used to calculate a single sales tax that is collected at a specified rate and paid to a single agency.
# Retrieve a sales-tax item
Source: https://docs.conductor.is/qbd-api/sales-tax-items/retrieve
GET /quickbooks-desktop/sales-tax-items/{id}
Retrieves a sales-tax item by ID.
# Update a sales-tax item
Source: https://docs.conductor.is/qbd-api/sales-tax-items/update
POST /quickbooks-desktop/sales-tax-items/{id}
Updates an existing sales-tax item.
# SDKs
Source: https://docs.conductor.is/qbd-api/sdks
Check out Conductor's official Node.js and Python SDKs for integrating with the QuickBooks Desktop API.
Conductor provides powerful, fully-typed SDKs for Node.js and Python that provides a top-tier developer experience for integrating QuickBooks Desktop. Both SDKs provide:
* Full API coverage
* Type safety and autocomplete for every endpoint, parameter, and response field
* Inline docs for all fields and methods
* Automatic request retries
* Comprehensive error handling
* async/await operations
* Modern API design patterns
# Node.js SDK
See the [Node.js SDK Documentation](https://github.com/conductor-is/quickbooks-desktop-node) for more details.
Though this version of the Node.js SDK uses an NPM `@beta` tag, it ***is* stable and ready for production use**! We merely have a few more endpoints to migrate before prompting all existing users to update. **Any new Conductor users should absolutely use the beta version**!
If you're migrating from the old `conductor-node` package, please see the [upgrade guide](/qbd-api/upgrade-node).
```bash npm
npm install conductor-node@beta
```
```bash yarn
yarn add conductor-node@beta
```
```bash pnpm
pnpm add conductor-node@beta
```
```ts
import Conductor from "conductor-node";
const conductor = new Conductor({
apiKey: process.env["CONDUCTOR_SECRET_KEY"], // This is the default and can be omitted
});
async function main() {
// Fetch the first page of invoices
const invoices = await conductor.qbd.invoices.list({
conductorEndUserId: "{{YOUR_END_USER_ID}}",
});
console.log(invoices.data);
}
main();
```
# Python SDK
See the [Python SDK Documentation](https://github.com/conductor-is/quickbooks-desktop-python) for more details.
```bash
pip install conductor-py
```
```python
import os
from conductor import Conductor
conductor = Conductor(
api_key=os.environ.get("CONDUCTOR_SECRET_KEY"), # This is the default and can be omitted
)
# Fetch the first page of invoices
invoices = conductor.qbd.invoices.list(
conductor_end_user_id="{{YOUR_END_USER_ID}}",
)
print(invoices.data)
```
# Create a service item
Source: https://docs.conductor.is/qbd-api/service-items/create
POST /quickbooks-desktop/service-items
Creates a new service item.
# List all service items
Source: https://docs.conductor.is/qbd-api/service-items/list
GET /quickbooks-desktop/service-items
Returns a list of service items. Use the `cursor` parameter to paginate through the results.
# The Service Item object
Source: https://docs.conductor.is/qbd-api/service-items/object
A service item represents a billable service offered by or purchased by a business in QuickBooks Desktop. It can track both sales and purchases of services, with customizable pricing, descriptions, and tax settings. Common examples include professional services (consulting, legal advice), labor charges (installation, repairs), recurring services (maintenance contracts), and any non-physical items that generate revenue or expenses.
# Retrieve a service item
Source: https://docs.conductor.is/qbd-api/service-items/retrieve
GET /quickbooks-desktop/service-items/{id}
Retrieves a service item by ID.
# Update a service item
Source: https://docs.conductor.is/qbd-api/service-items/update
POST /quickbooks-desktop/service-items/{id}
Updates an existing service item.
# Create a standard term
Source: https://docs.conductor.is/qbd-api/standard-terms/create
POST /quickbooks-desktop/standard-terms
Creates a new standard term.
# List all standard terms
Source: https://docs.conductor.is/qbd-api/standard-terms/list
GET /quickbooks-desktop/standard-terms
Returns a list of standard terms. NOTE: QuickBooks Desktop does not support pagination for standard terms; hence, there is no `cursor` parameter. Users typically have few standard terms.
# The Standard Term object
Source: https://docs.conductor.is/qbd-api/standard-terms/object
A standard term is a payment term that shows the number of days within which payment is due and can include a discount for early payment.
# Retrieve a standard term
Source: https://docs.conductor.is/qbd-api/standard-terms/retrieve
GET /quickbooks-desktop/standard-terms/{id}
Retrieves a standard term by ID.
# Create a subtotal item
Source: https://docs.conductor.is/qbd-api/subtotal-items/create
POST /quickbooks-desktop/subtotal-items
Creates a new subtotal item.
# List all subtotal items
Source: https://docs.conductor.is/qbd-api/subtotal-items/list
GET /quickbooks-desktop/subtotal-items
Returns a list of subtotal items. Use the `cursor` parameter to paginate through the results.
# The Subtotal Item object
Source: https://docs.conductor.is/qbd-api/subtotal-items/object
A subtotal item calculates the sum of all items above it on a sales form, up to the previous subtotal. This is particularly important for applying discounts because discounts can only be applied to the line directly above them, requiring items to be subtotaled first.
# Retrieve a subtotal item
Source: https://docs.conductor.is/qbd-api/subtotal-items/retrieve
GET /quickbooks-desktop/subtotal-items/{id}
Retrieves a subtotal item by ID.
# Update a subtotal item
Source: https://docs.conductor.is/qbd-api/subtotal-items/update
POST /quickbooks-desktop/subtotal-items/{id}
Updates an existing subtotal item.
# Create a transfer
Source: https://docs.conductor.is/qbd-api/transfers/create
POST /quickbooks-desktop/transfers
Creates a new transfer.
# List all transfers
Source: https://docs.conductor.is/qbd-api/transfers/list
GET /quickbooks-desktop/transfers
Returns a list of transfers. Use the `cursor` parameter to paginate through the results.
# The Transfer object
Source: https://docs.conductor.is/qbd-api/transfers/object
A transfer records the movement of funds between two accounts in QuickBooks Desktop. It reduces the balance of one account (the "from" account) and increases the balance of another account (the "to" account) by the same amount. Transfers are commonly used for moving money between bank accounts or recording internal fund movements.
# Retrieve a transfer
Source: https://docs.conductor.is/qbd-api/transfers/retrieve
GET /quickbooks-desktop/transfers/{id}
Retrieves a transfer by ID.
# Update a transfer
Source: https://docs.conductor.is/qbd-api/transfers/update
POST /quickbooks-desktop/transfers/{id}
Updates an existing transfer.
# Upgrading to Conductor's new Node.js SDK
Source: https://docs.conductor.is/qbd-api/upgrade-node
How to migrate from the old `conductor-node` package to Conductor's new Node.js SDK and QuickBooks Desktop API v2.
We're excited to announce a major update to `conductor-node` that brings full support for Conductor's new QuickBooks Desktop API v2. This new version introduces significant improvements in usability, consistency, and functionality.
Though the old version of `conductor-node` will continue to work, it will not
receive any further updates. We strongly recommend upgrading to take advantage
of the new features and improvements.
## Key improvements
Our new QuickBooks Desktop API v2 has been completely redesigned from the ground up. We've carefully chosen every field name, parameter, and method description to be significantly more intuitive and clearer than QuickBooks's original documentation. The API structure has been simplified while maintaining full functionality.
Major improvements include:
* **Improved parameter and fields names**,
* Completely **rewritten inline documentation**
* **[Automatic pagination](#automatic-pagination) support**
* **Automatic retries** with exponential backoff
* **Configurable timeouts**
* New methods like **`.retrieve()`** and **`.delete()`**
* All fields included in responses
* Consistent array handling
## Warning: Some QuickBooks Desktop types are not yet available in the new SDK
Several *less common* QuickBooks Desktop types/endpoints from the previous version of `conductor-node` are not *yet* available in the new SDK. **If the type is listed in the sidebar to the left of this page, it is available in the new SDK.**
If you need a specific QBD type, please [contact support](mailto:support@conductor.is) and we'll add it to the next release.
## How to upgrade
Though this version of the Node.js SDK uses an NPM `@beta` tag, it ***is*
stable and ready for production use**! We merely have a few more endpoints to
migrate before prompting all existing users to update.
```bash npm
npm install conductor-node@beta
```
```bash yarn
yarn add conductor-node@beta
```
```bash pnpm
pnpm add conductor-node@beta
```
## ⚠️ Breaking changes
**The only breaking changes in this update relate to naming structure.
*QuickBooks business logic has no changes.*** We've simply made the interface
simpler, more intuitive, and more robust, while adding new features like
automatic pagination and retries.
**Old:**
```typescript
import Conductor from "conductor-node";
const conductor = new Conductor("{{YOUR_SECRET_KEY}}");
```
**New:** You can now automatically load your secret key from the `CONDUCTOR_SECRET_KEY` environment variable (or pass it to the constructor as an argument like before):
```typescript
import Conductor from "conductor-node";
const conductor = new Conductor({
apiKey: process.env["CONDUCTOR_SECRET_KEY"], // This is the default and can be omitted
});
```
**Old:** Singular resource names.
```typescript
await conductor.qbd.bill.*
await conductor.qbd.invoice.*
await conductor.qbd.itemInventory.*
```
**New:** Plural resource names and clearer naming.
```typescript
await conductor.qbd.bills.*
await conductor.qbd.invoices.*
await conductor.qbd.inventoryItems.*
```
**Old:** Odd naming conventions.
```typescript
await conductor.qbd.bill.query(...)
await conductor.qbd.bill.add(...)
await conductor.qbd.bill.mod(...)
```
**New:** Intuitive naming following REST conventions.
```typescript
await conductor.qbd.bills.list(...)
await conductor.qbd.bills.create(...)
await conductor.qbd.bills.update(...)
await conductor.qbd.bills.retrieve(...) // New!
await conductor.qbd.bills.delete(...) // New!
```
**Old:** Required as its own argument.
```typescript
await conductor.qbd.bill.query("end_usr_1234abcd", { ... });
```
**New:** Required as a `conductorEndUserId` parameter in the parameters object.
```typescript
await conductor.qbd.bills.list({
conductorEndUserId: "end_usr_1234abcd",
// ... other params
});
```
All request parameters are now in camelCase and have been renamed for clarity
and consistency. Most of the changes are straightforward that you can find
using autocomplete in your IDE or checking the APIs in the sidebar.
**Old:** Odd naming conventions.
```typescript
await conductor.qbd.bill.add("end_usr_1234abcd", {
VendorRef: { ListID: "..." },
RefNumber: "...",
ExpenseLineAdd: [
{
Amount: "1.00",
},
],
});
```
**New:** camelCase and clearer naming.
```typescript
await conductor.qbd.bills.create({
conductorEndUserId: "end_usr_1234abcd",
vendorId: "...",
refNumber: "...",
expenseLines: [
{
amount: "1.00",
},
],
});
```
All output fields are now in camelCase and have been renamed for clarity and
consistency. Most of the changes are straightforward that you can find using
autocomplete in your IDE or checking the APIs in the sidebar.
Here are some key renamed fields:
* `TxnID` and `ListID` → `id`
* `TimeCreated` and `TimeModified` → `createdAt` and `updatedAt`
* `EditSequence` → `revisionNumber`
* `*Ref` fields (e.g., `CustomerRef`) → simplified (e.g., `customer`)
**Old:** Odd naming conventions.
```typescript
const invoice = await conductor.qbd.invoice.query("end_usr_1234abcd", "...");
// {
// TxnID: "...",
// TimeCreated: "...",
// TimeModified: "...",
// EditSequence: "...",
// TxnNumber: "...",
// CustomerRef: {
// ListID: "...",
// FullName: "..."
// }
// }
```
**New:** camelCase and clearer naming.
```typescript
const invoice = await conductor.qbd.invoices.retrieve({
conductorEndUserId: "end_usr_1234abcd",
id: "...",
});
// {
// id: "...",
// objectType: "qbd_invoice",
// createdAt: "...",
// updatedAt: "...",
// revisionNumber: "...",
// transactionNumber: "...",
// customer: {
// id: "...",
// fullName: "..."
// }
// }
```
**Old:** Odd naming conventions and complex structure.
```typescript
const invoices = await conductor.qbd.invoice.query("end_usr_1234abcd", {
ModifiedDateRangeFilter: {
FromModifiedDate: "...",
ToModifiedDate: "...",
},
AccountFilter: {
ListID: "...",
},
RefNumberFilter: "...",
RefNumberRangeFilter: {
FromRefNumber: "...",
ToRefNumber: "...",
},
MaxReturned: 100,
});
```
**New:** Significantly simplified structure and clearer naming.
```typescript
const invoices = await conductor.qbd.invoices.list({
conductorEndUserId: "end_usr_1234abcd",
updatedAfter: "...",
updatedBefore: "...",
accountId: "...",
refNumber: "...",
refNumberFrom: "...",
refNumberTo: "...",
limit: 100,
});
```
To support automatic pagination, the query/list method now returns results in an object wrapper with properties for pagination metadata.
**Old:** Returns an array of results directly.
```typescript
const invoices = await conductor.qbd.invoice.query("end_usr_1234abcd");
// [
// {
// TxnID: "...",
// TimeCreated: "...",
// ...
// }
// ]
```
**New:** Returns results in an object wrapper with properties for pagination metadata.
```typescript
const response = await conductor.qbd.invoices.list({
conductorEndUserId: "end_usr_1234abcd",
});
console.log(response);
// {
// nextCursor: "...",
// hasMore: true,
// remainingCount: 100,
// data: [
// {
// id: "...",
// objectType: "qbd_invoice",
// createdAt: "...",
// ...
// }
// ]
// }
```
Previously, the API would return all matching records by default. This could lead to performance issues when unintentionally retrieving thousands of records, potentially causing long response times, overloading QuickBooks Desktop, and consuming excessive memory.
To prevent these issues, **Conductor now limits responses to a maximum of 150 records per page by default**. This limit was carefully determined through extensive testing across different scenarios and system configurations to optimize performance while avoiding timeouts and resource constraints.
With the new [automatic pagination](https://github.com/conductor-is/quickbooks-desktop-node?tab=readme-ov-file#auto-pagination), you can efficiently retrieve all records when needed, without worrying about these performance concerns.
Fields that can have multiple values are now always arrays, even when there's only one record:
```typescript
const response = await conductor.qbd.invoices.list({
conductorEndUserId: "end_usr_1234abcd",
});
// All responses with potential multiple records use arrays consistently
console.log(response.data[0].lines); // Always an array, even if there's only one line
```
Several *less common* QuickBooks Desktop types/endpoints from the previous version of `conductor-node` are not *yet* available in the new SDK. **If the type is listed in the sidebar to the left of this page, it is available in the new SDK.**
If you need a specific QBD type, please [contact support](mailto:support@conductor.is) and we'll add it to the next release.
## New features
You can now easily paginate through all results. See the [automatic pagination](https://github.com/conductor-is/quickbooks-desktop-node?tab=readme-ov-file#auto-pagination) section of the README for more details.
```typescript
async function fetchAllQbdInvoices(params) {
const allQbdInvoices = [];
// Automatically fetches more pages as needed
for await (const invoice of conductor.qbd.invoices.list({
conductorEndUserId: "{{YOUR_END_USER_ID}}",
...params,
})) {
allQbdInvoices.push(invoice);
}
return allQbdInvoices;
}
```
Intelligently retries requests, but only those requests that can potentially succeed when retried (such as network errors).
All objects now have a `retrieve` method and all transaction objects have a `delete` method.
```typescript
await conductor.qbd.bills.retrieve({ conductorEndUserId: "...", id: "..." });
await conductor.qbd.bills.delete({ conductorEndUserId: "...", id: "..." });
```
The new API now returns a consistent response structure with all possible fields, making it easier to work with the data. Fields that have no value are explicitly set to `null` rather than being omitted, and empty array fields return `[]` instead of being excluded. This means you can reliably access any field without checking if it exists first, and array operations will work consistently without special handling for missing fields.
## More information
For more detailed information about the new Node.js SDK, please check its [GitHub repository](https://github.com/conductor-is/quickbooks-desktop-node).
# Create a vendor credit
Source: https://docs.conductor.is/qbd-api/vendor-credits/create
POST /quickbooks-desktop/vendor-credits
Creates a new vendor credit.
# Delete a vendor credit
Source: https://docs.conductor.is/qbd-api/vendor-credits/delete
DELETE /quickbooks-desktop/vendor-credits/{id}
Permanently deletes a a vendor credit. The deletion will fail if the vendor credit is currently in use or has any linked transactions that are in use.
# List all vendor credits
Source: https://docs.conductor.is/qbd-api/vendor-credits/list
GET /quickbooks-desktop/vendor-credits
Returns a list of vendor credits. Use the `cursor` parameter to paginate through the results.
# The Vendor Credit object
Source: https://docs.conductor.is/qbd-api/vendor-credits/object
A vendor credit (also known as a bill credit) represents money that a vendor owes back to your business, typically from overpayment or returned merchandise. When processing bill payments, you can apply these credits via `applyToTransactions.setCredit` to reduce payment amounts. Note that vendor credits track money owed by vendors, while credit memos track money you owe customers and are handled through receive-payment transactions.
# Retrieve a vendor credit
Source: https://docs.conductor.is/qbd-api/vendor-credits/retrieve
GET /quickbooks-desktop/vendor-credits/{id}
Retrieves a vendor credit by ID.
# Update a vendor credit
Source: https://docs.conductor.is/qbd-api/vendor-credits/update
POST /quickbooks-desktop/vendor-credits/{id}
Updates an existing vendor credit.
# Create a vendor
Source: https://docs.conductor.is/qbd-api/vendors/create
POST /quickbooks-desktop/vendors
Creates a new vendor.
# List all vendors
Source: https://docs.conductor.is/qbd-api/vendors/list
GET /quickbooks-desktop/vendors
Returns a list of vendors. Use the `cursor` parameter to paginate through the results.
# The Vendor object
Source: https://docs.conductor.is/qbd-api/vendors/object
A vendor is any person or company from whom a small business owner buys goods and services. (Banks and tax agencies usually are included on the vendor list.) A company's vendor list contains information such as account balance and contact information about each vendor.
# Retrieve a vendor
Source: https://docs.conductor.is/qbd-api/vendors/retrieve
GET /quickbooks-desktop/vendors/{id}
Retrieves a vendor by ID.
# Update a vendor
Source: https://docs.conductor.is/qbd-api/vendors/update
POST /quickbooks-desktop/vendors/{id}
Updates an existing vendor.
# Welcome to Conductor's QuickBooks Desktop API
Source: https://docs.conductor.is/qbd-api/welcome
Welcome to Conductor's new QuickBooks Desktop API.
Conductor is a real-time, fully-typed API for QuickBooks Desktop (sometimes called QuickBooks Enterprise), available via Python, Node.js, and REST. In just a few lines, get real-time access to fetch, create, or update *any* QuickBooks Desktop object type and receive a fully-typed response.
Follow our [Quickstart guide](/quickstart) to get started.
## Key features
* **Any data type**: Query, create, or update any QuickBooks Desktop data type.
* **Real-time**: Get real-time updates on your QuickBooks Desktop data. No queues, no jobs, no cache layer -- just direct access to the data.
* **Modern API**: JSON-based REST API, replacing the old XML-based SOAP model.
* **Typed client libraries**: Fully typed libraries in Node.js and Python with autocomplete, inline docs, and type validation for endpoints, parameters, and responses.
* **Request handling**: Invisibly manages queues, timeouts, retries, and pagination.
* **Auto-pagination**: Automatically handles paginated responses to retrieve complete datasets.
* **Multi-company support**: Connects to multiple QuickBooks Desktop company files.
* **Validation**: Sanitizes and validates all inputs and outputs.
* **Unified error handling**: Streamlines error handling across the QuickBooks stack.
* **Authentication flow UI**: Simple UI for securely connecting QuickBooks Desktop accounts.
* **Dashboard**: UI to monitor and manage your QuickBooks Desktop connections and data.
* **Error resolution**: Detailed guides and instructions for resolving errors and handling edge cases.
# What's new in API v2
Source: https://docs.conductor.is/qbd-api/whats-new
Conductor's new QuickBooks Desktop API is a massive leap forward and sets the foundation for future integrations.
Welcome to Conductor's new QuickBooks Desktop API v2.
**API v2 brings the following improvements over v1.0:**
1. Proper HTTP methods: `GET` for reading, `POST` for creating or updating. No more `POST` for everything.
2. Cleaner URL endpoints: `/quickbooks_desktop/invoices` instead of `/end-users/{id}/passthrough/quickbooks_desktop` with `InvoiceQueryRq` in the body.
3. An OpenAPI spec for the entire API.
4. Full online documentation of all fields and their types.
5. API playground in the documentation to test requests and see responses.
6. Always returns all response fields. Uses `null` for undefined fields instead of omitting them.
7. Consistently returns arrays for any nested fields that previously returned a single object for one item and an array for multiple items.
* Returns an empty array instead of `null` for empty lists.
8. Clean response bodies: No more unwrapping outer objects; e.g., no more `InvoiceQueryRs.InvoiceRet`.
9. Proper object wrapper for all list responses: Previously, we returned an array of objects. Now, we return an object with a `data` field that contains the array of objects.
10. Pagination for all list endpoints.
11. Better parameter names instead of QuickBooks Desktop's unconventional naming. For example:
* `MaxReturned` → `limit`
* `TimeModified` → `updatedAt`
* `DataExtRet` → `customFields`
12. Uses `camelCase` for input and output field names instead of `PascalCase`.
13. Simplified request structure. For example:
* `refNumberStartsWith: "REF"` instead of `RefNumberFilter: { MatchCriterion: "StartsWith", RefNumber: "REF" }`
* `accountId: "123"` instead of `AccountRef: { ListID: "123" }`
14. Correct types for obscure fields: Previously, we inferred types from XML. Now, we define the type of every field to ensure it is always correct.
15. Better field descriptions: we are using our own descriptions instead of QuickBooks' descriptions.
16. Field-specific coercions: better handling of dates and money amounts.
17. Enforced upper bound on `limit` of 150 records per page to prevent unintentionally overloading QuickBooks Desktop instances.
18. Better defaults. For example:
* `includeLineItems` is `true` by default because who wants an empty invoice?
* `ownerId` is 0 by default to always include your end-users' custom fields.
## Feedback
We value your input! If you have suggestions or requests for improvements, changes, field names, documentation, or anything else, [please let us know](mailto:support@conductor.is?subject=Conductor%20QuickBooks%20Desktop%20API%20Feedback).
# Bills
Source: https://docs.conductor.is/qbd-examples/bills
export const pluralObjectName_0 = "bills"
A **bill** in QuickBooks Desktop is a record of a transaction that represents a request-for-payment from a [vendor](/qbd-examples/vendors) for goods or services that it has provided. Companies use bills to track the expenses they need to pay but have not yet paid. Bills are also known as payables.
To see all of the **request parameters and response fields** for
{pluralObjectName_0}, check out our client library's [amazing
autocomplete](/usage/autocomplete).
## Fetching bills
Each bill has one or multiple line items, which are the goods or services that the vendor is requesting payment for. The following example fetches all bills for a given end-user, including the line items for each bill.
```ts Fetching all bills with line items
const bills = await conductor.qbd.bill.fetchAll("{{END_USER_ID}}", {
IncludeLineItems: true,
});
```
## Creating bills
To create a bill in QuickBooks Desktop, you either need the identifiers (e.g., `ListID`) of the required associated objects, or you must create the associated objects first.
The following example uses mock data to create a bill in QuickBooks Desktop, which also requires creating a mock vendor, account, and service-item using the `add()` method of each object. The `add()` method returns the created object, which contains the `ListID` identifier to associate the objects with each other.
```ts Creating a bill
const END_USER_ID = "{{END_USER_ID}}";
// Use unique names for mock objects because QBD requires each to be unique.
const UNIQUE_SUFFIX = Math.random().toFixed(6);
const vendor = await conductor.qbd.vendor.add(END_USER_ID, {
Name: `Test Vendor ${UNIQUE_SUFFIX}`,
});
// A bill cannot be empty, so we must create an item to add to the bill,
// and every item requires an account, which we must create first.
const incomeAccount = await conductor.qbd.account.add(END_USER_ID, {
Name: `Test Income Account ${UNIQUE_SUFFIX}`,
AccountType: "Income",
});
// Create a service-item for the invoice with the account we just created.
const serviceItem = await conductor.qbd.itemService.add(END_USER_ID, {
Name: `Construction Work ${UNIQUE_SUFFIX}`,
SalesOrPurchase: {
Price: "100.00",
AccountRef: {
ListID: incomeAccount.ListID,
},
},
});
const bill = await conductor.qbd.bill.add(END_USER_ID, {
VendorRef: {
ListID: vendor.ListID,
},
ItemLineAdd: [
{
ItemRef: {
ListID: serviceItem.ListID,
},
Amount: "100.00",
Quantity: 1,
},
],
});
```
```json Example bill object from QBD
{
"TxnID": "ABC-1234567890",
"TxnNumber": 123,
"TxnDate": "2024-05-01",
"DueDate": "2024-05-15",
"TimeCreated": "2024-05-01T09:30:00+05:30",
"TimeModified": "2024-05-01T09:30:00+05:30",
"EditSequence": "9876543210",
"VendorRef": {
"ListID": "8000000A-1234567890",
"FullName": "Acme Inc."
},
"APAccountRef": {
"ListID": "8000000B-1234567890",
"FullName": "Accounts Payable"
},
"LinkedTxn": {
"TxnID": "XYZ-0987654321",
"TxnType": "PurchaseOrder",
"TxnDate": "2024-04-25",
"RefNumber": "PO-12345",
"LinkType": "QUANTYPE",
"Amount": "0.00"
},
"AmountDue": "5000.00",
"OpenAmount": "5000.00",
"IsPaid": false,
"ItemLineRet": [
{
"TxnLineID": "1A1-1234567890",
"ItemRef": {
"ListID": "8000000C-1234567890",
"FullName": "Widget A"
},
"Quantity": 10,
"Cost": "250.00",
"Amount": "2500.00"
},
{
"TxnLineID": "1A2-1234567890",
"ItemRef": {
"ListID": "8000000D-1234567890",
"FullName": "Widget B"
},
"Quantity": 5,
"Cost": "300.00",
"Amount": "1500.00"
},
{
"TxnLineID": "1A3-1234567890",
"ItemRef": {
"ListID": "8000000E-1234567890",
"FullName": "Widget C"
},
"Quantity": 2,
"Cost": "500.00",
"Amount": "1000.00"
}
]
}
```
# Inventory items
Source: https://docs.conductor.is/qbd-examples/inventory
export const pluralObjectName_0 = "inventory items"
In QuickBooks Desktop, an inventory item is any merchandise or part that a business purchases, tracks as inventory, and then resells. In QuickBooks, information about an inventory item is grouped into three categories:
1. **Purchase Information**: `PurchaseDesc`, `PurchaseCost`, `COGSAccountRef`, and `PrefVendorRef`.
2. **Sales Information**: `SalesDesc`, `SalesPrice`, and `SalesTaxCodeRef`.
3. **Inventory Information**: `AssetAccountRef`, `ReorderPoint`, `QuantityOnHand`, `TotalValue`, and `InventoryDate`.
To see all of the **request parameters and response fields** for
{pluralObjectName_0}, check out our client library's [amazing
autocomplete](/usage/autocomplete).
In addition to the inventory item operations documented herein, **Conductor can fetch, create, and update every other inventory-related QuickBooks Desktop data type**:
* Inventory assembly items
* Inventory transfers
* Inventory adjustments
* Inventory sites
We will document these data types in the future. In the meantime, contact us if you need help with them.
## Fetching inventory items
It is quite simple to fetch inventory items. There are many optional request parameters you can use to filter the results.
```ts Fetching all inventory items
const inventoryItems =
await conductor.qbd.itemInventory.query("{{END_USER_ID}}");
```
```ts Fetching all inventory items with a filter
const inventoryItems = await conductor.qbd.itemInventory.query(
"{{END_USER_ID}}",
{
NameFilter: {
MatchCriterion: "StartsWith",
Name: "Test Inventory Items",
},
},
);
```
## Creating inventory items
Creating vendors is also quite simple. There are many optional request parameters available, but the only required one is `Name`.
```ts Creating an inventory item
const END_USER_ID = "{{END_USER_ID}}";
// Use unique names for mock objects because QBD requires each to be unique.
const UNIQUE_SUFFIX = Math.random().toFixed(6);
// An inventory item requires an income account, asset account, and a COGS
// account. These will usually already exist for an end-user, but we create
// mock accounts below for this example:
const incomeAccount = await client.qbd.account.add(END_USER_ID, {
Name: `Test Income Account ${UNIQUE_SUFFIX}`,
AccountType: "Income",
});
const assetAccount = await client.qbd.account.add(END_USER_ID, {
Name: `Test Asset Account ${UNIQUE_SUFFIX}`,
AccountType: "FixedAsset",
});
const cogsAccount = await client.qbd.account.add(END_USER_ID, {
Name: `Test COGS Account ${UNIQUE_SUFFIX}`,
AccountType: "CostOfGoodsSold",
});
const inventoryItem = await client.qbd.itemInventory.add(END_USER_ID, {
Name: `Test Inventory Item ${UNIQUE_SUFFIX}`,
IncomeAccountRef: {
ListID: incomeAccount.ListID,
},
AssetAccountRef: {
ListID: assetAccount.ListID,
},
COGSAccountRef: {
ListID: cogsAccount.ListID,
},
PurchaseCost: "50.00",
SalesPrice: "100.00",
});
```
```json Example inventory item object from QBD
{
"ListID": "800012AB-1234567890",
"Name": "MS-EX-ITEM",
"FullName": "MS-EX-ITEM",
"ManufacturerPartNumber": "EXITEM123",
"IsActive": true,
"Sublevel": 0,
"QuantityOnHand": 100,
"QuantityOnOrder": 50,
"QuantityOnSalesOrder": 75,
"PurchaseCost": "50.00",
"AverageCost": "48.50",
"SalesPrice": "99.99",
"PurchaseDesc": "EXAMPLE ITEM PURCHASE DESCRIPTION",
"SalesDesc": "EXAMPLE ITEM SALES DESCRIPTION",
"ClassRef": {
"ListID": "80000ABC-1234567890",
"FullName": "EXAMPLE CLASS"
},
"UnitOfMeasureSetRef": {
"ListID": "80000XYZ-1234567890",
"FullName": "EACH"
},
"PrefVendorRef": {
"ListID": "80000DEF-1234567890",
"FullName": "EXAMPLE VENDOR"
},
"AssetAccountRef": {
"ListID": "80000JKL-1234567890",
"FullName": "Inventory Asset"
},
"COGSAccountRef": {
"ListID": "80000MNO-1234567890",
"FullName": "Cost of Goods Sold"
},
"IncomeAccountRef": {
"ListID": "80000PQR-1234567890",
"FullName": "Sales"
},
"SalesTaxCodeRef": {
"ListID": "80000GHI-1234567890",
"FullName": "EXAMPLE TAX CODE"
},
"EditSequence": "1234567890",
"TimeCreated": "2024-05-01T09:30:00-05:00",
"TimeModified": "2024-05-02T14:45:30-05:00"
}
```
# Invoices
Source: https://docs.conductor.is/qbd-examples/invoices
export const pluralObjectName_0 = "invoices"
An **invoice** in QuickBooks Desktop records the amount owed by a customer who purchased goods or services but did not pay in full at the time of the sale. If full payment is received at the time of the sale, it is recorded as a [sales receipt](/qbd-examples/sales-receipts), not an invoice.
To see all of the **request parameters and response fields** for
{pluralObjectName_0}, check out our client library's [amazing
autocomplete](/usage/autocomplete).
## Fetching invoices
Each invoice in QuickBooks Desktop has several line items, which you would typically want to include when fetching invoices. The following example does just that:
```ts Fetching all invoices with line items
const invoices = await conductor.qbd.invoice.query("{{END_USER_ID}}", {
IncludeLineItems: true,
});
```
Invoices are also assigned to specific jobs under a customer or to the customer directly when not related to a particular job. The following example fetches all invoices for a specific customer:
```ts Fetching all invoices for a specific customer
const invoices = await conductor.qbd.invoice.query("{{END_USER_ID}}", {
EntityFilter: {
FullName: "Test customer 1234",
},
IncludeLineItems: true,
});
```
Here is an example of fetching invoices modified (or created) after a specific date:
```ts Fetching invoices modified after a specific date
const invoices = await conductor.qbd.invoice.query("{{END_USER_ID}}", {
ModifiedDateRangeFilter: {
FromModifiedDate: "2024-04-01",
},
IncludeLineItems: true,
});
```
## Creating invoices
An invoice is a complex object with many associated objects. To create an invoice from scratch, you either need the identifiers (e.g., `ListID`) of the required associated objects, or you must create the associated objects first.
The following example uses mock data to create an invoice in QuickBooks Desktop, which also requires creating a mock customer, account, and service-item using the `add()` method of each object. The `add()` method returns the created object, which contains the `ListID` identifier to associate the objects with each other.
```ts Creating an invoice
const END_USER_ID = "{{END_USER_ID}}";
// Use unique names for mock objects because QBD requires each to be unique.
const UNIQUE_SUFFIX = Math.random().toFixed(6);
const customer = await conductor.qbd.customer.add(END_USER_ID, {
Name: `Test customer ${UNIQUE_SUFFIX}`,
});
// An invoice cannot be empty, so we must create an item to add to the invoice,
// and every item requires an account, which we must create first.
const account = await conductor.qbd.account.add(END_USER_ID, {
Name: `Test income account ${UNIQUE_SUFFIX}`,
AccountType: "Income",
});
// Create a service-item for the invoice with the account we just created.
const serviceItem = await conductor.qbd.itemService.add(END_USER_ID, {
Name: `Construction work ${UNIQUE_SUFFIX}`,
SalesOrPurchase: {
Price: "100.00",
AccountRef: {
ListID: account.ListID,
},
},
});
const invoice = await conductor.qbd.invoice.add(END_USER_ID, {
CustomerRef: {
ListID: customer.ListID,
},
TxnDate: "2021-09-01",
InvoiceLineAdd: [
{
Amount: "100.00",
ItemRef: {
ListID: serviceItem.ListID,
},
},
],
});
```
## Updating invoices and line-items
To modify existing line-items or add line-items to an invoice, QuickBooks Desktop requires that you include all unmodified line-items in the update request, even the ones you do not want to change. Otherwise, QuickBooks Desktop will remove the line-items you did not include in the update request. Hence, we recommend you first query the invoice you want to update, then update that invoice with the new line-items you want to add or modify while including all the existing line-items returned from the query.
```ts Updating an invoice by adding a new line-item
const END_USER_ID = "{{END_USER_ID}}";
const newInvoice = await conductor.qbd.invoice.add(END_USER_ID, {
CustomerRef: {
FullName: "Test Customer",
},
Memo: "New invoice",
InvoiceLineAdd: [
{
ItemRef: {
FullName: "Test Item",
},
Desc: "First line item",
Amount: "100.00",
},
{
ItemRef: {
FullName: "Test Item",
},
Desc: "Second line item",
Amount: "200.00",
},
],
});
const updatedInvoice = await conductor.qbd.invoice.mod(END_USER_ID, {
TxnID: newInvoice.TxnID,
// `EditSequence` from the original object is required to update
// any QuickBooks Desktop object.
EditSequence: newInvoice.EditSequence,
Memo: "Updated invoice",
InvoiceLineMod: [
// QuickBooks Desktop requires that you re-include the
// existing line items in the request. Otherwise, it will
// remove them from the invoice.
...newInvoice.InvoiceLineRet,
{
ItemRef: {
ListID: inventoryItems[0].ListID,
},
Desc: "Item 3",
// Set `TxnLineID` to -1 to add a new line item.
TxnLineID: "-1",
},
],
});
```
```json Example invoice object from QBD
{
"TxnID": "ABC123-9876543210",
"TxnNumber": 2345,
"RefNumber": "INV-2345",
"TxnDate": "2024-05-01",
"TimeCreated": "2024-05-01T09:30:00+00:00",
"TimeModified": "2024-05-01T09:45:00+00:00",
"EditSequence": "9876543210",
"CustomerRef": {
"ListID": "100000-1234567890",
"FullName": "John Doe"
},
"ARAccountRef": {
"ListID": "200000-1234567890",
"FullName": "Accounts Receivable"
},
"TemplateRef": {
"ListID": "300000-1234567890",
"FullName": "Standard Invoice Template"
},
"ItemSalesTaxRef": {
"ListID": "400000-1234567890",
"FullName": "State Sales Tax"
},
"CustomerSalesTaxCodeRef": {
"ListID": "500000-1234567890",
"FullName": "Standard Tax Code"
},
"ShipMethodRef": {
"ListID": "600000-1234567890",
"FullName": "FedEx Ground"
},
"Subtotal": "1000.00",
"SalesTaxTotal": "80.00",
"SalesTaxPercentage": 8.0,
"AppliedAmount": "500.00",
"BalanceRemaining": "580.00",
"DueDate": "2024-06-01",
"ShipDate": "2024-05-03",
"IsPaid": false,
"IsPending": true,
"IsFinanceCharge": false,
"IsToBeEmailed": true,
"IsToBePrinted": false,
"InvoiceLineRet": [
{
"TxnLineID": "LI1-9876543210",
"ItemRef": {
"ListID": "700000-1234567890",
"FullName": "Product A"
},
"Desc": "Product A description",
"Quantity": 10,
"Rate": "100.00",
"Amount": "1000.00",
"SalesTaxCodeRef": {
"ListID": "500000-1234567890",
"FullName": "Standard Tax Code"
}
},
{
"TxnLineID": "LI2-9876543210",
"ItemRef": {
"ListID": "800000-1234567890",
"FullName": "Discount"
},
"Desc": "10% discount",
"RatePercent": -10,
"Amount": "-100.00"
},
{
"TxnLineID": "LI3-9876543210",
"ItemRef": {
"ListID": "900000-1234567890",
"FullName": "Subtotal"
},
"Desc": "Subtotal",
"Amount": "900.00"
}
]
}
```
# Jobs and customers
Source: https://docs.conductor.is/qbd-examples/jobs-and-customers
Understanding the relationship between customers and jobs in QuickBooks Desktop.
export const pluralObjectName_0 = "customers"
## Overview
In QuickBooks Desktop, both "customers" and "jobs" are represented as `Customer` objects. Jobs are considered a subset of customers and cannot be queried separately. This data model is a quirk of QuickBooks Desktop and is outside of Conductor's control.
## Differences between jobs and customers
A job in QuickBooks Desktop differs from a customer in the following ways:
1. **ParentRef**: A job has a `ParentRef` property that points to the parent customer.
2. **FullName**: A job's `FullName` property is the concatenation of the parent customer's `FullName` and the job's Name.
* Example: If the parent customer's `FullName` is `"Annie's Alligators"` and the job's Name is `"Swamp"`, the job's `FullName` will be `"Annie's Alligators:Swamp"`.
3. **Sublevel**: A job has a `Sublevel` property set to `1`, while the parent customer's `Sublevel` property is set to `0`.
## Querying customers and jobs
To fetch all customers and jobs for a given end-user, use the following query:
```ts Fetching all customers and jobs
const customersAndJobs = await conductor.qbd.customer.query("{{END_USER_ID}}");
```
If you're looking for a specific job in QuickBooks Desktop, you must query for
the customer and then filter the results to find the job.
To see all of the **request parameters and response fields** for
{pluralObjectName_0}, check out our client library's [amazing
autocomplete](/usage/autocomplete).
## Fetching objects related to customers' jobs
Some objects in QuickBooks Desktop, such as SalesOrders, are associated with a customer's job instead of directly with the customer. In these cases, querying using the `EntityFilter.ListID` parameter set to a customer's `ListID` will return no results.
To fetch objects related to a customer's jobs, use the `EntityFilter.ListIDWithChildren` parameter with the customer's `ListID`. This will return the objects corresponding to all of the customer's jobs. For example:
```ts Fetching SalesOrders for all jobs of a customer
const salesOrders = await conductor.qbd.salesOrder.query("{{END_USER_ID}}", {
EntityFilter: {
// The `ListID` of the customer whose jobs' SalesOrders you want to fetch.
ListIDWithChildren: "800000AB-1234567890",
},
});
```
By using the `ListIDWithChildren` parameter, you can effectively query for objects related to a customer's jobs without having to query for each job individually.
```json Example customer object from QBD
{
"ListID": "800000AB-1234567890",
"Name": "SUNNY GARDENS INC.",
"FullName": "SUNNY GARDENS INC.",
"CompanyName": "SUNNY GARDENS INC.",
"Phone": "555-987-6543",
"AltPhone": "800-246-1357",
"Fax": "555-123-4567",
"Email": "info@sunnygardens.com",
"IsActive": true,
"Balance": "5678.92",
"TotalBalance": "5678.92",
"TimeCreated": "2021-09-15T14:30:00-05:00",
"TimeModified": "2023-09-01T09:45:12-05:00",
"EditSequence": "1987654321",
"CustomerTypeRef": {
"ListID": "8000000F-1234567890",
"FullName": "Wholesale"
},
"PriceLevelRef": {
"ListID": "80000003-1234567890",
"FullName": "WHOLESALE PRICE LEVEL LIST"
},
"SalesTaxCodeRef": {
"ListID": "80000003-1234567890",
"FullName": "Taxable"
},
"TermsRef": {
"ListID": "80000007-1234567890",
"FullName": "Net 60"
},
"BillAddress": {
"Addr1": "SUNNY GARDENS INC.",
"Addr2": "4321 MAIN STREET",
"City": "SPRINGFIELD, IL 62701 US, IL 62",
"State": "IL 62701 US"
},
"BillAddressBlock": {
"Addr1": "SUNNY GARDENS INC.",
"Addr2": "4321 MAIN STREET",
"Addr3": "SPRINGFIELD, IL 62701 US, IL 62701"
},
"ShipAddress": {
"Addr1": "SUNNY GARDENS INC.",
"Addr2": "4321 MAIN STREET",
"City": "SPRINGFIELD",
"State": "IL",
"PostalCode": "62701",
"Country": "United States"
},
"ShipAddressBlock": {
"Addr1": "SUNNY GARDENS INC.",
"Addr2": "4321 MAIN STREET",
"Addr3": "SPRINGFIELD, IL 62701",
"Addr4": "United States"
},
"Sublevel": 0,
"JobStatus": "None",
"Notes": "John Smith - Owner\\nMary Smith - Manager"
}
```
```json Example "job" for the customer above
{
"ListID": "8000000D-1987654321",
"TimeCreated": "2022-03-01T10:15:00-05:00",
"TimeModified": "2023-09-01T14:30:00-05:00",
"EditSequence": 1987654322,
"Name": "Spring Planting",
// For jobs, `FullName` is the concatenation of the
// parent customer's `FullName` and the job's `Name`.
"FullName": "SUNNY GARDENS INC.:Spring Planting",
"IsActive": true,
// `ParentRef` only exists for jobs and points to
// the parent customer object.
"ParentRef": {
"ListID": "800000AB-1234567890",
"FullName": "SUNNY GARDENS INC."
},
"Sublevel": 1,
"Balance": 1234.56,
"TotalBalance": 1234.56,
"JobStatus": "In Progress",
"PreferredDeliveryMethod": "Email",
"StartDate": "2022-03-15",
"ProjectedEndDate": "2022-05-31",
"JobTypeRef": {
"ListID": "8000000G-1987654321",
"FullName": "Landscaping"
},
"JobDescription": "Annual spring planting and garden setup for Sunny Gardens Inc.",
"PrimaryContactRef": {
"ListID": "8000000H-1987654321",
"FullName": "Mary Smith"
}
}
```
# Refunds
Source: https://docs.conductor.is/qbd-examples/refunds
This guide covers how to implement refunds using Conductor's QuickBooks Desktop API. We'll cover two main scenarios:
1. Invoice-based refunds (full or partial)
2. Custom refunds (not linked to any invoice)
## Invoice-based refund
For invoice-based refunds, you will create a credit memo and then apply it to the relevant invoice using a receive payment transaction to reduce the outstanding balance.
### Step 1: Create the credit memo
First, create a credit memo for the customer for the amount you wish to refund. This credit memo can be for the full or partial amount of the invoice.
Here's an example of how to create a credit memo:
```typescript
const creditMemo = await conductor.qbd.creditMemo.add("{{END_USER_ID}}", {
CustomerRef: {
ListID: "customer_list_id", // Customer's ListID from the original invoice
},
TxnDate: "2024-10-23", // Current date
RefNumber: "REFUND-123", // Optional: Your reference number
Memo: "Refund for Invoice INV-001", // Add a memo for reference
CreditMemoLineAdd: [
{
ItemRef: {
ListID: "item_list_id", // Original item from the invoice
},
Desc: "Refund for Invoice #123",
Quantity: 1, // Quantity being refunded
Amount: "50.00", // Amount being refunded for the item
},
],
});
```
### Step 2: Apply the credit memo to the invoice
Next, apply the credit memo to the outstanding invoice using a receive payment request. This will reduce the balance of the invoice by the credit amount.
Here's an example of how to apply the credit:
```typescript
const receivePayment = await conductor.qbd.receivePayment.add(
"{{END_USER_ID}}",
{
CustomerRef: {
ListID: "customer_list_id", // Must match the customer from credit memo
},
TotalAmount: "0.00", // No new payment being received
Memo: "Applying credit memo to invoice",
AppliedToTxnAdd: {
TxnID: "original_invoice_txn_id", // Original invoice's TxnID
PaymentAmount: "0.00", // No payment being made
SetCredit: {
CreditTxnID: creditMemo.TxnID, // TxnID from the credit memo we just created
AppliedAmount: "50.00", // Amount of credit to apply
},
},
},
);
```
## Custom refund (not linked to any invoice)
For a custom refund not linked to any specific invoice, simply create a credit memo to record the amount owed to the customer.
Here's an example of how to create a custom credit memo:
```typescript
const standaloneCreditMemo = await conductor.qbd.creditMemo.add(
"{{END_USER_ID}}",
{
CustomerRef: {
ListID: "customer_list_id", // Required: Customer's ListID
},
TxnDate: "2024-10-23", // Current date
RefNumber: "REFUND-124", // Optional: Your reference number
Memo: "Goodwill refund",
CreditMemoLineAdd: [
{
ItemRef: {
ListID: "refund_item_list_id", // Use a specific item for refunds
},
Desc: "Customer satisfaction refund",
Amount: "75.00", // Refund amount
},
],
},
);
```
## Common scenarios
### Partial refund
Modify the `CreditMemoLineAdd.Amount` to match the partial refund amount:
```typescript
CreditMemoLineAdd: [
{
ItemRef: { ListID: "item_list_id" },
Desc: "Partial refund - 50%",
Amount: "25.00", // Half of the original amount
},
];
```
### Multiple item refund
Use multiple `CreditMemoLineAdd` entries:
```typescript
CreditMemoLineAdd: [
{
ItemRef: { ListID: "item1_list_id" },
Desc: "Refund - Item 1",
Amount: "30.00",
},
{
ItemRef: { ListID: "item2_list_id" },
Desc: "Refund - Item 2",
Amount: "20.00",
},
];
```
# Sales receipts
Source: https://docs.conductor.is/qbd-examples/sales-receipts
export const pluralObjectName_0 = "sales receipts"
A **sales receipt** in QuickBooks Desktop is a record of a sale to a customer, such as a payment by cash, check, or credit card. Each sales receipt has several line items, which are the products or services sold.
To see all of the **request parameters and response fields** for
{pluralObjectName_0}, check out our client library's [amazing
autocomplete](/usage/autocomplete).
## Fetching sales receipts
The following example fetches all sales receipts for the specified end-user, including the line items:
```ts Fetching all sales receipts with line items
const salesReceipts = await conductor.qbd.salesReceipt.query(
"{{END_USER_ID}}",
{ IncludeLineItems: true },
);
```
## Creating sales receipts
To create a sales receipt in QuickBooks Desktop from scratch, you either need the identifiers (e.g., `ListID`) of the required associated objects, or you must create the associated objects first.
The following example uses mock data to create a sales receipt in QuickBooks Desktop, which also requires creating a mock customer, account, and service-item using the `add()` method of each object. The `add()` method returns the created object, which contains the `ListID` identifier to associate the objects with each other.
```ts Creating a sales receipt
const END_USER_ID = "{{END_USER_ID}}";
// Use unique names for mock objects because QBD requires each to be unique.
const UNIQUE_SUFFIX = Math.random().toFixed(6);
const customer = await conductor.qbd.customer.add(END_USER_ID, {
Name: `Test Customer ${UNIQUE_SUFFIX}`,
});
// A sales receipt cannot be empty, so we must create an item to add to the
// sales receipt, and every item requires an account, which we create first.
const account = await conductor.qbd.account.add(END_USER_ID, {
Name: `Test Income Account ${UNIQUE_SUFFIX}`,
AccountType: "Income",
});
// Create a service-item for the sales receipt with the account we just created.
const serviceItem = await conductor.qbd.itemService.add(END_USER_ID, {
Name: `Construction Work ${UNIQUE_SUFFIX}`,
SalesOrPurchase: {
Price: "100.00",
AccountRef: {
ListID: account.ListID,
},
},
});
const salesReceipt = await conductor.qbd.salesReceipt.add(END_USER_ID, {
CustomerRef: {
ListID: customer.ListID,
},
SalesReceiptLineAdd: [
{
Quantity: 5,
ItemRef: {
ListID: serviceItem.ListID,
},
},
],
});
```
```json Example sales receipt object from QBD
{
"TxnID": "1234-5678901234",
"TxnNumber": 1000,
"TxnDate": "2024-05-01",
"RefNumber": "11",
"CustomerRef": {
"ListID": "1234567890",
"FullName": "John Doe"
},
"Subtotal": "1000.00",
"SalesTaxTotal": "80.00",
"TotalAmount": "1080.00",
"DepositToAccountRef": {
"ListID": "9876543210",
"FullName": "Checking Account"
},
"ClassRef": {
"ListID": "1122334455",
"FullName": "Online Sales"
},
"TemplateRef": {
"ListID": "5544332211",
"FullName": "Standard Sales Receipt"
},
"BillAddress": {
"Addr1": "123 Main St"
},
"BillAddressBlock": {
"Addr1": "123 Main St"
},
"ShipDate": "2024-05-02",
"DueDate": "2024-05-15",
"SalesTaxPercentage": 8.0,
"IsPending": false,
"IsToBeEmailed": true,
"IsToBePrinted": false,
"EditSequence": "1683057600",
"TimeCreated": "2024-05-01T09:30:00-04:00",
"TimeModified": "2024-05-01T09:45:00-04:00",
"SalesReceiptLineRet": {
"TxnLineID": "4E3-1703630162",
"ItemRef": {
"ListID": "80000035-1703630156",
"FullName": "Construction Work"
},
"Quantity": 5,
"Rate": 100,
"Amount": 500,
"SalesTaxCodeRef": {
"ListID": "80000002-1692738438",
"FullName": "Non"
}
}
}
```
# Node.js / TypeScript for QuickBooks Desktop
Source: https://docs.conductor.is/qbd/api
Execute real-time requests for *any* QuickBooks Desktop object type with fully-typed requests and responses.
## Accessing QuickBooks Desktop through Conductor
With Conductor, you can read, create, or update *any* QuickBooks Desktop object type. Every operation is available through a single, consistent interface vis `conductor.qbd.*`.
We recommend using Conductor's [amazing autocomplete](/usage/autocomplete) to
discover the available operations, parameters, and responses fields.
For example:
```ts Fetch all invoices with line items
const invoices = await conductor.qbd.invoice.query("{{END_USER_ID}}", {
IncludeLineItems: true,
});
```
```ts Create an invoice
const newInvoice = await conductor.qbd.invoice.add("{{END_USER_ID}}", {
CustomerRef: {
FullName: "Acme Inc.",
},
TxnDate: "2024-01-12",
Memo: "Customer invoice for Jan 1 - 7",
InvoiceLineAdd: [
{
Amount: "100.00",
ItemRef: {
FullName: "Consulting",
},
},
],
});
```
```ts Update an invoice
const updatedInvoice = await conductor.qbd.invoice.mod("{{END_USER_ID}}", {
TxnID: "1234-ABCD",
EditSequence: "1234-ABCD",
DueDate: "2024-01-19",
InvoiceLineMod: {
TxnLineID: "1234-ABCD",
ItemRef: {
FullName: "Consulting",
},
Amount: "200.00",
},
});
```
### Supported object types
Conductor supports the following QuickBooks Desktop object types and operations. Alternatively, see [QuickBooks Desktop's official API Reference](https://developer.intuit.com/app/developer/qbdesktop/docs/api-reference/qbdesktop) to explore the operations available for each object type.
| Object | Read | Create | Update |
| --------------------- | :--: | :----: | :----: |
| Account | ✔ | ✔ | ✔ |
| AgingReport | ✔ | | |
| Bill | ✔ | ✔ | ✔ |
| BillPaymentCheck | ✔ | ✔ | ✔ |
| BillPaymentCreditCard | ✔ | ✔ | |
| BillingRate | ✔ | ✔ | |
| BudgetSummaryReport | ✔ | | |
| BuildAssembly | ✔ | ✔ | ✔ |
| Charge | ✔ | ✔ | ✔ |
| Check | ✔ | ✔ | ✔ |
| Class | ✔ | ✔ | ✔ |
| Company | ✔ | | |
| CreditCardCharge | ✔ | ✔ | ✔ |
| CreditCardCredit | ✔ | ✔ | ✔ |
| CreditMemo | ✔ | ✔ | ✔ |
| Currency | ✔ | ✔ | ✔ |
| CustomDetailReport | ✔ | | |
| CustomSummaryReport | ✔ | | |
| Customer | ✔ | ✔ | ✔ |
| CustomerType | ✔ | ✔ | |
| DataExt | | ✔ | ✔ |
| DateDrivenTerms | ✔ | ✔ | |
| Deposit | ✔ | ✔ | ✔ |
| Employee | ✔ | ✔ | ✔ |
| Estimate | ✔ | ✔ | ✔ |
| GeneralDetailReport | ✔ | | |
| GeneralSummaryReport | ✔ | | |
| InventoryAdjustment | ✔ | ✔ | ✔ |
| InventorySite | ✔ | ✔ | ✔ |
| Invoice | ✔ | ✔ | ✔ |
| ItemDiscount | ✔ | ✔ | ✔ |
| ItemFixedAsset | ✔ | ✔ | ✔ |
| ItemGroup | ✔ | ✔ | ✔ |
| ItemInventory | ✔ | ✔ | ✔ |
| ItemInventoryAssembly | ✔ | ✔ | ✔ |
| ItemNonInventory | ✔ | ✔ | ✔ |
| ItemOtherCharge | ✔ | ✔ | ✔ |
| ItemPayment | ✔ | ✔ | ✔ |
| ItemReceipt | ✔ | ✔ | ✔ |
| ItemSalesTax | ✔ | ✔ | ✔ |
| ItemSalesTaxGroup | ✔ | ✔ | ✔ |
| ItemService | ✔ | ✔ | ✔ |
| ItemSites | ✔ | | |
| ItemSubtotal | ✔ | ✔ | ✔ |
| JobReport | ✔ | | |
| JobType | ✔ | ✔ | |
| JournalEntry | ✔ | ✔ | ✔ |
| Lead | ✔ | ✔ | ✔ |
| ListDeleted | ✔ | | |
| OtherName | ✔ | ✔ | ✔ |
| PaymentMethod | ✔ | ✔ | |
| PayrollDetailReport | ✔ | | |
| PayrollItemWage | ✔ | ✔ | |
| PayrollSummaryReport | ✔ | | |
| PriceLevel | ✔ | ✔ | ✔ |
| PurchaseOrder | ✔ | ✔ | ✔ |
| ReceivePayment | ✔ | ✔ | ✔ |
| SalesOrder | ✔ | ✔ | ✔ |
| SalesReceipt | ✔ | ✔ | ✔ |
| SalesRep | ✔ | ✔ | ✔ |
| SalesTaxCode | ✔ | ✔ | ✔ |
| SalesTaxPaymentCheck | ✔ | ✔ | ✔ |
| StandardTerms | ✔ | ✔ | |
| TimeReport | ✔ | | |
| TimeTracking | ✔ | ✔ | ✔ |
| Transaction | ✔ | | |
| Transfer | ✔ | ✔ | ✔ |
| TransferInventory | ✔ | ✔ | ✔ |
| TxnDeleted | ✔ | | |
| Vehicle | ✔ | ✔ | ✔ |
| VehicleMileage | ✔ | ✔ | |
| Vendor | ✔ | ✔ | ✔ |
| VendorCredit | ✔ | ✔ | ✔ |
| VendorType | ✔ | ✔ | |
| WorkersCompCode | ✔ | ✔ | ✔ |
## TypeScript for QuickBooks Desktop
In the Conductor Node.js library, every request parameter and response attribute is fully-typed with inline documentation and will autocomplete in your editor. This makes it easy to explore the API and write code that works the first time.
If you ever need to access the raw QuickBooks Desktop types, you can import them from `conductor-node` like so:
```ts
import { QbdTypes } from "conductor-node";
const accountAddInput: QbdTypes.AccountAdd = {
Name: "Test Account",
AccountType: "Bank",
OpenBalance: "100",
};
```
# Get a free QuickBooks Desktop developer license
Source: https://docs.conductor.is/qbd/dev-license
Obtain a free Not-For-Resale (NFR) license to use QuickBooks Desktop indefinitely for development and testing with Conductor. Takes 2 minutes.
export const Image = ({src, alt, width, align = "center", noShadow = false, noBorder = false, noZoom = false}) => ;
To develop and test integrations with Conductor, you need your own QuickBooks Desktop instance. If you don't have an existing instance, you can [install the QuickBooks Desktop free trial](/qbd/test-instance). The trial includes all features of the full version but expires after 30 days. To continue using QuickBooks Desktop for development beyond this period, you'll need a free Not-For-Resale (NFR) license. Follow these steps to obtain one:
If you haven't already, follow our guide for [installing the QuickBooks Desktop free trial](/qbd/test-instance).
[Sign up for an Intuit developer account](https://accounts.intuit.com/app/sign-in?start_screen_hint=SignUp) if you don't have one. This account is required to request the NFR license.
1. Go to [Intuit's developer support page](https://help.developer.intuit.com/s/contactsupport).
2. Choose the following options:
* **Product**: QuickBooks Desktop
* **Category**: NFR License
3. Click "Next" to proceed.
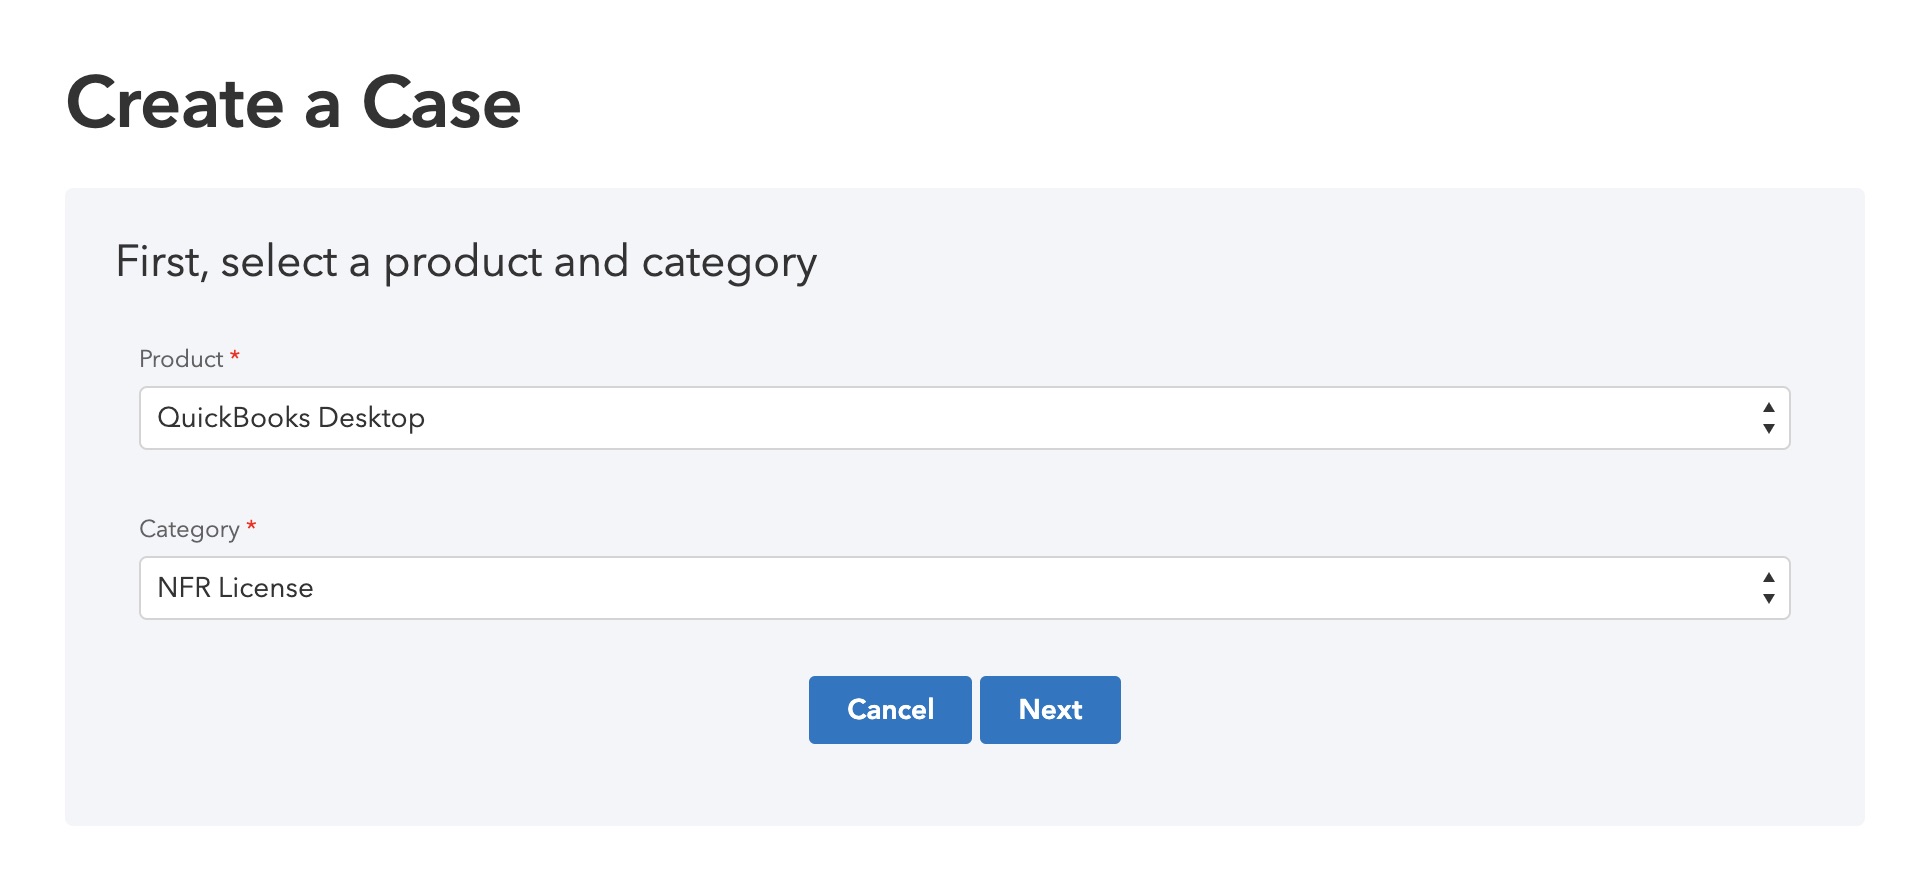
On the next page, specify:
* **Product Year**: 2024 (or the latest available)
* **Product Country**: US
* **Product Version**: QuickBooks Enterprise v24 (or the latest version)
Conductor works identically with all QuickBooks Desktop versions and editions. We recommend the Enterprise edition for development to avoid potential limitations in user count and dataset size.
* **Enable Advanced Inventory?** Yes (Allows testing with the full feature set)
After filling out these details, click "Create Support Ticket".
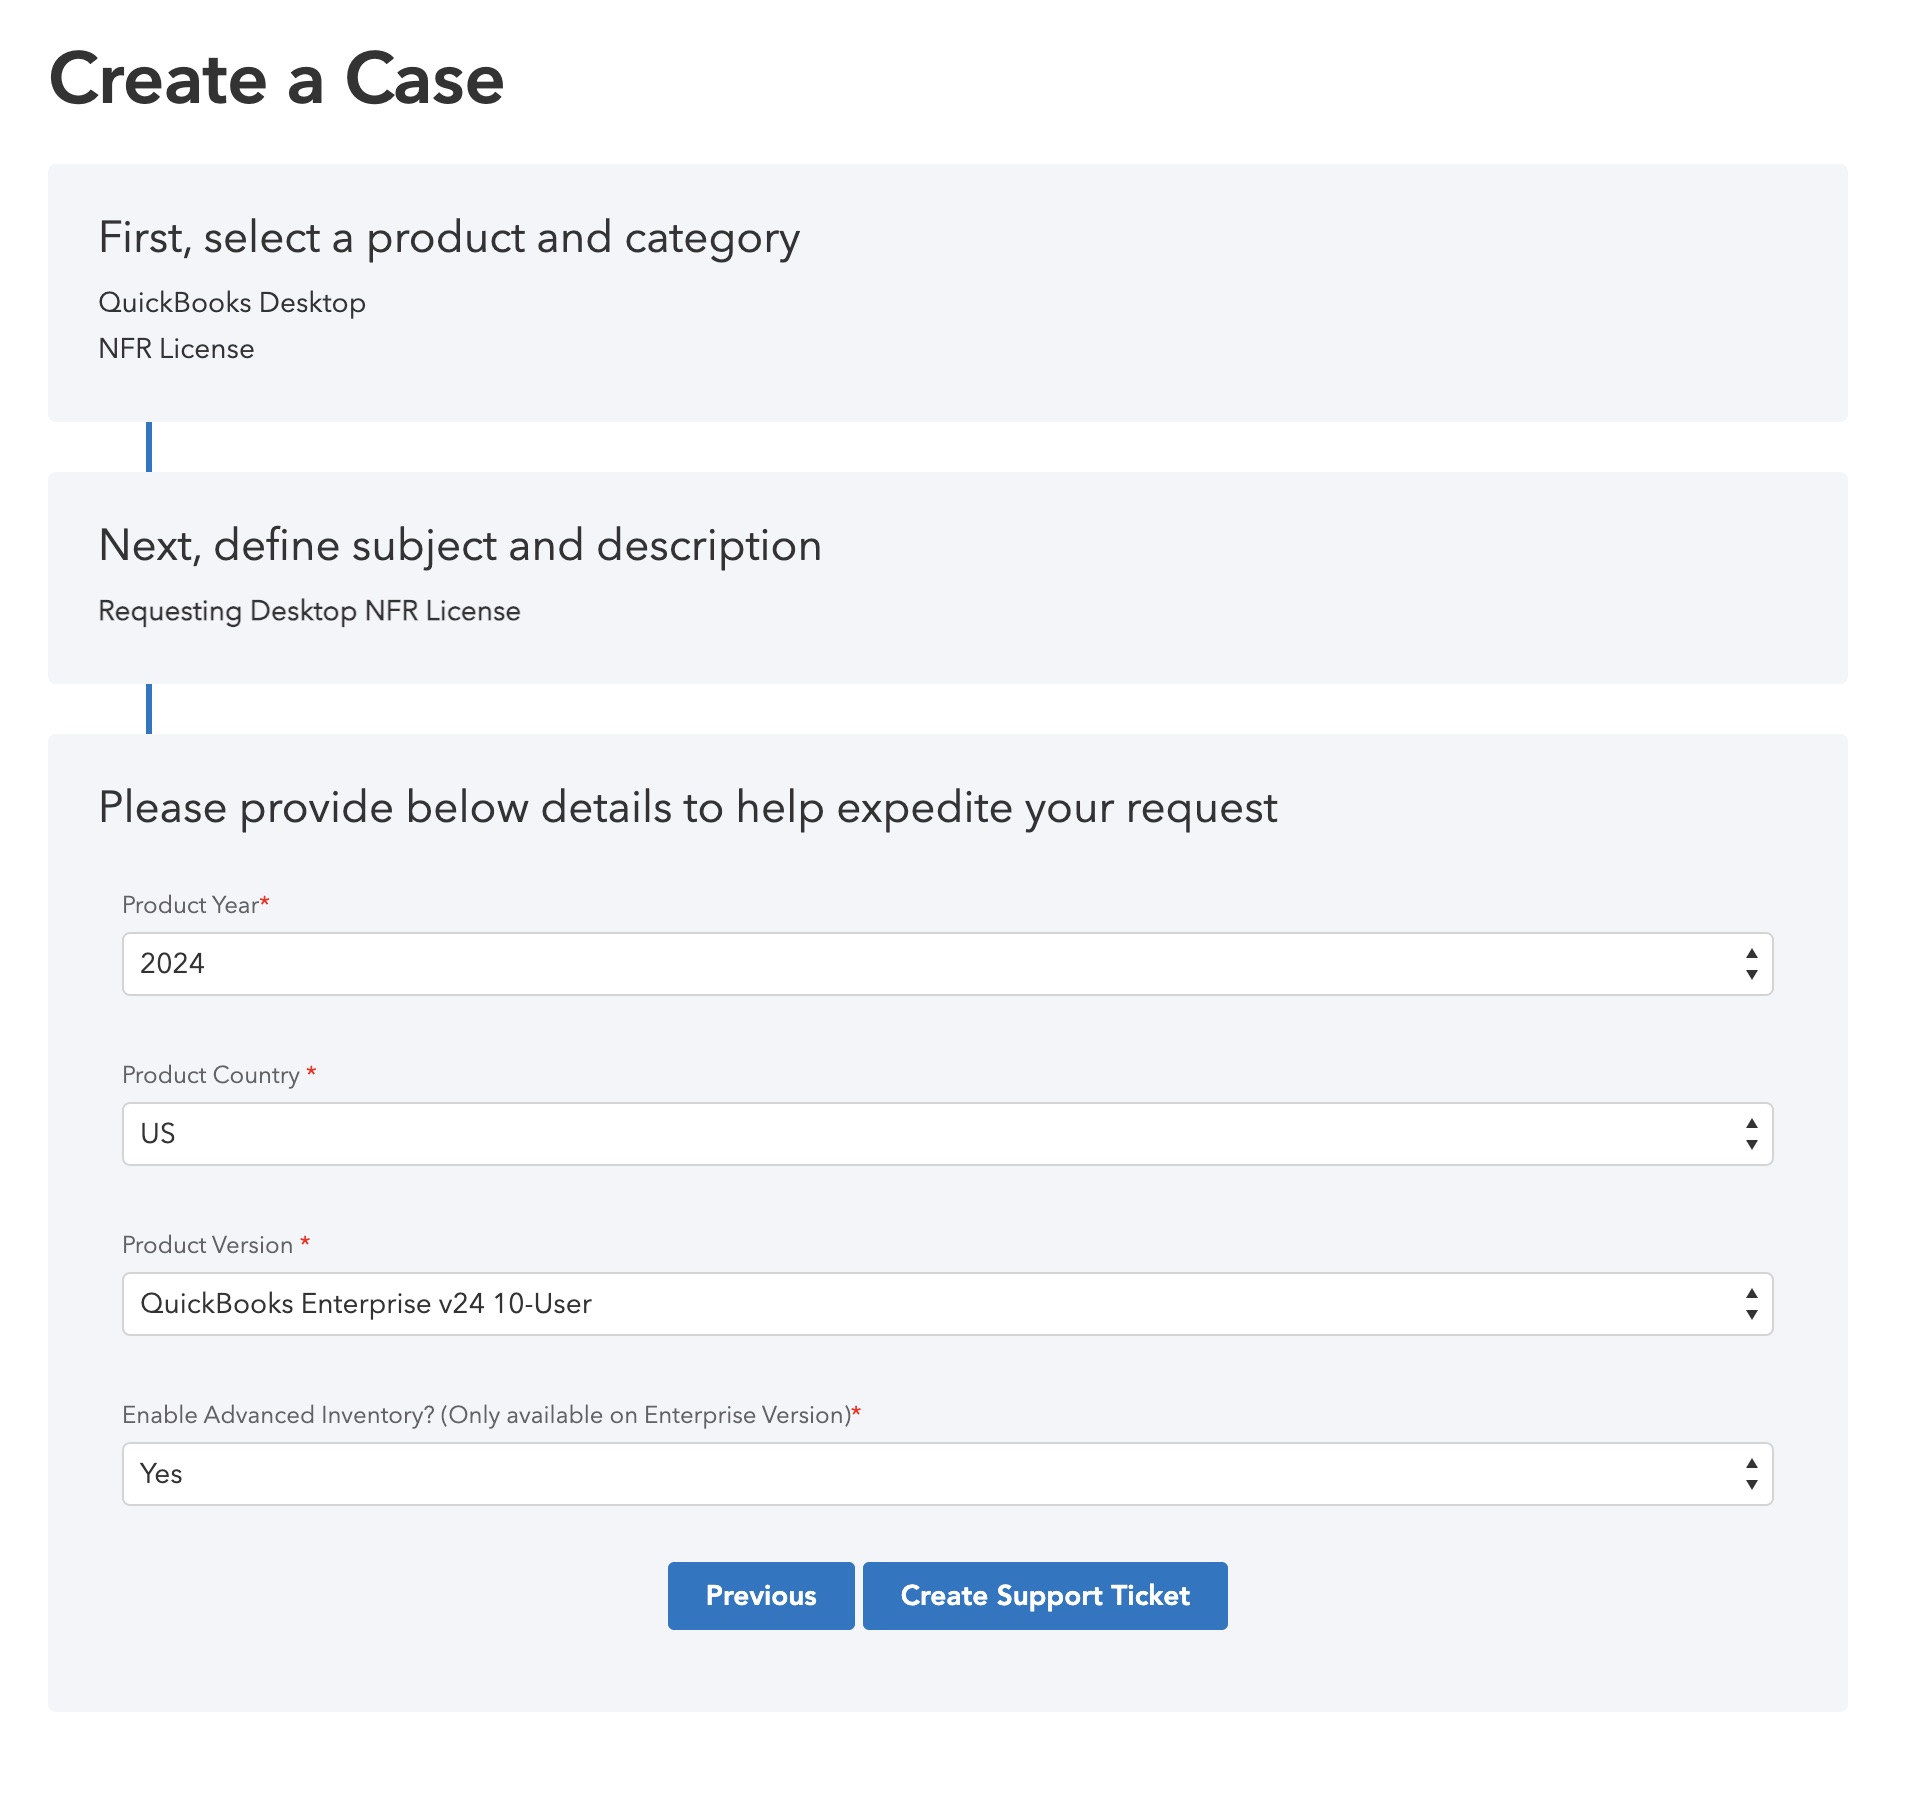
After you click "Create Support Ticket", Intuit will send you a confirmation email. Intuit will send you another email within 24-48 hours with your license key.
Once you have the license key:
1. Open your existing QuickBooks Desktop trial installation.
2. Go to Help > Manage My License > Change Product License.
3. Enter the NFR license key when prompted.
4. Follow any additional on-screen instructions to complete activation.
Your QuickBooks Desktop is now licensed for indefinite use in development and testing with Conductor.
# Mapping your app's objects to QuickBooks Desktop
Source: https://docs.conductor.is/qbd/mapping-objects
How to handle syncing your application's data objects with QuickBooks Desktop objects.
Most complex QuickBooks Desktop (QBD) object types, such as [invoices](/qbd-examples/invoices) and [sales receipts](/qbd-examples/sales-receipts), interact with various related objects. For instance, an invoice may contain multiple line items, with each item linked to a specific QBD inventory item via an ID. **When creating these objects in QBD, you must ensure that all related objects are correctly linked.**
For effective integration, depending on the data type of these related objects and you application requirements, you can either:
1. **Create new QBD objects** and store their IDs in your application's database for future reference.
2. **Map existing QBD objects to corresponding objects in your application** through manual configurations made by users within your application's UI. Consider the following example for inventory items:
1. Fetch all existing QBD inventory items using Conductor's API (e.g., `await conductor.qbd.itemInventory.query()`).
2. Display these QBD items alongside items from your application in the UI.
3. Users can then specify mappings, or opt to create new items in QBD.
4. Record the corresponding QBD item ID in your application's database (e.g., add a **`qbd_item_id`** column to the **`items`** table).
**Important**: The need to map or create objects may vary based on object type
(e.g., some users might prefer mapping existing QBD objects for certain types
while creating new ones for others). Regardless, it is crucial for your
application to store these QBD IDs in its database for all future
interactions, ensuring no duplicate objects are created.
# Create a QuickBooks Desktop test instance
Source: https://docs.conductor.is/qbd/test-instance
Create your own QuickBooks Desktop test instance with an AWS WorkSpace.
export const Image = ({src, alt, width, align = "center", noShadow = false, noBorder = false, noZoom = false}) => ;
To develop and test integrations with Conductor, you need your own QuickBooks Desktop instance to send and receive data. This guide shows you how to set up a QuickBooks Desktop test environment by creating a virtual Windows instance and installing the QuickBooks Desktop free trial. Once set up, you can connect to this QuickBooks Desktop test instance from your local development environment via Conductor.
**Also important**: This guide may be outdated as AWS WorkSpaces.
Alternatively, check out [this
guide](https://chatgpt.com/share/67813957-e52c-8003-8776-be82b725215f) or
asking an LLM (like ChatGPT) for different approaches to setting up a Windows
instance with QuickBooks Desktop installed.
## 1. Set up a virtual Windows environment
Create a new Amazon WorkSpace at [https://us-west-2.console.aws.amazon.com/workspaces/v2/workspaces](https://us-west-2.console.aws.amazon.com/workspaces/v2/workspaces).
;
This guide is provided by Conductor, the service that powers the QuickBooks
Desktop integration for many business tools, including the one that sent you
here.
If Conductor is unable to sync your QuickBooks Desktop data, you may see the following error:
```
Your QuickBooks Desktop connection is not active. It was last active...
```
This error indicates that Conductor cannot establish a connection with the QuickBooks Web Connector on your computer. The Web Connector is an essential component that comes pre-installed with QuickBooks Desktop. It runs silently in the background, facilitating secure synchronization of your QuickBooks Desktop data with Conductor.
Follow these troubleshooting steps to resolve the issue:
## Troubleshooting steps
The Web Connector requires your computer to be powered on and connected to the internet. If your computer is off, turn it on and ensure it has an active internet connection before attempting to sync again.
If the error persists, proceed to the next step.
The Web Connector should always be running in the background on your computer. If it's not, launch the program by following these steps:
1. Open QuickBooks Desktop with the company file you want to sync.
2. In the top menu bar, click "**File**" > "**App Management**" > "**Update Web Services**" to launch the QuickBooks Web Connector.
3. In the window that appears, click "**Hide**" in the bottom-right corner to keep the Web Connector running in the background.
After completing these steps, attempt to sync your QuickBooks Desktop data again.
If the error persists, continue to the next step.
If the Web Connector doesn't start automatically with your computer, Conductor may face difficulties in reliably syncing your QuickBooks Desktop data. To ensure automatic startup, [follow this guide](/help/guides/ensure-web-connector-opens-at-startup).
Reopen the Web Connector (following the steps in Step 2) and confirm:
1. **Auto-Run is enabled** for your connection. If not, tick it.
2. **Every-Min is blank** for your connection. If not, follow these steps to reset it. *(These steps are the only way to reset the Every-Min value; you cannot directly clear it manually.)*
1. Click "**Remove**" to the right of the connection in the Web Connector. Click "**Yes**" to confirm.
2. Click "**Add an Application**" in the bottom-right corner of the Web Connector. Select the same "**.qwc**" file from your **Downloads folder** that you previously opened.
3. Re-enter the **password from the QBD setup guide** that you initially used to create this connection. If you do not have this link, contact the support team of the product that sent you this guide.
**Never change these settings!** These settings are required to for a stable connection to your QuickBooks Desktop.
After fixing these settings, click "**Hide**" in the bottom-right corner to keep the Web Connector running in the background. Then, attempt to sync your QuickBooks Desktop data once more.
If you continue to receive the "Your QuickBooks Desktop connection is not active" error after completing these steps, please contact our support team at [support@conductor.is](mailto:support@conductor.is?subject=QuickBooks%20Desktop%20Connection%20Issue).
# How to fix: "Could not start QuickBooks"
Source: https://docs.conductor.is/help/connection-errors/could-not-start-quickbooks
export const Image = ({src, alt, width, align = "center", noShadow = false, noBorder = false, noZoom = false}) => ;
This guide is provided by Conductor, the service that powers the QuickBooks
Desktop integration for many business tools, including the one that sent you
here.
If you were directed to this page, it was likely because you encountered the following error attempting to sync with your QuickBooks Desktop:
```
We could not connect to your QuickBooks Desktop because either QuickBooks
Desktop is closed and we could not start it, or an error popped up on your
Windows computer.
```
Alternatively, you might have been directed to this page for the following error *(which is the exact same error; the message above is merely Conductor's user-friendly version)*:
```
(0x80040408): Could not start QuickBooks.
```
Follow these troubleshooting steps to resolve the issue:
## Troubleshooting steps
Having multiple versions of QuickBooks Desktop installed on your Windows computer can cause the error above and several other issues. Please [complete this guide to ensure](/help/guides/ensure-only-one-version-installed) only one version of QuickBooks Desktop is installed on your computer. Then, try syncing with QuickBooks Desktop again.
If you continue to see the same error when syncing, you may need to recreate the Web Connector log file. Please [complete this guide to delete the log file](/help/connection-errors/there-was-a-problem-with-the-log-file#delete-the-web-connector-log-file). Then, try syncing with QuickBooks Desktop again.
If you still see the same error when syncing, check if the dialog box shown below appears on your Windows computer. If so, please [complete this guide to resolve that issue](/help/connection-errors/do-you-want-to-allow-this-app-to-make-changes-to-your-device). Then, try syncing with QuickBooks Desktop again.
If you continue to see the error above after trying all of the solutions above, please email us at [support@conductor.is](mailto:support@conductor.is?subject=QuickBooks%20Desktop%20Help). We want to help you resolve this issue and use your experience to improve this guide for others.
# How to fix: "Do you want to allow this app to make changes to your device?"
Source: https://docs.conductor.is/help/connection-errors/do-you-want-to-allow-this-app-to-make-changes-to-your-device
export const Image = ({src, alt, width, align = "center", noShadow = false, noBorder = false, noZoom = false}) => ;
This guide is provided by Conductor, the service that powers the QuickBooks
Desktop integration for many business tools, including the one that sent you
here.
If you ever see the Windows prompt shown below whenever you attempt to sync with QuickBooks Desktop, it is preventing Conductor from syncing with QuickBooks Desktop. To resolve this issue, you must configure QuickBooks Desktop and the QuickBooks Web Connector to run as an administrator. Please follow all of the steps in this guide to resolve this issue.
{/* NOTE: The following solution is identical to `there-was-a-problem-with-the-log-file.mdx` */}
## Solution
To prevent Windows from showing you the prompt above, which blocks Conductor from syncing QuickBooks Desktop, you must configure QuickBooks Desktop and the QuickBooks Web Connector to run as an administrator. To do so, follow the steps below:
### 1. Run QuickBooks Desktop as an administrator
Using Windows search (usually located in the bottom-left corner of your
screen), type "**QuickBooks Desktop**", right-click on the QuickBooks
Desktop result, and select "**Open file location**". If you have QuickBooks
Desktop pinned to your taskbar or on your desktop, you can right-click on
the icon there instead.
In the folder that opens, right-click on the QuickBooks Desktop icon and
select "**Properties**" to open the Properties window.
In the Properties window, navigate to the "**Compatibility**" tab.
Check the box labeled "**Run this program as an administrator**" under the
Settings section.
Click "**Apply**" to save the changes, then click "**OK**" to close the
Properties window.
If QuickBooks Desktop is currently open, close it completely and then
re-open it.
### 2. Run the QuickBooks Web Connector as an administrator
Using Windows search (usually located in the bottom-left corner of your
screen), type "**Web Connector**", right-click on the Web Connector result,
and select "**Open file location**".
In the folder that opens, right-click on the Web Connector icon and select
"**Properties**" to open the Properties window.
In the Properties window, navigate to the "**Compatibility**" tab.
Check the box labeled "**Run this program as an administrator**" under the
Settings section.
Click "**Apply**" to save the changes, then click "**OK**" to close the
Properties window.
Restart your computer to ensure the changes take effect.
By following these steps, QuickBooks Desktop and the Web Connector will always run with administrator privileges, preventing the error from occurring.
If you're still encountering the error after completing all the steps in this guide, please email us at [support@conductor.is](mailto:support@conductor.is?subject=QuickBooks%20Desktop%20Help) for further assistance.
# How to fix: "QBWC1039: This application has not accessed this QuickBooks company data file before"
Source: https://docs.conductor.is/help/connection-errors/qbd-admin-required
export const Image = ({src, alt, width, align = "center", noShadow = false, noBorder = false, noZoom = false}) => ;
This guide is provided by Conductor, the service that powers the QuickBooks
Desktop integration for many business tools, including the one that sent you
here.
When setting up the QuickBooks Desktop integration, you might encounter the following error after attempting to open the downloaded config file:
**This error occurs because you did not correctly sign in to QuickBooks Desktop using the built-in "Admin" user before starting the setup process.** Even if your current user has administrative privileges, the username must specifically be "Admin" - this is a QuickBooks Desktop requirement that cannot be bypassed.
## Solution: Sign in as the "Admin" user
Sign in using the QuickBooks built-in "Admin" user. **The username must be exactly "Admin"** - not any other user, even if it has administrative privileges.
Signing in as the "Admin" user is only needed for this one-time setup process. After setup is complete, you can return to using your regular QuickBooks Desktop user account.
Re-open the QuickBooks config file again from your Downloads folder (it has the file extension `.qwc`). This is the file you just downloaded from the QuickBooks Desktop setup guide. Now, QuickBooks Desktop should no longer show the error shown above and you can continue setting up the connection.
After you complete the setup process, you can return to using your regular QuickBooks Desktop user account.
If this guide did not resolve your issue, please contact our support team at [support@conductor.is](mailto:support@conductor.is?subject=QuickBooks%20Desktop%20Setup%20Issue).
# How to fix: "QBWC1085: There was a problem with the log file"
Source: https://docs.conductor.is/help/connection-errors/there-was-a-problem-with-the-log-file
export const Image = ({src, alt, width, align = "center", noShadow = false, noBorder = false, noZoom = false}) => ;
This guide is provided by Conductor, the service that powers the QuickBooks
Desktop integration for many business tools, including the one that sent you
here.
When connecting to QuickBooks Desktop with Conductor, you might encounter the error shown below, which prevents syncing your QuickBooks Desktop data with Conductor. Follow the steps below to resolve this issue.
## Solution: Delete the Web Connector log file
A corrupted QuickBooks Web Connector log file can cause this error. Typically, this file was already in this corrupted state even before setting up the connection. Deleting the log file will force the Web Connector to generate a new one. To do so, follow these steps:
Ensure QuickBooks Desktop is completely closed.
Terminate the QuickBooks Web Connector process to ensure it is not running in the background:
1. Open the Windows Task Manager by searching for "Task Manager" in the Windows search bar (usually located in the bottom-left corner of your screen).
2. In the Task Manager, find "QuickBooks Web Connector", right-click it, and select "**End Task**". You may need to click "**More details**" at the bottom of the Task Manager window to see all running processes.
3. Close the Task Manager.
Open File Explorer and navigate to the QuickBooks Web Connector log directory by copying and pasting the following path into the address bar:
```
C:\ProgramData\Intuit\QBWebConnector\log
```
In the log directory, locate the file named `QWCLog.txt`, right-click on it, and select "**Delete**".
Restart QuickBooks Desktop and the QuickBooks Web Connector to generate a new log file:
1. Open QuickBooks Desktop with the company file you want to sync.
2. In the top menu bar, click "**File**" > "**App Management**" > "**Update Web Services**" to launch the QuickBooks Web Connector.
3. In the window that appears, click "**Hide**" in the bottom-right corner to keep the Web Connector running in the background.
After completing these steps, attempt to sync your QuickBooks Desktop data again. If you continue to encounter the error, please email us at [support@conductor.is](mailto:support@conductor.is?subject=QuickBooks%20Desktop%20Help) for further assistance.
# How to fix: "Unable to cast COM object of type System.__ComObject..."
Source: https://docs.conductor.is/help/connection-errors/unable-to-cast-com-object
export const Image = ({src, alt, width, align = "center", noShadow = false, noBorder = false, noZoom = false}) => ;
This guide is provided by Conductor, the service that powers the QuickBooks
Desktop integration for many business tools, including the one that sent you
here.
If a Conductor error message directed you to this page, it's because we encountered the following error when attempting to connect to QuickBooks Desktop on your computer:
```
Unable to cast COM object of type 'System.__ComObject' to interface type
'Interop.QBXMLRP2.RequestProcessor2'. This operation failed because the
QueryInterface call on the COM component for the interface with IID
'{8DB91B17-D5A2-41DB-80A7-CC6F1E449A05}' failed due to the following error:
No such interface supported (Exception from HRESULT: 0x80004002 (E_NOINTERFACE)).
```
## Solution
Complete the following steps to re-register the QuickBooks Desktop components to resolve this issue:
Ensure QuickBooks Desktop is completely closed.
Using Windows search (usually located in the bottom-left corner of your screen), type "**cmd**", right-click on the "**Command Prompt**" result, and select "**Run as administrator**".
In the PowerShell window, paste the following command and press Enter:
```shell
regsvr32 "C:\Program Files (x86)\Common Files\Intuit\QuickBooks\QBXMLRP2.dll"
```
If the command was successful, restart your computer to ensure the changes take effect. After restarting, try connecting to QuickBooks Desktop again.
If you're still encountering the same error after following these steps, please email us at [support@conductor.is](mailto:support@conductor.is?subject=QuickBooks%20Desktop%20Help).
# How to fix: "QBWC1039: Unique OwnerID/FileID pair value required"
Source: https://docs.conductor.is/help/connection-errors/unique-owner-id-file-id-pair-required
export const Image = ({src, alt, width, align = "center", noShadow = false, noBorder = false, noZoom = false}) => ;
This guide will walk you through resolving the following error that occurs when attempting to add a connection to the QuickBooks Web Connector:
This error typically occurs when:
* You previously added a connection to the QuickBooks Web Connector, removed it, and are now attempting to add it again for the same QuickBooks company file.
* You previously added the connection to the QuickBooks Web Connector *on another computer* for the same QuickBooks company file, removed it, and are now attempting to add it *on a different computer*.
#### If you are also getting the "Unhandled exception has occurred" error
In addition to the error above, some users also encounter the following error *at the same time:*
If you are encountering this error as well, we must first force-quit the QuickBooks Web Connector before we can fix the other error at the top of this page. To do this, follow the steps below.
1. Open the Windows Task Manager by searching for "Task Manager" in the Windows search bar (usually located in the bottom-left corner of your screen).
2. In the Task Manager, find the QuickBooks Web Connector, right-click it, and select "**End Task**". You may need to click "**More details**" at the bottom of the Task Manager window to see all running processes.
After force-quitting the QuickBooks Web Connector, continue to the next section to fix the original error for *"Unique OwnerID/FileID pair value required"*.
## Solution
Complete the following steps to fix the error shown above for *"Unique OwnerID/FileID pair value required"*.
Download the [QBWC CP3 tool](https://http-download.intuit.com/http.intuit/CP3Tool/QBWC_CP3Tool.exe?_ga=2.67283025.1765810068.1652776906-1422200743.1652776904), created by Intuit (the makers of QuickBooks Desktop), to address this issue. Open the program ("QBWC\_CP3Tool.exe") from your downloads folder.
In the window that opens, as shown below, click "**Select File**", locate the QWC file that you attempted to open earlier which resulted in the error, and click "**Open**". This file is often found in your downloads folder.
QuickBooks Desktop will prompt you to grant permission to the CP3 Tool to make the necessary changes:
1. In the QuickBooks Application Certificate window that appears, click "**Yes**", then "**Continue**".
2. On the Access Confirmation window, select "**Done**".
3. Follow the instructions, then select "**OK**".
You should receive a confirmation that the Owner ID was removed. Select "**OK**" and close the CP3 tool.
Attempt to open the same QWC file you tried opening earlier. This time, it should work without any errors, and you should see the connection added to the QuickBooks Web Connector.
If you continue to encounter the error after completing these steps or have trouble with any step, please email us at [support@conductor.is](mailto:support@conductor.is?subject=QuickBooks%20Desktop%20Help) for further assistance.
# QuickBooks Desktop FAQ for end-users
Source: https://docs.conductor.is/help/faq/end-user-faq
An FAQ guide written for the end-users of Conductor's QuickBooks Desktop integration.
This guide is provided by Conductor, the service that powers the QuickBooks
Desktop integration for many business tools, including the one that sent you
here.
This FAQ is designed to answer any questions you may have about your QuickBooks Desktop connection and Conductor, the technology provider that powers it.
### How does the integration connect with QuickBooks Desktop?
The integration uses the QuickBooks Web Connector, an built-in feature of QuickBooks Desktop designed for secure data synchronization. This method is officially recommended by QuickBooks and involves robust user authentication and SSL (Secure Socket Layer) encryption. This ensures that your data is encrypted during transmission, protecting it from unauthorized access.
### Do you store any of my QuickBooks Desktop data?
**No, we do not store any of your QuickBooks Desktop data.** The integration acts as a secure conduit, facilitating the transfer of information between your QuickBooks Desktop and the software you are using, without retaining any of that information on our systems.
### What is the QuickBooks Desktop Web Connector?
The QuickBooks Web Connector is a program that comes preinstalled with QuickBooks Desktop that the integration uses to securely sync your data. This program always runs invisibly in the background on your computer and starts automatically whenever you start your computer. If it does not start automatically, the integration cannot reliably sync your data. The only time you should ever see the Web Connector is when you first set up your QuickBooks Desktop connection with the integration; other than that, it should be invisible.
### What security measures does the integration implement to secure data?
Our QuickBooks Desktop integration adheres to the industry's top security practices, including:
* **SSL Encryption:** For secure data transmission.
* **Encrypted API Keys:** Unique keys that ensure only authorized software can access your data.
* **Zero Data Storage Policy:** We don't store your QuickBooks data, maintaining your privacy.
* **Continuous Monitoring:** Our systems are monitored continuously for any unusual activity to prevent unauthorized access.
### Does the integration impact the speed or performance of QuickBooks Desktop?
No, the integration does not slow down QuickBooks Desktop. Here's why:
* The integration is powered by QuickBooks Desktop's built-in Web Connector. When the Web Connector is running in the background, it operates independently of QuickBooks Desktop, much like any other Windows program. In this idle state, it simply waits for new requests without interacting with QuickBooks Desktop.
* Even when processing a request, QuickBooks Desktop's performance would only be impacted if more than 5,000 records were being retrieved at once, however, we prevent this by limiting requests to 500 records at a time.
* The Web Connector is lightweight and only checks for new requests every 10 seconds, making it unlikely to slow down the Windows system as a whole.
* We have never observed or received reports of the integration affecting system performance.
### Which data from QuickBooks Desktop can the integration access?
The integration can read and write most data types in your QuickBooks Desktop, ***excluding* sensitive personal information like Social Security Numbers and customer credit card details**. This broad access is necessary because the QuickBooks Web Connector does not support limited permissions for selective data access.
### Does my computer need to be powered on to sync my QuickBooks Desktop data?
Yes, your computer must be powered on to sync your QuickBooks Desktop data.
### Can I connect to multiple QuickBooks Desktop company files on the same computer?
Yes, you can connect to multiple company files on a single computer, but it requires maintaining a specific setup to work correctly. Please see our [guide on connecting multiple company files](/help/guides/multiple-connections-one-computer) for critical setup instructions and best practices.
### Does QuickBooks Desktop need to be open to sync my data?
No, we can sync your QuickBooks Desktop data even if QuickBooks Desktop is not open. However, if QuickBooks Desktop is open to a different company file, we will return an error.
### Does my computer need to sign in as the Admin user to sync my data?
No, signing in as the Admin user is only required for the initial setup process. After the setup is complete, you can switch back to your regular QuickBooks Desktop user.
### Is it a problem if the Web Connector says "Update postponed by application"?
No, there is no problem at all if you see this message. It means that things are working correctly. This message indicates that the Web Connector has checked for updates, but no sync is necessary at the moment.
### How often does the integration access my QuickBooks data?
The frequency of data access is determined by the software you are using. Typically, data syncs occur when you initiate them (e.g., clicking a "sync" button in your software). For specifics, please contact your software provider.
### Does the integration support Rightworks (formerly called Right Networks)?
Yes, the integration fully supports QuickBooks Desktop when hosted on Rightworks. For setup instructions, please see our [Connecting to Rightworks guide](/help/guides/rightworks).
### How can I disable the QuickBooks Desktop connection?
Please follow [this guide](/help/guides/disable-connection) to disable the QuickBooks Desktop connection.
### Who is Conductor?
Conductor is a technology provider that powers the QuickBooks Desktop integration for the software you're using. We specialize in creating secure, reliable connections between different software platforms, ensuring your data flows smoothly and safely from QuickBooks Desktop to your business application.
### Any other questions?
If you have any other questions, please check the other guides in the sidebar on the left, contact your software provider, or email us at [support@conductor.is](mailto:support@conductor.is).
# How to disable the QuickBooks Desktop connection
Source: https://docs.conductor.is/help/guides/disable-connection
Learn how to disable the QuickBooks Desktop connection in the QuickBooks Web Connector.
export const Image = ({src, alt, width, align = "center", noShadow = false, noBorder = false, noZoom = false}) => ;
This guide is provided by Conductor, the service that powers the QuickBooks
Desktop integration for many business tools, including the one that sent you
here.
Follow the steps below to disable a QuickBooks Desktop connection in the QuickBooks Web Connector.
1. Open QuickBooks Desktop.
2. In the top menu bar, click "**File**" > "**App Management**" > "**Update Web Services**" to launch the QuickBooks Web Connector.
In the Web Connector window that opens, find the connection for the product or service you want to disconnect, and uncheck the box in the "**Auto-Run**" column for that connection.
We recommend disabling "Auto-Run" instead of clicking "Remove" because the "Remove" button is known to cause issues. Plus, it is convenient to save the old connection's configuration in case you want to restore this connection later.
Finally, click "**Hide**" in the bottom-right corner of the window to close the Web Connector.
Conductor's QuickBooks Desktop connection will no longer run on your computer.
If you encountered any unexpected issues while following these steps, please email us at [support@conductor.is](mailto:support@conductor.is?subject=QuickBooks%20Desktop%20Help).
# Ensure only one version of QuickBooks Desktop is installed
Source: https://docs.conductor.is/help/guides/ensure-only-one-version-installed
Conductor will not function properly if multiple versions of QuickBooks Desktop are installed on the same computer.
export const Image = ({src, alt, width, align = "center", noShadow = false, noBorder = false, noZoom = false}) => ;
This guide is provided by Conductor, the service that powers the QuickBooks
Desktop integration for many business tools, including the one that sent you
here.
Having multiple versions of QuickBooks Desktop installed on the same computer can cause issues with Conductor. Often, this prevents the QuickBooks Web Connector from connecting to QuickBooks Desktop or causes it to crash. Please follow the steps below to ensure only one version of QuickBooks Desktop is installed on your computer.
Using Windows search (usually located in the bottom-left corner of your screen), search for "Control Panel", and open it.
In the Control Panel, click on "**Programs and Features**" or "**Uninstall a program**" (exact wording may vary depending on your version of Windows).
In the list of installed programs, look for any versions of QuickBooks Desktop. If you see multiple versions, such as in the example below, continue to the next step. If you only see one version, you can stop here.
Before uninstalling any versions of QuickBooks Desktop, make sure QuickBooks Desktop is completely closed.
Back in the Control Panel window, right-click on the older version(s) of QuickBooks Desktop in the list of installed programs and click "**Uninstall**". Follow the prompts to uninstall the program. For example:
After uninstalling the older version(s), reopen QuickBooks Desktop and follow any prompts for updates.
1. If QuickBooks Desktop asks you to fix the installation, click "**Continue**".
2. If QuickBooks Desktop asks you to reboot after fixing the installation, click "**OK**".
By following these steps, you can ensure only one version of QuickBooks Desktop is installed on your computer, which will help prevent issues with Conductor.
# Ensure the QuickBooks Web Connector opens at startup
Source: https://docs.conductor.is/help/guides/ensure-web-connector-opens-at-startup
Set up the QuickBooks Web Connector to automatically launch and run in the background whenever you start your computer.
export const Image = ({src, alt, width, align = "center", noShadow = false, noBorder = false, noZoom = false}) => ;
This guide is provided by Conductor, the service that powers the QuickBooks
Desktop integration for many business tools, including the one that sent you
here.
The QuickBooks Web Connector is a program that comes preinstalled with QuickBooks Desktop that Conductor uses to securely sync your data. This program always runs invisibly in the background on your computer and starts automatically whenever you start your computer. If it does not start automatically, Conductor cannot reliably sync your data.
If you are having trouble syncing your data, please follow the steps below to ensure that the Web Connector starts automatically when you start your computer. If we discover it does not, we will configure the Windows Task Scheduler to start the Web Connector automatically.
## 1. Check if the Web Connector starts automatically when you start your computer
First, let's check whether the Web Connector starts automatically when you start your computer:
Restart your computer so we can check in the next step whether the Web Connector automatically starts when your computer starts.
After your computer finishes booting up, the Web Connector should automatically start invisibly in the background. Let's check if it is running:
1. Open the Windows Task Manager by searching for "Task Manager" in the Windows search bar (usually located in the bottom-left corner of your screen).
2. If you see a "More details" button in the bottom-left corner of the Task Manager window, click it to expand the Task Manager.
3. Navigate to the "Details" tab and scroll down until you see the "QBWebConnector.exe" process which should look like the screenshot below. **If you see it, you can skip the rest of this guide. Otherwise, continue to the section below.**
## 2. Configure the Web Connector to start automatically using the Windows Task Scheduler
After confirming that the Web Connector does not start automatically when you start your computer in the previous section, we will now configure the Windows Task Scheduler to start the Web Connector automatically.
Open the Windows Task Scheduler by searching for "Task Scheduler" in the Windows search bar (usually located in the bottom-left corner of your screen).
In the Task Scheduler, go to the "Action" menu and select "**Create Task**".
In the "General" tab of the new task window:
1. Enter any name for your task, such as "Open QuickBooks Web Connector".
2. Check the option "**Run with highest privileges**" near the bottom to ensure the task runs with administrator rights.
Go to the "**Triggers**" tab and click "**New**".
1. Under "Begin the task", select "**At startup**" from the dropdown menu.
2. Set a delay for 1 minute by checking "Delay task for" and choose "1 minute".
Finally, click "**OK**".
1. Using Windows search (usually located in the bottom-left corner of your screen), type "**Web Connector**", right-click on the Web Connector result, and select "**Open file location**".
2. In the folder that opens, you should see a shortcut for the Web Connector. Right-click on the Web Connector icon and select "**Properties**" from the context menu to open the Properties window.
3. In the Properties window, as shown below, copy the file path in the "**Target**" field. You can do this by selecting the text and pressing `Ctrl + C` on your keyboard. Then click "**Cancel**" to close the Properties window.
Go back to the Task Scheduler window and go to the "Actions" tab. Click "**New**" and paste the file path you copied in the previous step into the "**Program/script**" field by right-clicking and selecting "**Paste**" from the context menu. Then click "**OK**".
In the "Settings" tab, check the option "**If the task fails, restart every**" and set the value to "**1 minute**" and the "**Attempt to restart up to**" value to "**3 times**". Then click "**OK**".
Click "**OK**" to save your new task. You might be prompted to enter an administrator password at this point.
Finally, test your task by restarting your computer, waiting one minute, and confirming that the QuickBooks Web Connector opened automatically after startup using [the same steps as in the first section of this guide](/help/guides/ensure-web-connector-opens-at-startup#1-check-if-the-web-connector-starts-automatically-when-you-start-your-computer).
By following these steps, the QuickBooks Web Connector will now always start automatically whenever you start your computer.
If you're still having trouble after completing all steps, please email us at [support@conductor.is](mailto:support@conductor.is?subject=QuickBooks%20Desktop%20Help).
# Move your QuickBooks Desktop connection to a different computer
Source: https://docs.conductor.is/help/guides/move-computers
Learn how to transfer your QuickBooks Desktop connection to a different computer for the same company file.
export const Image = ({src, alt, width, align = "center", noShadow = false, noBorder = false, noZoom = false}) => ;
This guide is provided by Conductor, the service that powers the QuickBooks
Desktop integration for many business tools, including the one that sent you
here.
Before setting up the new connection, follow [this guide to disable the existing connection](/help/guides/disable-connection) on your **current** computer.
It is essential that you complete this step first to avoid synchronization conflicts with your new computer's connection.
1. Launch QuickBooks Desktop on your **new** computer.
2. Open the company file you want to connect.
3. Log in using your QuickBooks **Admin** user credentials.
Ensure you're using the exact same company file as before. The file path can be different, but it must be the same QuickBooks company file.
Return to the setup guide, click **"Download config file"**, and then the downloaded configuration file.
QuickBooks Desktop might *not* show the permissions prompt when adding the new connection because you previously authorized access to this company file on your old computer. This is normal and doesn't indicate any problem with the setup.
Follow the remaining steps in the setup guide. When complete, the final step of the guide will confirm that the connection is successful.
You have now successfully moved your connection to a different computer.
If you encountered any unexpected issues while following these steps, please email us at [support@conductor.is](mailto:support@conductor.is?subject=QuickBooks%20Desktop%20Help).
# Connect to multiple QuickBooks company files on a single computer
Source: https://docs.conductor.is/help/guides/multiple-connections-one-computer
How to connect to multiple QuickBooks Desktop company files on a single computer.
This guide is provided by Conductor, the service that powers the QuickBooks
Desktop integration for many business tools, including the one that sent you
here.
In QuickBooks Desktop, a **company file** is the primary local file that stores all financial data for a specific company. While most QuickBooks Desktop users have only one company file, some users, such as accounting firms managing finances for multiple clients, work with several company files on a single computer. This guide will walk you through connecting Conductor (which powers your integration) to multiple company files on a single computer, as well as best practices and performance considerations.
## Important requirement
Companies managing multiple company files typically host them all on a dedicated Windows server. **You will want to set up the Conductor connections on this Windows server**, adhering to the following requirement:
**QuickBooks Desktop must always remain open *without* any company file loaded
when connecting to multiple company files on a single computer.** This setup
allows the Web Connector to open the correct company file when it receives a
request from your QuickBooks Desktop integration.
### Why is this necessary?
The [QuickBooks Web Connector](/help/faq/end-user-faq#what-is-the-quickbooks-desktop-web-connector) has certain limitations when working with multiple company files on a single computer:
1. It can only communicate with one company file at a time.
2. It can only communicate with the company file that is currently open in QuickBooks Desktop.
3. It cannot switch between company files if QuickBooks Desktop already has a different company file open (to avoid disrupting an active user).
Despite these limitations, **the Web Connector can open a specified company file if no other company file is currently open, fulfill the request, and then close the company file** without fully closing QuickBooks Desktop. Therefore, keeping QuickBooks Desktop open without any company file loaded allows the Web Connector to open and process requests for the correct company file as needed.
### How to close a company file
To ensure QuickBooks Desktop is open without any company file loaded:
1. Open **QuickBooks Desktop**.
2. Go to the "**File**" menu.
3. Select "**Close Company**".

If you or someone else opens a company file *on this machine* without returning QuickBooks Desktop to this state, you may encounter an error stating that the wrong company file is open.
## How to set up connections to multiple company files
To connect to multiple company files on one computer, you must complete the setup process **for each company file**, as each requires its own connection and authentication.
1. Open **QuickBooks Desktop**.
2. Open the company file you wish to connect.
3. Sign in as the **Admin** user.
4. Complete the setup guide *while* the corresponding company file is open.
5. Repeat steps 1-4 for each company file.
Once complete, each company file will have a separate connection in the Web Connector, resembling the state shown below:

## Best practices
* **Use a dedicated Windows server:** Most users managing multiple company files already have a Windows server dedicated to managing their QuickBooks Desktop company files. Set up the Conductor Web Connector connection on this server. On this server, keep QuickBooks Desktop open without a company file loaded so that it is ready to receive requests and open the correct company file. This setup is preferable to sharing a personal computer used for other tasks, where the Web Connector cannot fulfill requests if the wrong company file is open.
* **Add QuickBooks Desktop to Windows startup:** Adding QuickBooks Desktop to the computer's startup programs ensures it is always open and ready to receive requests whenever you restart the computer. The Web Connector already automatically starts in the background when the computer boots up and can open QuickBooks Desktop if it receives a request from Conductor while QuickBooks Desktop is closed; however, doing so will delay the request because QuickBooks Desktop takes a while to launch.
## Performance considerations
* **Increased request time:** Keeping QuickBooks Desktop open without a company file loaded adds 20-40 seconds to each request due to the time it takes to load a company file. However, when you send numerous Conductor requests for the same company file in quick succession, the Web Connector will resolve the sequence rapidly because Conductor keeps the company file open between these requests.
* **Serial processing:** The Web Connector can only process requests for one company file at a time because it can only communicate with QuickBooks Desktop when one company file is loaded. Therefore, Conductor manages your requests in a queue, ensuring that the Web Connector processes them serially, opening and closing the appropriate company file for each request.
# Rebuild and verify Data in QuickBooks Desktop
Source: https://docs.conductor.is/help/guides/rebuild-verify-data
Learn how to use the Rebuild and Verify Data utilities to fix and identify data issues in your QuickBooks Desktop company file.
export const Image = ({src, alt, width, align = "center", noShadow = false, noBorder = false, noZoom = false}) => ;
This guide is provided by Conductor, the service that powers the QuickBooks
Desktop integration for many business tools, including the one that sent you
here.
Over time, your QuickBooks Desktop company file may accumulate data issues that can lead to unexpected behavior or errors. QuickBooks provides built-in tools—**Rebuild Data** and **Verify Data**—to help fix and identify these issues. This guide will walk you through the steps to rebuild and verify your company file to ensure data integrity.
**When to use these utilities:** Use the **Rebuild Data** utility if you
experience symptoms like missing transactions, program crashes, balance sheet
discrepancies, or other unexpected behaviors. After rebuilding your data, use
the **Verify Data** utility to confirm that all issues have been resolved.
Use the Rebuild Data utility to fix data issues in your company file:
1. Open QuickBooks Desktop.
2. Go to the "**File**" menu, hover over "**Utilities**", and select "**Rebuild Data**".
3. When prompted to back up your company file, click "**OK**". QuickBooks will ask you to create a backup before rebuilding to prevent data loss.
4. Choose a location to save the backup, then click "**OK**".
5. QuickBooks will begin rebuilding your data. This may take some time, depending on the size of your company file.
6. Once the rebuild is complete, click "**OK**" when you see the message "Rebuild has completed".
After rebuilding your data, use the Verify Data utility to confirm that all issues have been resolved:
1. Go to the "**File**" menu, hover over "**Utilities**", and select "**Verify Data**".
2. QuickBooks will begin scanning your company file. This may take a few minutes.
After the verification process completes, QuickBooks will display a message:
* **If you see "QuickBooks detected no problem with your data":** Your company file is now repaired and in good shape.
* **If you see "Your data has lost integrity":** Data issues still exist, repeat the rebuild process.
* **If you see a specific error message or code:** Note the details as they may be helpful if you need to contact support.
**Note:** If errors continue after rebuilding your data multiple times, your company file may be damaged beyond repair through these utilities. Please contact Intuit support for further assistance.
By following these steps, you've ensured that your QuickBooks Desktop company file is free of data issues. If you encounter any problems during this process or need additional assistance, please contact our support team at [support@conductor.is](mailto:support@conductor.is?subject=QuickBooks%20Desktop%20Help).
# Connecting to QuickBooks Desktop on Rightworks
Source: https://docs.conductor.is/help/guides/rightworks
How to set up the QuickBooks Web Connector when using Rightworks (formerly Right Networks) to host QuickBooks Desktop.
export const Image = ({src, alt, width, align = "center", noShadow = false, noBorder = false, noZoom = false}) => ;
This guide is provided by Conductor, the service that powers the QuickBooks
Desktop integration for many business tools, including the one that sent you
here.
Rightworks (formerly Right Networks) hosts QuickBooks Desktop in the cloud, allowing you to access it remotely. While we fully support connecting to Rightworks, there is **one important limitation you must remember**:
**Important:** To sync data with your QuickBooks Desktop, you must be actively
connected to your Rightworks remote desktop session with QuickBooks Desktop
open. This is because Rightworks stops all background programs when you
disconnect from your session.
## Step 1: Verify or install the QuickBooks Web Connector
Connecting to QuickBooks Desktop on Rightworks requires the QuickBooks Web Connector to be installed on your Rightworks remote desktop. The Web Connector is a small program that enables secure communication between QuickBooks Desktop and external applications. Let's first verify that it's installed on your Rightworks computer.
1. Connect to your Rightworks remote desktop.
2. Click the Windows Start menu.
3. Type "Web Connector".
4. Look for "QuickBooks Web Connector" in the search results.
If you find it, skip to the next section of this guide. If not, continue with the installation step below.
If you don't find the Web Connector in your Start menu, you can install it from the Rightworks Dashboard:
1. Log in to your [Rightworks Dashboard](https://login.rightworks.com).
2. Select "My Apps" in the left sidebar.
3. In the search bar, type "Web Connector".
4. Locate "QuickBooks Web Connector" in the results.
5. Click the "+" button next to it to add it to your account.
6. Wait 5-10 minutes for the installation to complete.
7. Connect to your Rightworks remote desktop and verify the Web Connector is now installed using the steps above.
## Step 2: Configure the Web Connector to start automatically
Now that we've confirmed the Web Connector is installed, we must ensure both QuickBooks Desktop and the Web Connector start automatically when you log into Rightworks.
You must contact Rightworks support to configure the Web Connector to start automatically. This cannot be done on your own. Visit [Rightworks Support](https://helpdesk.rightnetworks.com) to begin.
Rightworks support is available Monday - Friday, 8:00 AM - 8:00 PM ET.
On the Rightworks support page, click the yellow "Chat" bubble in the bottom-right corner to start a live chat (there is no email or phone support available for this task).
In the chat window, **provide the full name and email address** associated with your Rightworks account. This is typically the information for the person at your company who set up your Rightworks account.
**Copy and paste this exact message** to the Rightworks support agent:
```
Hello! Could you please configure our Rightworks account to ensure
that BOTH of the following applications are added to our startup
items and automatically launch in the background every time we sign
into our Rightworks instance?
1. QuickBooks Web Connector
2. QuickBooks Desktop
We need BOTH applications to launch automatically.
Please apply this setting for ALL USERS on our Rightworks account.
```
1. Wait for the support agent to confirm that the Web Connector has been added to your startup programs.
2. Sign out and sign back into your Rightworks desktop session for the changes to take effect.
That's it! From now on, the QuickBooks Web Connector will automatically start every time you connect to Rightworks, ensuring a stable connection to your QuickBooks Desktop company file.
# Upgrade the QuickBooks Web Connector
Source: https://docs.conductor.is/help/guides/upgrade-web-connector
Learn how to upgrade the QuickBooks Web Connector to ensure compatibility with Conductor.
export const Image = ({src, alt, width, align = "center", noShadow = false, noBorder = false, noZoom = false}) => ;
This guide is provided by Conductor, the service that powers the QuickBooks
Desktop integration for many business tools, including the one that sent you
here.
The QuickBooks Web Connector is a vital component that comes pre-installed with QuickBooks Desktop. Conductor uses this tool to securely sync your data. To use Conductor, you must have at least **version 2.3.0.20** of the QuickBooks Web Connector installed. In our experience, fewer than 1% of users have an older version. If you're using an outdated version, you might see an error message like this:
Follow these steps to upgrade the QuickBooks Web Connector to the latest version:
Ensure that QuickBooks Desktop is completely closed before proceeding.
Close the QuickBooks Web Connector process to ensure it's not running in the background:
1. Open the Windows Task Manager by pressing `Ctrl + Shift + Esc` or by searching for "Task Manager" in the Windows search bar.
2. In the Task Manager, locate "QuickBooks Web Connector". Right-click it and select "**End Task**". If you don't see it, click "**More details**" at the bottom of the Task Manager window to view all running processes.
3. Close the Task Manager.
To upgrade, you must first delete the current installation:
1. Open File Explorer and navigate to `C:\Program Files (x86)\Common Files\Intuit\QuickBooks`.
2. Delete the folder named `QBWebConnector` and, if present, the folder named `QBWebConnector3.0`.
Visit Intuit's [official download page](https://developer.intuit.com/app/developer/qbdesktop/docs/get-started/get-started-with-quickbooks-web-connector#download-and-install-the-quickbooks-web-connector) to get the latest version of the QuickBooks Web Connector. Always download the most recent version, even if you're using an older version of QuickBooks Desktop.
Once the download is complete, open the downloaded file and follow the installation wizard's instructions.
1. Open QuickBooks Desktop.
2. In the top menu bar, click "**File**" > "**App Management**" > "**Update Web Services**" to launch the QuickBooks Web Connector.
3. In the window that appears, click "**Hide**" in the bottom-right corner to keep the Web Connector running in the background.
You have now successfully upgraded to the latest version of the QuickBooks Web Connector and can proceed with setting up your connection to Conductor. If you encounter any issues during this process, please don't hesitate to contact our support team at [support@conductor.is](mailto:support@conductor.is?subject=QuickBooks%20Desktop%20Help).
# Create an account
Source: https://docs.conductor.is/qbd-api/accounts/create
POST /quickbooks-desktop/accounts
Creates a new financial account.
# List all accounts
Source: https://docs.conductor.is/qbd-api/accounts/list
GET /quickbooks-desktop/accounts
Returns a list of accounts. NOTE: QuickBooks Desktop does not support pagination for accounts; hence, there is no `cursor` parameter. Users typically have few accounts.
# The Account object
Source: https://docs.conductor.is/qbd-api/accounts/object
An account in QuickBooks Desktop represents a financial account used to track money and transactions. It can be customized with features like hierarchical sub-accounts, account numbers, and opening balances. Accounts form the foundation of the chart of accounts and can represent various types like bank accounts, credit cards, income, expense, and other financial categories.
# Retrieve an account
Source: https://docs.conductor.is/qbd-api/accounts/retrieve
GET /quickbooks-desktop/accounts/{id}
Retrieves an account by ID.
# Update an account
Source: https://docs.conductor.is/qbd-api/accounts/update
POST /quickbooks-desktop/accounts/{id}
Updates an existing financial account.
# Create a bill check payment
Source: https://docs.conductor.is/qbd-api/bill-check-payments/create
POST /quickbooks-desktop/bill-check-payments
Creates a new bill check payment.
# Delete a bill check payment
Source: https://docs.conductor.is/qbd-api/bill-check-payments/delete
DELETE /quickbooks-desktop/bill-check-payments/{id}
Permanently deletes a a bill check payment. The deletion will fail if the bill check payment is currently in use or has any linked transactions that are in use.
# List all bill check payments
Source: https://docs.conductor.is/qbd-api/bill-check-payments/list
GET /quickbooks-desktop/bill-check-payments
Returns a list of bill check payments. Use the `cursor` parameter to paginate through the results.
# The Bill Check Payment object
Source: https://docs.conductor.is/qbd-api/bill-check-payments/object
A bill check payment records a payment made by check to pay off one or more vendor bills. It reduces accounts payable and decreases the bank account balance. This transaction links the original bill(s) with the payment, allowing QuickBooks to track which bills have been paid and maintain accurate vendor balances.
# Retrieve a bill check payment
Source: https://docs.conductor.is/qbd-api/bill-check-payments/retrieve
GET /quickbooks-desktop/bill-check-payments/{id}
Retrieves a bill check payment by ID.
# Update a bill check payment
Source: https://docs.conductor.is/qbd-api/bill-check-payments/update
POST /quickbooks-desktop/bill-check-payments/{id}
Updates an existing bill check payment.
# Create a bill credit card payment
Source: https://docs.conductor.is/qbd-api/bill-credit-card-payments/create
POST /quickbooks-desktop/bill-credit-card-payments
Creates a new bill credit card payment.
# Delete a bill credit card payment
Source: https://docs.conductor.is/qbd-api/bill-credit-card-payments/delete
DELETE /quickbooks-desktop/bill-credit-card-payments/{id}
Permanently deletes a a bill credit card payment. The deletion will fail if the bill credit card payment is currently in use or has any linked transactions that are in use.
# List all bill credit card payments
Source: https://docs.conductor.is/qbd-api/bill-credit-card-payments/list
GET /quickbooks-desktop/bill-credit-card-payments
Returns a list of bill credit card payments. Use the `cursor` parameter to paginate through the results.
# The Bill Credit Card Payment object
Source: https://docs.conductor.is/qbd-api/bill-credit-card-payments/object
A bill credit card payment records a payment made via credit card to pay off one or more vendor bills. It reduces accounts payable and increases the credit card account balance. This transaction links the original bill(s) with the payment, allowing QuickBooks to track which bills have been paid and maintain accurate vendor balances.
# Retrieve a bill credit card payment
Source: https://docs.conductor.is/qbd-api/bill-credit-card-payments/retrieve
GET /quickbooks-desktop/bill-credit-card-payments/{id}
Retrieves a bill credit card payment by ID.
# Create a bill
Source: https://docs.conductor.is/qbd-api/bills/create
POST /quickbooks-desktop/bills
Creates a new bill.
# Delete a bill
Source: https://docs.conductor.is/qbd-api/bills/delete
DELETE /quickbooks-desktop/bills/{id}
Permanently deletes a a bill. The deletion will fail if the bill is currently in use or has any linked transactions that are in use.
# List all bills
Source: https://docs.conductor.is/qbd-api/bills/list
GET /quickbooks-desktop/bills
Returns a list of bills. Use the `cursor` parameter to paginate through the results.
# The Bill object
Source: https://docs.conductor.is/qbd-api/bills/object
A bill represents an obligation to pay a vendor for goods or services received. It records the amount owed, due date, and payment terms, and increases accounts payable. Bills can be partially paid over time and may be linked to purchase orders or item receipts.
# Retrieve a bill
Source: https://docs.conductor.is/qbd-api/bills/retrieve
GET /quickbooks-desktop/bills/{id}
Retrieves a bill by ID.
# Update a bill
Source: https://docs.conductor.is/qbd-api/bills/update
POST /quickbooks-desktop/bills/{id}
Updates an existing bill.
# Create a check
Source: https://docs.conductor.is/qbd-api/checks/create
POST /quickbooks-desktop/checks
Creates a new check.
# Delete a check
Source: https://docs.conductor.is/qbd-api/checks/delete
DELETE /quickbooks-desktop/checks/{id}
Permanently deletes a a check. The deletion will fail if the check is currently in use or has any linked transactions that are in use.
# List all checks
Source: https://docs.conductor.is/qbd-api/checks/list
GET /quickbooks-desktop/checks
Returns a list of checks. Use the `cursor` parameter to paginate through the results.
# The Check object
Source: https://docs.conductor.is/qbd-api/checks/object
A check represents a payment made from a bank account, typically via paper check. It records the withdrawal of funds paid to a vendor, employee, or other payee. The transaction reduces the balance of the specified bank account and can be linked to bills or other transactions being paid.
# Retrieve a check
Source: https://docs.conductor.is/qbd-api/checks/retrieve
GET /quickbooks-desktop/checks/{id}
Retrieves a check by ID.
# Update a check
Source: https://docs.conductor.is/qbd-api/checks/update
POST /quickbooks-desktop/checks/{id}
Updates an existing check.
# Create a class
Source: https://docs.conductor.is/qbd-api/classes/create
POST /quickbooks-desktop/classes
Creates a new class.
# List all classes
Source: https://docs.conductor.is/qbd-api/classes/list
GET /quickbooks-desktop/classes
Returns a list of classes. NOTE: QuickBooks Desktop does not support pagination for classes; hence, there is no `cursor` parameter. Users typically have few classes.
# The Class object
Source: https://docs.conductor.is/qbd-api/classes/object
A class is a category used to group QuickBooks objects into meaningful categories. For example, classes can be used to classify transactions by department, location, or type of work.
# Retrieve a class
Source: https://docs.conductor.is/qbd-api/classes/retrieve
GET /quickbooks-desktop/classes/{id}
Retrieves a class by ID.
# Update a class
Source: https://docs.conductor.is/qbd-api/classes/update
POST /quickbooks-desktop/classes/{id}
Updates an existing class.
# Create a credit card charge
Source: https://docs.conductor.is/qbd-api/credit-card-charges/create
POST /quickbooks-desktop/credit-card-charges
Creates a new credit card charge for the specified account.
# Delete a credit card charge
Source: https://docs.conductor.is/qbd-api/credit-card-charges/delete
DELETE /quickbooks-desktop/credit-card-charges/{id}
Permanently deletes a a credit card charge. The deletion will fail if the credit card charge is currently in use or has any linked transactions that are in use.
# List all credit card charges
Source: https://docs.conductor.is/qbd-api/credit-card-charges/list
GET /quickbooks-desktop/credit-card-charges
Returns a list of credit card charges. Use the `cursor` parameter to paginate through the results.
# The Credit Card Charge object
Source: https://docs.conductor.is/qbd-api/credit-card-charges/object
A credit card charge is a general charge incurred when a QuickBooks user makes a purchase using a credit card. Credit card charges for purchases can be tracked as expenses (in expense accounts) or as items.
# Retrieve a credit card charge
Source: https://docs.conductor.is/qbd-api/credit-card-charges/retrieve
GET /quickbooks-desktop/credit-card-charges/{id}
Retrieves a credit card charge by ID.
# Update a credit card charge
Source: https://docs.conductor.is/qbd-api/credit-card-charges/update
POST /quickbooks-desktop/credit-card-charges/{id}
Updates an existing credit card charge.
# Create a credit card credit
Source: https://docs.conductor.is/qbd-api/credit-card-credits/create
POST /quickbooks-desktop/credit-card-credits
Creates a new credit card credit for the specified account.
# Delete a credit card credit
Source: https://docs.conductor.is/qbd-api/credit-card-credits/delete
DELETE /quickbooks-desktop/credit-card-credits/{id}
Permanently deletes a a credit card credit. The deletion will fail if the credit card credit is currently in use or has any linked transactions that are in use.
# List all credit card credits
Source: https://docs.conductor.is/qbd-api/credit-card-credits/list
GET /quickbooks-desktop/credit-card-credits
Returns a list of credit card credits. Use the `cursor` parameter to paginate through the results.
# The Credit Card Credit object
Source: https://docs.conductor.is/qbd-api/credit-card-credits/object
A credit card credit represents a credit or refund received from a vendor for returned merchandise, billing adjustment, or other credit. It reduces the balance owed on the credit card account.
# Retrieve a credit card credit
Source: https://docs.conductor.is/qbd-api/credit-card-credits/retrieve
GET /quickbooks-desktop/credit-card-credits/{id}
Retrieves a credit card credit by ID.
# Update a credit card credit
Source: https://docs.conductor.is/qbd-api/credit-card-credits/update
POST /quickbooks-desktop/credit-card-credits/{id}
Updates an existing credit card credit.
# Create a credit memo
Source: https://docs.conductor.is/qbd-api/credit-memos/create
POST /quickbooks-desktop/credit-memos
Creates a new credit memo.
# Delete a credit memo
Source: https://docs.conductor.is/qbd-api/credit-memos/delete
DELETE /quickbooks-desktop/credit-memos/{id}
Permanently deletes a a credit memo. The deletion will fail if the credit memo is currently in use or has any linked transactions that are in use.
# List all credit memos
Source: https://docs.conductor.is/qbd-api/credit-memos/list
GET /quickbooks-desktop/credit-memos
Returns a list of credit memos. Use the `cursor` parameter to paginate through the results.
# The Credit Memo object
Source: https://docs.conductor.is/qbd-api/credit-memos/object
A credit memo records an amount owed to a customer (such as for returns, over-payments, or pre-payments), reducing their outstanding balance. The credit remains available (tracked in the `creditRemaining` field) until it's applied to other transactions (such as invoices or sales receipts) through a receive-payment's `applyToTransactions.applyCredits` field.
# Retrieve a credit memo
Source: https://docs.conductor.is/qbd-api/credit-memos/retrieve
GET /quickbooks-desktop/credit-memos/{id}
Retrieves a credit memo by ID.
# Update a credit memo
Source: https://docs.conductor.is/qbd-api/credit-memos/update
POST /quickbooks-desktop/credit-memos/{id}
Updates an existing credit memo.
# Create a customer
Source: https://docs.conductor.is/qbd-api/customers/create
POST /quickbooks-desktop/customers
Creates a new customer.
# List all customers
Source: https://docs.conductor.is/qbd-api/customers/list
GET /quickbooks-desktop/customers
Returns a list of customers. Use the `cursor` parameter to paginate through the results.
# The Customer object
Source: https://docs.conductor.is/qbd-api/customers/object
A customer record in QuickBooks Desktop represents either a business or individual who purchases goods or services, or a specific job/project being performed for that customer. Jobs are treated as sub-customers and inherit billing information from their parent customer while allowing for job-specific details to be tracked.
# Retrieve a customer
Source: https://docs.conductor.is/qbd-api/customers/retrieve
GET /quickbooks-desktop/customers/{id}
Retrieves a customer by ID.
# Update a customer
Source: https://docs.conductor.is/qbd-api/customers/update
POST /quickbooks-desktop/customers/{id}
Updates an existing customer.
# Create a date-driven term
Source: https://docs.conductor.is/qbd-api/date-driven-terms/create
POST /quickbooks-desktop/date-driven-terms
Creates a new date-driven term.
# List all date-driven terms
Source: https://docs.conductor.is/qbd-api/date-driven-terms/list
GET /quickbooks-desktop/date-driven-terms
Returns a list of date-driven terms. NOTE: QuickBooks Desktop does not support pagination for date-driven terms; hence, there is no `cursor` parameter. Users typically have few date-driven terms.
# The Date-Driven Term object
Source: https://docs.conductor.is/qbd-api/date-driven-terms/object
A date-driven term shows the day of the month by which payment is due and can include a discount for early payment.
# Retrieve a date-driven term
Source: https://docs.conductor.is/qbd-api/date-driven-terms/retrieve
GET /quickbooks-desktop/date-driven-terms/{id}
Retrieves a date-driven term by ID.
# Create a discount item
Source: https://docs.conductor.is/qbd-api/discount-items/create
POST /quickbooks-desktop/discount-items
Creates a new discount item.
# List all discount items
Source: https://docs.conductor.is/qbd-api/discount-items/list
GET /quickbooks-desktop/discount-items
Returns a list of discount items. Use the `cursor` parameter to paginate through the results.
# The Discount Item object
Source: https://docs.conductor.is/qbd-api/discount-items/object
A discount item applies a percentage or fixed amount reduction to the total or subtotal of the line directly above it. Items must be subtotaled first because discounts only affect the preceding line. Unlike discounts for early payments, which use standard-terms or date-driven-terms. Important: Never specify a quantity in a transaction when using a discount item.
# Retrieve a discount item
Source: https://docs.conductor.is/qbd-api/discount-items/retrieve
GET /quickbooks-desktop/discount-items/{id}
Retrieves a discount item by ID.
# Update a discount item
Source: https://docs.conductor.is/qbd-api/discount-items/update
POST /quickbooks-desktop/discount-items/{id}
Updates an existing discount item.
# Create an employee
Source: https://docs.conductor.is/qbd-api/employees/create
POST /quickbooks-desktop/employees
Creates a new employee.
# List all employees
Source: https://docs.conductor.is/qbd-api/employees/list
GET /quickbooks-desktop/employees
Returns a list of employees. Use the `cursor` parameter to paginate through the results.
# The Employee object
Source: https://docs.conductor.is/qbd-api/employees/object
An employee represents a person employed by the company. It stores personal information, employment details, and payroll data used for personnel management and payroll processing.
# Retrieve an employee
Source: https://docs.conductor.is/qbd-api/employees/retrieve
GET /quickbooks-desktop/employees/{id}
Retrieves an employee by ID.
# Update an employee
Source: https://docs.conductor.is/qbd-api/employees/update
POST /quickbooks-desktop/employees/{id}
Updates an existing employee.
# Create an estimate
Source: https://docs.conductor.is/qbd-api/estimates/create
POST /quickbooks-desktop/estimates
Creates a new estimate.
# Delete an estimate
Source: https://docs.conductor.is/qbd-api/estimates/delete
DELETE /quickbooks-desktop/estimates/{id}
Permanently deletes a an estimate. The deletion will fail if the estimate is currently in use or has any linked transactions that are in use.
# List all estimates
Source: https://docs.conductor.is/qbd-api/estimates/list
GET /quickbooks-desktop/estimates
Returns a list of estimates. Use the `cursor` parameter to paginate through the results.
# The Estimate object
Source: https://docs.conductor.is/qbd-api/estimates/object
An estimate is a formal proposal detailing costs and terms for goods or services to a customer. It can be called a "bid" or "proposal" and uses similar fields to invoices in QuickBooks. As a non-posting transaction, it serves as a planning tool that can be converted to an invoice upon customer acceptance.
# Retrieve an estimate
Source: https://docs.conductor.is/qbd-api/estimates/retrieve
GET /quickbooks-desktop/estimates/{id}
Retrieves an estimate by ID.
# Update an estimate
Source: https://docs.conductor.is/qbd-api/estimates/update
POST /quickbooks-desktop/estimates/{id}
Updates an existing estimate.
# Create an inventory adjustment
Source: https://docs.conductor.is/qbd-api/inventory-adjustments/create
POST /quickbooks-desktop/inventory-adjustments
Creates a new inventory adjustment.
# Delete an inventory adjustment
Source: https://docs.conductor.is/qbd-api/inventory-adjustments/delete
DELETE /quickbooks-desktop/inventory-adjustments/{id}
Permanently deletes a an inventory adjustment. The deletion will fail if the inventory adjustment is currently in use or has any linked transactions that are in use.
# List all inventory adjustments
Source: https://docs.conductor.is/qbd-api/inventory-adjustments/list
GET /quickbooks-desktop/inventory-adjustments
Returns a list of inventory adjustments. NOTE: QuickBooks Desktop does not support pagination for inventory adjustments; hence, there is no `cursor` parameter. Users typically have few inventory adjustments.
# The Inventory Adjustment object
Source: https://docs.conductor.is/qbd-api/inventory-adjustments/object
An inventory adjustment records changes to inventory item quantities and values in QuickBooks Desktop, typically used to correct discrepancies between physical counts and system records, or to account for damage, theft, or other inventory changes that aren't related to purchases or sales.
# Retrieve an inventory adjustment
Source: https://docs.conductor.is/qbd-api/inventory-adjustments/retrieve
GET /quickbooks-desktop/inventory-adjustments/{id}
Retrieves an inventory adjustment by ID.
# Update an inventory adjustment
Source: https://docs.conductor.is/qbd-api/inventory-adjustments/update
POST /quickbooks-desktop/inventory-adjustments/{id}
Updates an existing inventory adjustment.
# Create an inventory assembly item
Source: https://docs.conductor.is/qbd-api/inventory-assembly-items/create
POST /quickbooks-desktop/inventory-assembly-items
Creates a new inventory assembly item.
# List all inventory assembly items
Source: https://docs.conductor.is/qbd-api/inventory-assembly-items/list
GET /quickbooks-desktop/inventory-assembly-items
Returns a list of inventory assembly items. Use the `cursor` parameter to paginate through the results.
# The Inventory Assembly Item object
Source: https://docs.conductor.is/qbd-api/inventory-assembly-items/object
An inventory assembly item is an item that is assembled or manufactured from inventory items. The items and/or assemblies that make up the assembly are called components.
# Retrieve an inventory assembly item
Source: https://docs.conductor.is/qbd-api/inventory-assembly-items/retrieve
GET /quickbooks-desktop/inventory-assembly-items/{id}
Retrieves an inventory assembly item by ID.
# Update an inventory assembly item
Source: https://docs.conductor.is/qbd-api/inventory-assembly-items/update
POST /quickbooks-desktop/inventory-assembly-items/{id}
Updates an existing inventory assembly item.
# Create an inventory item
Source: https://docs.conductor.is/qbd-api/inventory-items/create
POST /quickbooks-desktop/inventory-items
Creates a new inventory item.
# List all inventory items
Source: https://docs.conductor.is/qbd-api/inventory-items/list
GET /quickbooks-desktop/inventory-items
Returns a list of inventory items. Use the `cursor` parameter to paginate through the results.
# The Inventory Item object
Source: https://docs.conductor.is/qbd-api/inventory-items/object
An inventory item is any merchandise or part that a business purchases, tracks as inventory, and then resells.
# Retrieve an inventory item
Source: https://docs.conductor.is/qbd-api/inventory-items/retrieve
GET /quickbooks-desktop/inventory-items/{id}
Retrieves an inventory item by ID.
# Update an inventory item
Source: https://docs.conductor.is/qbd-api/inventory-items/update
POST /quickbooks-desktop/inventory-items/{id}
Updates an existing inventory item.
# Create an inventory site
Source: https://docs.conductor.is/qbd-api/inventory-sites/create
POST /quickbooks-desktop/inventory-sites
Creates a new inventory site.
# List all inventory sites
Source: https://docs.conductor.is/qbd-api/inventory-sites/list
GET /quickbooks-desktop/inventory-sites
Returns a list of inventory sites. NOTE: QuickBooks Desktop does not support pagination for inventory sites; hence, there is no `cursor` parameter. Users typically have few inventory sites.
# The Inventory Site object
Source: https://docs.conductor.is/qbd-api/inventory-sites/object
An inventory site is a location where inventory is stored. For example, a company might have a warehouse, a stockroom, and a showroom, each of which is an inventory site. NOTE: Inventory sites require QuickBooks Enterprise with an Advanced Inventory subscription.
# Retrieve an inventory site
Source: https://docs.conductor.is/qbd-api/inventory-sites/retrieve
GET /quickbooks-desktop/inventory-sites/{id}
Retrieves an inventory site by ID.
# Update an inventory site
Source: https://docs.conductor.is/qbd-api/inventory-sites/update
POST /quickbooks-desktop/inventory-sites/{id}
Updates an existing inventory site.
# Create an invoice
Source: https://docs.conductor.is/qbd-api/invoices/create
POST /quickbooks-desktop/invoices
Creates a new invoice.
# Delete an invoice
Source: https://docs.conductor.is/qbd-api/invoices/delete
DELETE /quickbooks-desktop/invoices/{id}
Permanently deletes a an invoice. The deletion will fail if the invoice is currently in use or has any linked transactions that are in use.
# List all invoices
Source: https://docs.conductor.is/qbd-api/invoices/list
GET /quickbooks-desktop/invoices
Returns a list of invoices. Use the `cursor` parameter to paginate through the results.
# The Invoice object
Source: https://docs.conductor.is/qbd-api/invoices/object
An invoice is a commercial document issued to customers that itemizes and records a transaction between buyer and seller. It lists the products or services provided, their quantities, prices, payment terms, and the total amount due. In QuickBooks, invoices are used to track accounts receivable and record sales transactions where payment was not made in full at the time of purchase.
# Retrieve an invoice
Source: https://docs.conductor.is/qbd-api/invoices/retrieve
GET /quickbooks-desktop/invoices/{id}
Retrieves an invoice by ID.
# Update an invoice
Source: https://docs.conductor.is/qbd-api/invoices/update
POST /quickbooks-desktop/invoices/{id}
Updates an existing invoice.
# Create a journal entry
Source: https://docs.conductor.is/qbd-api/journal-entries/create
POST /quickbooks-desktop/journal-entries
Creates a new journal entry.
# Delete a journal entry
Source: https://docs.conductor.is/qbd-api/journal-entries/delete
DELETE /quickbooks-desktop/journal-entries/{id}
Permanently deletes a a journal entry. The deletion will fail if the journal entry is currently in use or has any linked transactions that are in use.
# List all journal entries
Source: https://docs.conductor.is/qbd-api/journal-entries/list
GET /quickbooks-desktop/journal-entries
Returns a list of journal entries. Use the `cursor` parameter to paginate through the results.
# The Journal Entry object
Source: https://docs.conductor.is/qbd-api/journal-entries/object
A journal entry is a direct way to record financial transactions by their debit and credit impacts on accounts, typically used for recording depreciation, adjusting entries, or other transactions that can't be entered through standard forms like bills or invoices.
# Retrieve a journal entry
Source: https://docs.conductor.is/qbd-api/journal-entries/retrieve
GET /quickbooks-desktop/journal-entries/{id}
Retrieves a journal entry by ID.
# Update a journal entry
Source: https://docs.conductor.is/qbd-api/journal-entries/update
POST /quickbooks-desktop/journal-entries/{id}
Updates an existing journal entry.
# Create a non-inventory item
Source: https://docs.conductor.is/qbd-api/non-inventory-items/create
POST /quickbooks-desktop/non-inventory-items
Creates a new non-inventory item.
# List all non-inventory items
Source: https://docs.conductor.is/qbd-api/non-inventory-items/list
GET /quickbooks-desktop/non-inventory-items
Returns a list of non-inventory items. Use the `cursor` parameter to paginate through the results.
# The Non-Inventory Item object
Source: https://docs.conductor.is/qbd-api/non-inventory-items/object
A non-inventory item is any material or part that a business buys but does not keep on hand as inventory.
There are two types of non-inventory items: 1. Materials or parts that are part of the business's overhead (for example, office supplies) 2. Materials or parts that the business buys to finish a specific job and then charges back to the customer.
# Retrieve a non-inventory item
Source: https://docs.conductor.is/qbd-api/non-inventory-items/retrieve
GET /quickbooks-desktop/non-inventory-items/{id}
Retrieves a non-inventory item by ID.
# Update a non-inventory item
Source: https://docs.conductor.is/qbd-api/non-inventory-items/update
POST /quickbooks-desktop/non-inventory-items/{id}
Updates an existing non-inventory item.
# Pagination
Source: https://docs.conductor.is/qbd-api/pagination
Learn how to efficiently retrieve large datasets in API v2 from QuickBooks Desktop using cursor-based pagination.
Conductor's QuickBooks Desktop API v2 uses cursor-based pagination to handle large datasets efficiently, allowing you to retrieve results in manageable chunks. This guide explains how to implement pagination and its key limitations.
## How pagination works
For list endpoints that support pagination (indicated by the presence of a `cursor` query parameter in the API specification), the process works as follows:
1. Make your initial request to the list endpoint without a cursor.
* Use the `limit` query parameter to control how many items are returned per page.
* The default and maximum value is `150` items per page. We enforce this limit to prevent overloading QuickBooks Desktop.
2. The response will contain the following pagination fields:
* `nextCursor` - The cursor value to use when requesting the next page of results. This field is `null` if there are no more pages.
* `hasMore` - Indicates whether there are more pages of results available.
* `remainingCount` - The number of remaining items that can be retrieved in subsequent pages.
3. To fetch the next page, make another request with the `cursor` query parameter set to the `nextCursor` value from the previous response.
**You must make subsequent pagination requests within 10 seconds of
receiving the previous response.** If you exceed this time limit, you'll
receive an error.
* This limitation is inherent to QuickBooks Desktop's design.
* While this is not an issue when using code to automatically fetch pages in sequence (e.g., in a loop), it may affect manual API testing where you're copying and pasting cursor values between requests.
4. Repeat until `hasMore` is `false`.
5. Attempting to request another page when `hasMore` is `false` will result in an error.
## Important limitations
### Same `cursor` value used for all pages
The `cursor` value remains constant throughout the entire pagination sequence. This means you should reuse the same cursor value for all subsequent requests in the sequence, which is a design characteristic inherent to the QuickBooks Desktop system.
### No custom sorting available
The order of results is determined entirely by QuickBooks Desktop, and no information about the ordering is provided in the response. Due to this limitation, custom sorting of results is not supported through the API.
### Non-paginated endpoints
Some QuickBooks Desktop list APIs do not support pagination due to limitations in QuickBooks Desktop itself. These endpoints can be identified by the absence of the `cursor` parameter in their API specification. This typically applies to endpoints where the end-user is highly unlikely to have a large set of objects of that type, so the absence of pagination will not impact performance.
## Pagination in Conductor SDKs
Our official client libraries handle pagination automatically, making it easier to work with paginated responses. Check out their documentation for implementation details:
* [Node.js SDK](https://github.com/conductor-is/quickbooks-desktop-node?tab=readme-ov-file#auto-pagination)
* [Python SDK](https://github.com/conductor-is/quickbooks-desktop-python?tab=readme-ov-file#pagination)
## Example
1. Initial request:
```http
GET https://api.conductor.is/v1/quickbooks_desktop/customers
```
```json Example initial response
{
"data": [...],
"nextCursor": "abc123",
"hasMore": true,
"remainingCount": 99
}
```
2. Next page request with `cursor` query parameter:
```http
GET https://api.conductor.is/v1/quickbooks_desktop/customers?cursor=abc123
```
```json Example next page response
{
"data": [...],
"nextCursor": "abc123",
"hasMore": false,
"remainingCount": 0
}
```
3. Requesting another page after `hasMore` is `false` will result in an error:
```http
GET https://api.conductor.is/v1/quickbooks_desktop/customers?cursor=abc123
```
```json Example error response
{
"error": {
"message": "No more results available"
// ...
}
}
```
# Create a payroll wage item
Source: https://docs.conductor.is/qbd-api/payroll-wage-items/create
POST /quickbooks-desktop/payroll-wage-items
Creates a new payroll wage item.
# List all payroll wage items
Source: https://docs.conductor.is/qbd-api/payroll-wage-items/list
GET /quickbooks-desktop/payroll-wage-items
Returns a list of payroll wage items. Use the `cursor` parameter to paginate through the results.
# The Payroll Wage Item object
Source: https://docs.conductor.is/qbd-api/payroll-wage-items/object
A payroll wage item defines a type of payment scheme in QuickBooks Desktop, such as Regular Pay or Overtime Pay, that specifies how employee wages are calculated and tracked.
# Retrieve a payroll wage item
Source: https://docs.conductor.is/qbd-api/payroll-wage-items/retrieve
GET /quickbooks-desktop/payroll-wage-items/{id}
Retrieves a payroll wage item by ID.
# Create a purchase order
Source: https://docs.conductor.is/qbd-api/purchase-orders/create
POST /quickbooks-desktop/purchase-orders
Creates a new purchase order.
# Delete a purchase order
Source: https://docs.conductor.is/qbd-api/purchase-orders/delete
DELETE /quickbooks-desktop/purchase-orders/{id}
Permanently deletes a a purchase order. The deletion will fail if the purchase order is currently in use or has any linked transactions that are in use.
# List all purchase orders
Source: https://docs.conductor.is/qbd-api/purchase-orders/list
GET /quickbooks-desktop/purchase-orders
Returns a list of purchase orders. Use the `cursor` parameter to paginate through the results.
# The Purchase Order object
Source: https://docs.conductor.is/qbd-api/purchase-orders/object
A purchase order represents a formal request for goods or services sent to a vendor. Since it is a non-posting transaction, it serves as a commitment to purchase but does not impact the company's financial statements.
# Retrieve a purchase order
Source: https://docs.conductor.is/qbd-api/purchase-orders/retrieve
GET /quickbooks-desktop/purchase-orders/{id}
Retrieves a purchase order by ID.
# Update a purchase order
Source: https://docs.conductor.is/qbd-api/purchase-orders/update
POST /quickbooks-desktop/purchase-orders/{id}
Updates an existing purchase order.
# Create a receive-payment
Source: https://docs.conductor.is/qbd-api/receive-payments/create
POST /quickbooks-desktop/receive-payments
Creates a new receive-payment.
# Delete a receive-payment
Source: https://docs.conductor.is/qbd-api/receive-payments/delete
DELETE /quickbooks-desktop/receive-payments/{id}
Permanently deletes a a receive-payment. The deletion will fail if the receive-payment is currently in use or has any linked transactions that are in use.
# List all receive-payments
Source: https://docs.conductor.is/qbd-api/receive-payments/list
GET /quickbooks-desktop/receive-payments
Returns a list of receive-payments. Use the `cursor` parameter to paginate through the results.
# The Receive-Payment object
Source: https://docs.conductor.is/qbd-api/receive-payments/object
A receive-payment records when a payment is received from a customer *not* at the time of sale. It can be used for one or more of these purposes: (1) record a customer's payment against one or more invoices, (2) set a discount (e.g., for early payment), or (3) set a credit (e.g., from returned merchandise). Note: If full payment is received at the time of sale, use a sales receipt instead.
# Retrieve a receive-payment
Source: https://docs.conductor.is/qbd-api/receive-payments/retrieve
GET /quickbooks-desktop/receive-payments/{id}
Retrieves a receive-payment by ID.
# Update a receive-payment
Source: https://docs.conductor.is/qbd-api/receive-payments/update
POST /quickbooks-desktop/receive-payments/{id}
Updates an existing receive-payment.
# Create a sales order
Source: https://docs.conductor.is/qbd-api/sales-orders/create
POST /quickbooks-desktop/sales-orders
Creates a new sales order.
# Delete a sales order
Source: https://docs.conductor.is/qbd-api/sales-orders/delete
DELETE /quickbooks-desktop/sales-orders/{id}
Permanently deletes a a sales order. The deletion will fail if the sales order is currently in use or has any linked transactions that are in use.
# List all sales orders
Source: https://docs.conductor.is/qbd-api/sales-orders/list
GET /quickbooks-desktop/sales-orders
Returns a list of sales orders. Use the `cursor` parameter to paginate through the results.
# The Sales Order object
Source: https://docs.conductor.is/qbd-api/sales-orders/object
A sales order tracks inventory that is on back order for a customer. In QuickBooks, sales orders and invoices use similar fields, and a sales order can be "converted" into an invoice (by linking the invoice to the sales order) once the inventory is in stock.
# Retrieve a sales order
Source: https://docs.conductor.is/qbd-api/sales-orders/retrieve
GET /quickbooks-desktop/sales-orders/{id}
Retrieves a sales order by ID.
# Update a sales order
Source: https://docs.conductor.is/qbd-api/sales-orders/update
POST /quickbooks-desktop/sales-orders/{id}
Updates an existing sales order.
# Create a sales receipt
Source: https://docs.conductor.is/qbd-api/sales-receipts/create
POST /quickbooks-desktop/sales-receipts
Creates a new sales receipt.
# Delete a sales receipt
Source: https://docs.conductor.is/qbd-api/sales-receipts/delete
DELETE /quickbooks-desktop/sales-receipts/{id}
Permanently deletes a a sales receipt. The deletion will fail if the sales receipt is currently in use or has any linked transactions that are in use.
# List all sales receipts
Source: https://docs.conductor.is/qbd-api/sales-receipts/list
GET /quickbooks-desktop/sales-receipts
Returns a list of sales receipts. Use the `cursor` parameter to paginate through the results.
# The Sales Receipt object
Source: https://docs.conductor.is/qbd-api/sales-receipts/object
A sales receipt records a sale where complete payment is received at the time of the transaction, whether by cash, check, or credit card. It combines the sale and payment into a single transaction. For situations requiring partial or delayed payments, use an invoice with receive-payments instead.
# Retrieve a sales receipt
Source: https://docs.conductor.is/qbd-api/sales-receipts/retrieve
GET /quickbooks-desktop/sales-receipts/{id}
Retrieves a sales receipt by ID.
# Update a sales receipt
Source: https://docs.conductor.is/qbd-api/sales-receipts/update
POST /quickbooks-desktop/sales-receipts/{id}
Updates an existing sales receipt.
# Create a sales representative
Source: https://docs.conductor.is/qbd-api/sales-representatives/create
POST /quickbooks-desktop/sales-representatives
Creates a new sales representative.
# List all sales representatives
Source: https://docs.conductor.is/qbd-api/sales-representatives/list
GET /quickbooks-desktop/sales-representatives
Returns a list of sales representatives. NOTE: QuickBooks Desktop does not support pagination for sales representatives; hence, there is no `cursor` parameter. Users typically have few sales representatives.
# The Sales Representative object
Source: https://docs.conductor.is/qbd-api/sales-representatives/object
A sales representative is a person who can be assigned to sales transactions in QuickBooks Desktop. The sales representative corresponds to a separate employee, vendor, or other-name entity in QuickBooks.
# Retrieve a sales representative
Source: https://docs.conductor.is/qbd-api/sales-representatives/retrieve
GET /quickbooks-desktop/sales-representatives/{id}
Retrieves a sales representative by ID.
# Update a sales representative
Source: https://docs.conductor.is/qbd-api/sales-representatives/update
POST /quickbooks-desktop/sales-representatives/{id}
Updates an existing sales representative.
# Create a sales-tax code
Source: https://docs.conductor.is/qbd-api/sales-tax-codes/create
POST /quickbooks-desktop/sales-tax-codes
Creates a new sales-tax code.
# List all sales-tax codes
Source: https://docs.conductor.is/qbd-api/sales-tax-codes/list
GET /quickbooks-desktop/sales-tax-codes
Returns a list of sales-tax codes. NOTE: QuickBooks Desktop does not support pagination for sales-tax codes; hence, there is no `cursor` parameter. Users typically have few sales-tax codes.
# The Sales-Tax Code object
Source: https://docs.conductor.is/qbd-api/sales-tax-codes/object
A sales tax code helps categorize items on a sales form as taxable or non-taxable, detailing reasons and associating tax codes with customers, items, or transactions.
# Retrieve a sales-tax code
Source: https://docs.conductor.is/qbd-api/sales-tax-codes/retrieve
GET /quickbooks-desktop/sales-tax-codes/{id}
Retrieves a sales-tax code by ID.
# Update a sales-tax code
Source: https://docs.conductor.is/qbd-api/sales-tax-codes/update
POST /quickbooks-desktop/sales-tax-codes/{id}
Updates an existing sales-tax code.
# Create a sales-tax item
Source: https://docs.conductor.is/qbd-api/sales-tax-items/create
POST /quickbooks-desktop/sales-tax-items
Creates a new sales-tax item.
# List all sales-tax items
Source: https://docs.conductor.is/qbd-api/sales-tax-items/list
GET /quickbooks-desktop/sales-tax-items
Returns a list of sales-tax items. Use the `cursor` parameter to paginate through the results.
# The Sales-Tax Item object
Source: https://docs.conductor.is/qbd-api/sales-tax-items/object
A sales-tax item is an item used to calculate a single sales tax that is collected at a specified rate and paid to a single agency.
# Retrieve a sales-tax item
Source: https://docs.conductor.is/qbd-api/sales-tax-items/retrieve
GET /quickbooks-desktop/sales-tax-items/{id}
Retrieves a sales-tax item by ID.
# Update a sales-tax item
Source: https://docs.conductor.is/qbd-api/sales-tax-items/update
POST /quickbooks-desktop/sales-tax-items/{id}
Updates an existing sales-tax item.
# SDKs
Source: https://docs.conductor.is/qbd-api/sdks
Check out Conductor's official Node.js and Python SDKs for integrating with the QuickBooks Desktop API.
Conductor provides powerful, fully-typed SDKs for Node.js and Python that provides a top-tier developer experience for integrating QuickBooks Desktop. Both SDKs provide:
* Full API coverage
* Type safety and autocomplete for every endpoint, parameter, and response field
* Inline docs for all fields and methods
* Automatic request retries
* Comprehensive error handling
* async/await operations
* Modern API design patterns
# Node.js SDK
See the [Node.js SDK Documentation](https://github.com/conductor-is/quickbooks-desktop-node) for more details.
Though this version of the Node.js SDK uses an NPM `@beta` tag, it ***is* stable and ready for production use**! We merely have a few more endpoints to migrate before prompting all existing users to update. **Any new Conductor users should absolutely use the beta version**!
If you're migrating from the old `conductor-node` package, please see the [upgrade guide](/qbd-api/upgrade-node).
```bash npm
npm install conductor-node@beta
```
```bash yarn
yarn add conductor-node@beta
```
```bash pnpm
pnpm add conductor-node@beta
```
```ts
import Conductor from "conductor-node";
const conductor = new Conductor({
apiKey: process.env["CONDUCTOR_SECRET_KEY"], // This is the default and can be omitted
});
async function main() {
// Fetch the first page of invoices
const invoices = await conductor.qbd.invoices.list({
conductorEndUserId: "{{YOUR_END_USER_ID}}",
});
console.log(invoices.data);
}
main();
```
# Python SDK
See the [Python SDK Documentation](https://github.com/conductor-is/quickbooks-desktop-python) for more details.
```bash
pip install conductor-py
```
```python
import os
from conductor import Conductor
conductor = Conductor(
api_key=os.environ.get("CONDUCTOR_SECRET_KEY"), # This is the default and can be omitted
)
# Fetch the first page of invoices
invoices = conductor.qbd.invoices.list(
conductor_end_user_id="{{YOUR_END_USER_ID}}",
)
print(invoices.data)
```
# Create a service item
Source: https://docs.conductor.is/qbd-api/service-items/create
POST /quickbooks-desktop/service-items
Creates a new service item.
# List all service items
Source: https://docs.conductor.is/qbd-api/service-items/list
GET /quickbooks-desktop/service-items
Returns a list of service items. Use the `cursor` parameter to paginate through the results.
# The Service Item object
Source: https://docs.conductor.is/qbd-api/service-items/object
A service item represents a billable service offered by or purchased by a business in QuickBooks Desktop. It can track both sales and purchases of services, with customizable pricing, descriptions, and tax settings. Common examples include professional services (consulting, legal advice), labor charges (installation, repairs), recurring services (maintenance contracts), and any non-physical items that generate revenue or expenses.
# Retrieve a service item
Source: https://docs.conductor.is/qbd-api/service-items/retrieve
GET /quickbooks-desktop/service-items/{id}
Retrieves a service item by ID.
# Update a service item
Source: https://docs.conductor.is/qbd-api/service-items/update
POST /quickbooks-desktop/service-items/{id}
Updates an existing service item.
# Create a standard term
Source: https://docs.conductor.is/qbd-api/standard-terms/create
POST /quickbooks-desktop/standard-terms
Creates a new standard term.
# List all standard terms
Source: https://docs.conductor.is/qbd-api/standard-terms/list
GET /quickbooks-desktop/standard-terms
Returns a list of standard terms. NOTE: QuickBooks Desktop does not support pagination for standard terms; hence, there is no `cursor` parameter. Users typically have few standard terms.
# The Standard Term object
Source: https://docs.conductor.is/qbd-api/standard-terms/object
A standard term is a payment term that shows the number of days within which payment is due and can include a discount for early payment.
# Retrieve a standard term
Source: https://docs.conductor.is/qbd-api/standard-terms/retrieve
GET /quickbooks-desktop/standard-terms/{id}
Retrieves a standard term by ID.
# Create a subtotal item
Source: https://docs.conductor.is/qbd-api/subtotal-items/create
POST /quickbooks-desktop/subtotal-items
Creates a new subtotal item.
# List all subtotal items
Source: https://docs.conductor.is/qbd-api/subtotal-items/list
GET /quickbooks-desktop/subtotal-items
Returns a list of subtotal items. Use the `cursor` parameter to paginate through the results.
# The Subtotal Item object
Source: https://docs.conductor.is/qbd-api/subtotal-items/object
A subtotal item calculates the sum of all items above it on a sales form, up to the previous subtotal. This is particularly important for applying discounts because discounts can only be applied to the line directly above them, requiring items to be subtotaled first.
# Retrieve a subtotal item
Source: https://docs.conductor.is/qbd-api/subtotal-items/retrieve
GET /quickbooks-desktop/subtotal-items/{id}
Retrieves a subtotal item by ID.
# Update a subtotal item
Source: https://docs.conductor.is/qbd-api/subtotal-items/update
POST /quickbooks-desktop/subtotal-items/{id}
Updates an existing subtotal item.
# Create a transfer
Source: https://docs.conductor.is/qbd-api/transfers/create
POST /quickbooks-desktop/transfers
Creates a new transfer.
# List all transfers
Source: https://docs.conductor.is/qbd-api/transfers/list
GET /quickbooks-desktop/transfers
Returns a list of transfers. Use the `cursor` parameter to paginate through the results.
# The Transfer object
Source: https://docs.conductor.is/qbd-api/transfers/object
A transfer records the movement of funds between two accounts in QuickBooks Desktop. It reduces the balance of one account (the "from" account) and increases the balance of another account (the "to" account) by the same amount. Transfers are commonly used for moving money between bank accounts or recording internal fund movements.
# Retrieve a transfer
Source: https://docs.conductor.is/qbd-api/transfers/retrieve
GET /quickbooks-desktop/transfers/{id}
Retrieves a transfer by ID.
# Update a transfer
Source: https://docs.conductor.is/qbd-api/transfers/update
POST /quickbooks-desktop/transfers/{id}
Updates an existing transfer.
# Upgrading to Conductor's new Node.js SDK
Source: https://docs.conductor.is/qbd-api/upgrade-node
How to migrate from the old `conductor-node` package to Conductor's new Node.js SDK and QuickBooks Desktop API v2.
We're excited to announce a major update to `conductor-node` that brings full support for Conductor's new QuickBooks Desktop API v2. This new version introduces significant improvements in usability, consistency, and functionality.
Though the old version of `conductor-node` will continue to work, it will not
receive any further updates. We strongly recommend upgrading to take advantage
of the new features and improvements.
## Key improvements
Our new QuickBooks Desktop API v2 has been completely redesigned from the ground up. We've carefully chosen every field name, parameter, and method description to be significantly more intuitive and clearer than QuickBooks's original documentation. The API structure has been simplified while maintaining full functionality.
Major improvements include:
* **Improved parameter and fields names**,
* Completely **rewritten inline documentation**
* **[Automatic pagination](#automatic-pagination) support**
* **Automatic retries** with exponential backoff
* **Configurable timeouts**
* New methods like **`.retrieve()`** and **`.delete()`**
* All fields included in responses
* Consistent array handling
## Warning: Some QuickBooks Desktop types are not yet available in the new SDK
Several *less common* QuickBooks Desktop types/endpoints from the previous version of `conductor-node` are not *yet* available in the new SDK. **If the type is listed in the sidebar to the left of this page, it is available in the new SDK.**
If you need a specific QBD type, please [contact support](mailto:support@conductor.is) and we'll add it to the next release.
## How to upgrade
Though this version of the Node.js SDK uses an NPM `@beta` tag, it ***is*
stable and ready for production use**! We merely have a few more endpoints to
migrate before prompting all existing users to update.
```bash npm
npm install conductor-node@beta
```
```bash yarn
yarn add conductor-node@beta
```
```bash pnpm
pnpm add conductor-node@beta
```
## ⚠️ Breaking changes
**The only breaking changes in this update relate to naming structure.
*QuickBooks business logic has no changes.*** We've simply made the interface
simpler, more intuitive, and more robust, while adding new features like
automatic pagination and retries.
**Old:**
```typescript
import Conductor from "conductor-node";
const conductor = new Conductor("{{YOUR_SECRET_KEY}}");
```
**New:** You can now automatically load your secret key from the `CONDUCTOR_SECRET_KEY` environment variable (or pass it to the constructor as an argument like before):
```typescript
import Conductor from "conductor-node";
const conductor = new Conductor({
apiKey: process.env["CONDUCTOR_SECRET_KEY"], // This is the default and can be omitted
});
```
**Old:** Singular resource names.
```typescript
await conductor.qbd.bill.*
await conductor.qbd.invoice.*
await conductor.qbd.itemInventory.*
```
**New:** Plural resource names and clearer naming.
```typescript
await conductor.qbd.bills.*
await conductor.qbd.invoices.*
await conductor.qbd.inventoryItems.*
```
**Old:** Odd naming conventions.
```typescript
await conductor.qbd.bill.query(...)
await conductor.qbd.bill.add(...)
await conductor.qbd.bill.mod(...)
```
**New:** Intuitive naming following REST conventions.
```typescript
await conductor.qbd.bills.list(...)
await conductor.qbd.bills.create(...)
await conductor.qbd.bills.update(...)
await conductor.qbd.bills.retrieve(...) // New!
await conductor.qbd.bills.delete(...) // New!
```
**Old:** Required as its own argument.
```typescript
await conductor.qbd.bill.query("end_usr_1234abcd", { ... });
```
**New:** Required as a `conductorEndUserId` parameter in the parameters object.
```typescript
await conductor.qbd.bills.list({
conductorEndUserId: "end_usr_1234abcd",
// ... other params
});
```
All request parameters are now in camelCase and have been renamed for clarity
and consistency. Most of the changes are straightforward that you can find
using autocomplete in your IDE or checking the APIs in the sidebar.
**Old:** Odd naming conventions.
```typescript
await conductor.qbd.bill.add("end_usr_1234abcd", {
VendorRef: { ListID: "..." },
RefNumber: "...",
ExpenseLineAdd: [
{
Amount: "1.00",
},
],
});
```
**New:** camelCase and clearer naming.
```typescript
await conductor.qbd.bills.create({
conductorEndUserId: "end_usr_1234abcd",
vendorId: "...",
refNumber: "...",
expenseLines: [
{
amount: "1.00",
},
],
});
```
All output fields are now in camelCase and have been renamed for clarity and
consistency. Most of the changes are straightforward that you can find using
autocomplete in your IDE or checking the APIs in the sidebar.
Here are some key renamed fields:
* `TxnID` and `ListID` → `id`
* `TimeCreated` and `TimeModified` → `createdAt` and `updatedAt`
* `EditSequence` → `revisionNumber`
* `*Ref` fields (e.g., `CustomerRef`) → simplified (e.g., `customer`)
**Old:** Odd naming conventions.
```typescript
const invoice = await conductor.qbd.invoice.query("end_usr_1234abcd", "...");
// {
// TxnID: "...",
// TimeCreated: "...",
// TimeModified: "...",
// EditSequence: "...",
// TxnNumber: "...",
// CustomerRef: {
// ListID: "...",
// FullName: "..."
// }
// }
```
**New:** camelCase and clearer naming.
```typescript
const invoice = await conductor.qbd.invoices.retrieve({
conductorEndUserId: "end_usr_1234abcd",
id: "...",
});
// {
// id: "...",
// objectType: "qbd_invoice",
// createdAt: "...",
// updatedAt: "...",
// revisionNumber: "...",
// transactionNumber: "...",
// customer: {
// id: "...",
// fullName: "..."
// }
// }
```
**Old:** Odd naming conventions and complex structure.
```typescript
const invoices = await conductor.qbd.invoice.query("end_usr_1234abcd", {
ModifiedDateRangeFilter: {
FromModifiedDate: "...",
ToModifiedDate: "...",
},
AccountFilter: {
ListID: "...",
},
RefNumberFilter: "...",
RefNumberRangeFilter: {
FromRefNumber: "...",
ToRefNumber: "...",
},
MaxReturned: 100,
});
```
**New:** Significantly simplified structure and clearer naming.
```typescript
const invoices = await conductor.qbd.invoices.list({
conductorEndUserId: "end_usr_1234abcd",
updatedAfter: "...",
updatedBefore: "...",
accountId: "...",
refNumber: "...",
refNumberFrom: "...",
refNumberTo: "...",
limit: 100,
});
```
To support automatic pagination, the query/list method now returns results in an object wrapper with properties for pagination metadata.
**Old:** Returns an array of results directly.
```typescript
const invoices = await conductor.qbd.invoice.query("end_usr_1234abcd");
// [
// {
// TxnID: "...",
// TimeCreated: "...",
// ...
// }
// ]
```
**New:** Returns results in an object wrapper with properties for pagination metadata.
```typescript
const response = await conductor.qbd.invoices.list({
conductorEndUserId: "end_usr_1234abcd",
});
console.log(response);
// {
// nextCursor: "...",
// hasMore: true,
// remainingCount: 100,
// data: [
// {
// id: "...",
// objectType: "qbd_invoice",
// createdAt: "...",
// ...
// }
// ]
// }
```
Previously, the API would return all matching records by default. This could lead to performance issues when unintentionally retrieving thousands of records, potentially causing long response times, overloading QuickBooks Desktop, and consuming excessive memory.
To prevent these issues, **Conductor now limits responses to a maximum of 150 records per page by default**. This limit was carefully determined through extensive testing across different scenarios and system configurations to optimize performance while avoiding timeouts and resource constraints.
With the new [automatic pagination](https://github.com/conductor-is/quickbooks-desktop-node?tab=readme-ov-file#auto-pagination), you can efficiently retrieve all records when needed, without worrying about these performance concerns.
Fields that can have multiple values are now always arrays, even when there's only one record:
```typescript
const response = await conductor.qbd.invoices.list({
conductorEndUserId: "end_usr_1234abcd",
});
// All responses with potential multiple records use arrays consistently
console.log(response.data[0].lines); // Always an array, even if there's only one line
```
Several *less common* QuickBooks Desktop types/endpoints from the previous version of `conductor-node` are not *yet* available in the new SDK. **If the type is listed in the sidebar to the left of this page, it is available in the new SDK.**
If you need a specific QBD type, please [contact support](mailto:support@conductor.is) and we'll add it to the next release.
## New features
You can now easily paginate through all results. See the [automatic pagination](https://github.com/conductor-is/quickbooks-desktop-node?tab=readme-ov-file#auto-pagination) section of the README for more details.
```typescript
async function fetchAllQbdInvoices(params) {
const allQbdInvoices = [];
// Automatically fetches more pages as needed
for await (const invoice of conductor.qbd.invoices.list({
conductorEndUserId: "{{YOUR_END_USER_ID}}",
...params,
})) {
allQbdInvoices.push(invoice);
}
return allQbdInvoices;
}
```
Intelligently retries requests, but only those requests that can potentially succeed when retried (such as network errors).
All objects now have a `retrieve` method and all transaction objects have a `delete` method.
```typescript
await conductor.qbd.bills.retrieve({ conductorEndUserId: "...", id: "..." });
await conductor.qbd.bills.delete({ conductorEndUserId: "...", id: "..." });
```
The new API now returns a consistent response structure with all possible fields, making it easier to work with the data. Fields that have no value are explicitly set to `null` rather than being omitted, and empty array fields return `[]` instead of being excluded. This means you can reliably access any field without checking if it exists first, and array operations will work consistently without special handling for missing fields.
## More information
For more detailed information about the new Node.js SDK, please check its [GitHub repository](https://github.com/conductor-is/quickbooks-desktop-node).
# Create a vendor credit
Source: https://docs.conductor.is/qbd-api/vendor-credits/create
POST /quickbooks-desktop/vendor-credits
Creates a new vendor credit.
# Delete a vendor credit
Source: https://docs.conductor.is/qbd-api/vendor-credits/delete
DELETE /quickbooks-desktop/vendor-credits/{id}
Permanently deletes a a vendor credit. The deletion will fail if the vendor credit is currently in use or has any linked transactions that are in use.
# List all vendor credits
Source: https://docs.conductor.is/qbd-api/vendor-credits/list
GET /quickbooks-desktop/vendor-credits
Returns a list of vendor credits. Use the `cursor` parameter to paginate through the results.
# The Vendor Credit object
Source: https://docs.conductor.is/qbd-api/vendor-credits/object
A vendor credit (also known as a bill credit) represents money that a vendor owes back to your business, typically from overpayment or returned merchandise. When processing bill payments, you can apply these credits via `applyToTransactions.setCredit` to reduce payment amounts. Note that vendor credits track money owed by vendors, while credit memos track money you owe customers and are handled through receive-payment transactions.
# Retrieve a vendor credit
Source: https://docs.conductor.is/qbd-api/vendor-credits/retrieve
GET /quickbooks-desktop/vendor-credits/{id}
Retrieves a vendor credit by ID.
# Update a vendor credit
Source: https://docs.conductor.is/qbd-api/vendor-credits/update
POST /quickbooks-desktop/vendor-credits/{id}
Updates an existing vendor credit.
# Create a vendor
Source: https://docs.conductor.is/qbd-api/vendors/create
POST /quickbooks-desktop/vendors
Creates a new vendor.
# List all vendors
Source: https://docs.conductor.is/qbd-api/vendors/list
GET /quickbooks-desktop/vendors
Returns a list of vendors. Use the `cursor` parameter to paginate through the results.
# The Vendor object
Source: https://docs.conductor.is/qbd-api/vendors/object
A vendor is any person or company from whom a small business owner buys goods and services. (Banks and tax agencies usually are included on the vendor list.) A company's vendor list contains information such as account balance and contact information about each vendor.
# Retrieve a vendor
Source: https://docs.conductor.is/qbd-api/vendors/retrieve
GET /quickbooks-desktop/vendors/{id}
Retrieves a vendor by ID.
# Update a vendor
Source: https://docs.conductor.is/qbd-api/vendors/update
POST /quickbooks-desktop/vendors/{id}
Updates an existing vendor.
# Welcome to Conductor's QuickBooks Desktop API
Source: https://docs.conductor.is/qbd-api/welcome
Welcome to Conductor's new QuickBooks Desktop API.
Conductor is a real-time, fully-typed API for QuickBooks Desktop (sometimes called QuickBooks Enterprise), available via Python, Node.js, and REST. In just a few lines, get real-time access to fetch, create, or update *any* QuickBooks Desktop object type and receive a fully-typed response.
Follow our [Quickstart guide](/quickstart) to get started.
## Key features
* **Any data type**: Query, create, or update any QuickBooks Desktop data type.
* **Real-time**: Get real-time updates on your QuickBooks Desktop data. No queues, no jobs, no cache layer -- just direct access to the data.
* **Modern API**: JSON-based REST API, replacing the old XML-based SOAP model.
* **Typed client libraries**: Fully typed libraries in Node.js and Python with autocomplete, inline docs, and type validation for endpoints, parameters, and responses.
* **Request handling**: Invisibly manages queues, timeouts, retries, and pagination.
* **Auto-pagination**: Automatically handles paginated responses to retrieve complete datasets.
* **Multi-company support**: Connects to multiple QuickBooks Desktop company files.
* **Validation**: Sanitizes and validates all inputs and outputs.
* **Unified error handling**: Streamlines error handling across the QuickBooks stack.
* **Authentication flow UI**: Simple UI for securely connecting QuickBooks Desktop accounts.
* **Dashboard**: UI to monitor and manage your QuickBooks Desktop connections and data.
* **Error resolution**: Detailed guides and instructions for resolving errors and handling edge cases.
# What's new in API v2
Source: https://docs.conductor.is/qbd-api/whats-new
Conductor's new QuickBooks Desktop API is a massive leap forward and sets the foundation for future integrations.
Welcome to Conductor's new QuickBooks Desktop API v2.
**API v2 brings the following improvements over v1.0:**
1. Proper HTTP methods: `GET` for reading, `POST` for creating or updating. No more `POST` for everything.
2. Cleaner URL endpoints: `/quickbooks_desktop/invoices` instead of `/end-users/{id}/passthrough/quickbooks_desktop` with `InvoiceQueryRq` in the body.
3. An OpenAPI spec for the entire API.
4. Full online documentation of all fields and their types.
5. API playground in the documentation to test requests and see responses.
6. Always returns all response fields. Uses `null` for undefined fields instead of omitting them.
7. Consistently returns arrays for any nested fields that previously returned a single object for one item and an array for multiple items.
* Returns an empty array instead of `null` for empty lists.
8. Clean response bodies: No more unwrapping outer objects; e.g., no more `InvoiceQueryRs.InvoiceRet`.
9. Proper object wrapper for all list responses: Previously, we returned an array of objects. Now, we return an object with a `data` field that contains the array of objects.
10. Pagination for all list endpoints.
11. Better parameter names instead of QuickBooks Desktop's unconventional naming. For example:
* `MaxReturned` → `limit`
* `TimeModified` → `updatedAt`
* `DataExtRet` → `customFields`
12. Uses `camelCase` for input and output field names instead of `PascalCase`.
13. Simplified request structure. For example:
* `refNumberStartsWith: "REF"` instead of `RefNumberFilter: { MatchCriterion: "StartsWith", RefNumber: "REF" }`
* `accountId: "123"` instead of `AccountRef: { ListID: "123" }`
14. Correct types for obscure fields: Previously, we inferred types from XML. Now, we define the type of every field to ensure it is always correct.
15. Better field descriptions: we are using our own descriptions instead of QuickBooks' descriptions.
16. Field-specific coercions: better handling of dates and money amounts.
17. Enforced upper bound on `limit` of 150 records per page to prevent unintentionally overloading QuickBooks Desktop instances.
18. Better defaults. For example:
* `includeLineItems` is `true` by default because who wants an empty invoice?
* `ownerId` is 0 by default to always include your end-users' custom fields.
## Feedback
We value your input! If you have suggestions or requests for improvements, changes, field names, documentation, or anything else, [please let us know](mailto:support@conductor.is?subject=Conductor%20QuickBooks%20Desktop%20API%20Feedback).
# Bills
Source: https://docs.conductor.is/qbd-examples/bills
export const pluralObjectName_0 = "bills"
A **bill** in QuickBooks Desktop is a record of a transaction that represents a request-for-payment from a [vendor](/qbd-examples/vendors) for goods or services that it has provided. Companies use bills to track the expenses they need to pay but have not yet paid. Bills are also known as payables.
To see all of the **request parameters and response fields** for
{pluralObjectName_0}, check out our client library's [amazing
autocomplete](/usage/autocomplete).
## Fetching bills
Each bill has one or multiple line items, which are the goods or services that the vendor is requesting payment for. The following example fetches all bills for a given end-user, including the line items for each bill.
```ts Fetching all bills with line items
const bills = await conductor.qbd.bill.fetchAll("{{END_USER_ID}}", {
IncludeLineItems: true,
});
```
## Creating bills
To create a bill in QuickBooks Desktop, you either need the identifiers (e.g., `ListID`) of the required associated objects, or you must create the associated objects first.
The following example uses mock data to create a bill in QuickBooks Desktop, which also requires creating a mock vendor, account, and service-item using the `add()` method of each object. The `add()` method returns the created object, which contains the `ListID` identifier to associate the objects with each other.
```ts Creating a bill
const END_USER_ID = "{{END_USER_ID}}";
// Use unique names for mock objects because QBD requires each to be unique.
const UNIQUE_SUFFIX = Math.random().toFixed(6);
const vendor = await conductor.qbd.vendor.add(END_USER_ID, {
Name: `Test Vendor ${UNIQUE_SUFFIX}`,
});
// A bill cannot be empty, so we must create an item to add to the bill,
// and every item requires an account, which we must create first.
const incomeAccount = await conductor.qbd.account.add(END_USER_ID, {
Name: `Test Income Account ${UNIQUE_SUFFIX}`,
AccountType: "Income",
});
// Create a service-item for the invoice with the account we just created.
const serviceItem = await conductor.qbd.itemService.add(END_USER_ID, {
Name: `Construction Work ${UNIQUE_SUFFIX}`,
SalesOrPurchase: {
Price: "100.00",
AccountRef: {
ListID: incomeAccount.ListID,
},
},
});
const bill = await conductor.qbd.bill.add(END_USER_ID, {
VendorRef: {
ListID: vendor.ListID,
},
ItemLineAdd: [
{
ItemRef: {
ListID: serviceItem.ListID,
},
Amount: "100.00",
Quantity: 1,
},
],
});
```
```json Example bill object from QBD
{
"TxnID": "ABC-1234567890",
"TxnNumber": 123,
"TxnDate": "2024-05-01",
"DueDate": "2024-05-15",
"TimeCreated": "2024-05-01T09:30:00+05:30",
"TimeModified": "2024-05-01T09:30:00+05:30",
"EditSequence": "9876543210",
"VendorRef": {
"ListID": "8000000A-1234567890",
"FullName": "Acme Inc."
},
"APAccountRef": {
"ListID": "8000000B-1234567890",
"FullName": "Accounts Payable"
},
"LinkedTxn": {
"TxnID": "XYZ-0987654321",
"TxnType": "PurchaseOrder",
"TxnDate": "2024-04-25",
"RefNumber": "PO-12345",
"LinkType": "QUANTYPE",
"Amount": "0.00"
},
"AmountDue": "5000.00",
"OpenAmount": "5000.00",
"IsPaid": false,
"ItemLineRet": [
{
"TxnLineID": "1A1-1234567890",
"ItemRef": {
"ListID": "8000000C-1234567890",
"FullName": "Widget A"
},
"Quantity": 10,
"Cost": "250.00",
"Amount": "2500.00"
},
{
"TxnLineID": "1A2-1234567890",
"ItemRef": {
"ListID": "8000000D-1234567890",
"FullName": "Widget B"
},
"Quantity": 5,
"Cost": "300.00",
"Amount": "1500.00"
},
{
"TxnLineID": "1A3-1234567890",
"ItemRef": {
"ListID": "8000000E-1234567890",
"FullName": "Widget C"
},
"Quantity": 2,
"Cost": "500.00",
"Amount": "1000.00"
}
]
}
```
# Inventory items
Source: https://docs.conductor.is/qbd-examples/inventory
export const pluralObjectName_0 = "inventory items"
In QuickBooks Desktop, an inventory item is any merchandise or part that a business purchases, tracks as inventory, and then resells. In QuickBooks, information about an inventory item is grouped into three categories:
1. **Purchase Information**: `PurchaseDesc`, `PurchaseCost`, `COGSAccountRef`, and `PrefVendorRef`.
2. **Sales Information**: `SalesDesc`, `SalesPrice`, and `SalesTaxCodeRef`.
3. **Inventory Information**: `AssetAccountRef`, `ReorderPoint`, `QuantityOnHand`, `TotalValue`, and `InventoryDate`.
To see all of the **request parameters and response fields** for
{pluralObjectName_0}, check out our client library's [amazing
autocomplete](/usage/autocomplete).
In addition to the inventory item operations documented herein, **Conductor can fetch, create, and update every other inventory-related QuickBooks Desktop data type**:
* Inventory assembly items
* Inventory transfers
* Inventory adjustments
* Inventory sites
We will document these data types in the future. In the meantime, contact us if you need help with them.
## Fetching inventory items
It is quite simple to fetch inventory items. There are many optional request parameters you can use to filter the results.
```ts Fetching all inventory items
const inventoryItems =
await conductor.qbd.itemInventory.query("{{END_USER_ID}}");
```
```ts Fetching all inventory items with a filter
const inventoryItems = await conductor.qbd.itemInventory.query(
"{{END_USER_ID}}",
{
NameFilter: {
MatchCriterion: "StartsWith",
Name: "Test Inventory Items",
},
},
);
```
## Creating inventory items
Creating vendors is also quite simple. There are many optional request parameters available, but the only required one is `Name`.
```ts Creating an inventory item
const END_USER_ID = "{{END_USER_ID}}";
// Use unique names for mock objects because QBD requires each to be unique.
const UNIQUE_SUFFIX = Math.random().toFixed(6);
// An inventory item requires an income account, asset account, and a COGS
// account. These will usually already exist for an end-user, but we create
// mock accounts below for this example:
const incomeAccount = await client.qbd.account.add(END_USER_ID, {
Name: `Test Income Account ${UNIQUE_SUFFIX}`,
AccountType: "Income",
});
const assetAccount = await client.qbd.account.add(END_USER_ID, {
Name: `Test Asset Account ${UNIQUE_SUFFIX}`,
AccountType: "FixedAsset",
});
const cogsAccount = await client.qbd.account.add(END_USER_ID, {
Name: `Test COGS Account ${UNIQUE_SUFFIX}`,
AccountType: "CostOfGoodsSold",
});
const inventoryItem = await client.qbd.itemInventory.add(END_USER_ID, {
Name: `Test Inventory Item ${UNIQUE_SUFFIX}`,
IncomeAccountRef: {
ListID: incomeAccount.ListID,
},
AssetAccountRef: {
ListID: assetAccount.ListID,
},
COGSAccountRef: {
ListID: cogsAccount.ListID,
},
PurchaseCost: "50.00",
SalesPrice: "100.00",
});
```
```json Example inventory item object from QBD
{
"ListID": "800012AB-1234567890",
"Name": "MS-EX-ITEM",
"FullName": "MS-EX-ITEM",
"ManufacturerPartNumber": "EXITEM123",
"IsActive": true,
"Sublevel": 0,
"QuantityOnHand": 100,
"QuantityOnOrder": 50,
"QuantityOnSalesOrder": 75,
"PurchaseCost": "50.00",
"AverageCost": "48.50",
"SalesPrice": "99.99",
"PurchaseDesc": "EXAMPLE ITEM PURCHASE DESCRIPTION",
"SalesDesc": "EXAMPLE ITEM SALES DESCRIPTION",
"ClassRef": {
"ListID": "80000ABC-1234567890",
"FullName": "EXAMPLE CLASS"
},
"UnitOfMeasureSetRef": {
"ListID": "80000XYZ-1234567890",
"FullName": "EACH"
},
"PrefVendorRef": {
"ListID": "80000DEF-1234567890",
"FullName": "EXAMPLE VENDOR"
},
"AssetAccountRef": {
"ListID": "80000JKL-1234567890",
"FullName": "Inventory Asset"
},
"COGSAccountRef": {
"ListID": "80000MNO-1234567890",
"FullName": "Cost of Goods Sold"
},
"IncomeAccountRef": {
"ListID": "80000PQR-1234567890",
"FullName": "Sales"
},
"SalesTaxCodeRef": {
"ListID": "80000GHI-1234567890",
"FullName": "EXAMPLE TAX CODE"
},
"EditSequence": "1234567890",
"TimeCreated": "2024-05-01T09:30:00-05:00",
"TimeModified": "2024-05-02T14:45:30-05:00"
}
```
# Invoices
Source: https://docs.conductor.is/qbd-examples/invoices
export const pluralObjectName_0 = "invoices"
An **invoice** in QuickBooks Desktop records the amount owed by a customer who purchased goods or services but did not pay in full at the time of the sale. If full payment is received at the time of the sale, it is recorded as a [sales receipt](/qbd-examples/sales-receipts), not an invoice.
To see all of the **request parameters and response fields** for
{pluralObjectName_0}, check out our client library's [amazing
autocomplete](/usage/autocomplete).
## Fetching invoices
Each invoice in QuickBooks Desktop has several line items, which you would typically want to include when fetching invoices. The following example does just that:
```ts Fetching all invoices with line items
const invoices = await conductor.qbd.invoice.query("{{END_USER_ID}}", {
IncludeLineItems: true,
});
```
Invoices are also assigned to specific jobs under a customer or to the customer directly when not related to a particular job. The following example fetches all invoices for a specific customer:
```ts Fetching all invoices for a specific customer
const invoices = await conductor.qbd.invoice.query("{{END_USER_ID}}", {
EntityFilter: {
FullName: "Test customer 1234",
},
IncludeLineItems: true,
});
```
Here is an example of fetching invoices modified (or created) after a specific date:
```ts Fetching invoices modified after a specific date
const invoices = await conductor.qbd.invoice.query("{{END_USER_ID}}", {
ModifiedDateRangeFilter: {
FromModifiedDate: "2024-04-01",
},
IncludeLineItems: true,
});
```
## Creating invoices
An invoice is a complex object with many associated objects. To create an invoice from scratch, you either need the identifiers (e.g., `ListID`) of the required associated objects, or you must create the associated objects first.
The following example uses mock data to create an invoice in QuickBooks Desktop, which also requires creating a mock customer, account, and service-item using the `add()` method of each object. The `add()` method returns the created object, which contains the `ListID` identifier to associate the objects with each other.
```ts Creating an invoice
const END_USER_ID = "{{END_USER_ID}}";
// Use unique names for mock objects because QBD requires each to be unique.
const UNIQUE_SUFFIX = Math.random().toFixed(6);
const customer = await conductor.qbd.customer.add(END_USER_ID, {
Name: `Test customer ${UNIQUE_SUFFIX}`,
});
// An invoice cannot be empty, so we must create an item to add to the invoice,
// and every item requires an account, which we must create first.
const account = await conductor.qbd.account.add(END_USER_ID, {
Name: `Test income account ${UNIQUE_SUFFIX}`,
AccountType: "Income",
});
// Create a service-item for the invoice with the account we just created.
const serviceItem = await conductor.qbd.itemService.add(END_USER_ID, {
Name: `Construction work ${UNIQUE_SUFFIX}`,
SalesOrPurchase: {
Price: "100.00",
AccountRef: {
ListID: account.ListID,
},
},
});
const invoice = await conductor.qbd.invoice.add(END_USER_ID, {
CustomerRef: {
ListID: customer.ListID,
},
TxnDate: "2021-09-01",
InvoiceLineAdd: [
{
Amount: "100.00",
ItemRef: {
ListID: serviceItem.ListID,
},
},
],
});
```
## Updating invoices and line-items
To modify existing line-items or add line-items to an invoice, QuickBooks Desktop requires that you include all unmodified line-items in the update request, even the ones you do not want to change. Otherwise, QuickBooks Desktop will remove the line-items you did not include in the update request. Hence, we recommend you first query the invoice you want to update, then update that invoice with the new line-items you want to add or modify while including all the existing line-items returned from the query.
```ts Updating an invoice by adding a new line-item
const END_USER_ID = "{{END_USER_ID}}";
const newInvoice = await conductor.qbd.invoice.add(END_USER_ID, {
CustomerRef: {
FullName: "Test Customer",
},
Memo: "New invoice",
InvoiceLineAdd: [
{
ItemRef: {
FullName: "Test Item",
},
Desc: "First line item",
Amount: "100.00",
},
{
ItemRef: {
FullName: "Test Item",
},
Desc: "Second line item",
Amount: "200.00",
},
],
});
const updatedInvoice = await conductor.qbd.invoice.mod(END_USER_ID, {
TxnID: newInvoice.TxnID,
// `EditSequence` from the original object is required to update
// any QuickBooks Desktop object.
EditSequence: newInvoice.EditSequence,
Memo: "Updated invoice",
InvoiceLineMod: [
// QuickBooks Desktop requires that you re-include the
// existing line items in the request. Otherwise, it will
// remove them from the invoice.
...newInvoice.InvoiceLineRet,
{
ItemRef: {
ListID: inventoryItems[0].ListID,
},
Desc: "Item 3",
// Set `TxnLineID` to -1 to add a new line item.
TxnLineID: "-1",
},
],
});
```
```json Example invoice object from QBD
{
"TxnID": "ABC123-9876543210",
"TxnNumber": 2345,
"RefNumber": "INV-2345",
"TxnDate": "2024-05-01",
"TimeCreated": "2024-05-01T09:30:00+00:00",
"TimeModified": "2024-05-01T09:45:00+00:00",
"EditSequence": "9876543210",
"CustomerRef": {
"ListID": "100000-1234567890",
"FullName": "John Doe"
},
"ARAccountRef": {
"ListID": "200000-1234567890",
"FullName": "Accounts Receivable"
},
"TemplateRef": {
"ListID": "300000-1234567890",
"FullName": "Standard Invoice Template"
},
"ItemSalesTaxRef": {
"ListID": "400000-1234567890",
"FullName": "State Sales Tax"
},
"CustomerSalesTaxCodeRef": {
"ListID": "500000-1234567890",
"FullName": "Standard Tax Code"
},
"ShipMethodRef": {
"ListID": "600000-1234567890",
"FullName": "FedEx Ground"
},
"Subtotal": "1000.00",
"SalesTaxTotal": "80.00",
"SalesTaxPercentage": 8.0,
"AppliedAmount": "500.00",
"BalanceRemaining": "580.00",
"DueDate": "2024-06-01",
"ShipDate": "2024-05-03",
"IsPaid": false,
"IsPending": true,
"IsFinanceCharge": false,
"IsToBeEmailed": true,
"IsToBePrinted": false,
"InvoiceLineRet": [
{
"TxnLineID": "LI1-9876543210",
"ItemRef": {
"ListID": "700000-1234567890",
"FullName": "Product A"
},
"Desc": "Product A description",
"Quantity": 10,
"Rate": "100.00",
"Amount": "1000.00",
"SalesTaxCodeRef": {
"ListID": "500000-1234567890",
"FullName": "Standard Tax Code"
}
},
{
"TxnLineID": "LI2-9876543210",
"ItemRef": {
"ListID": "800000-1234567890",
"FullName": "Discount"
},
"Desc": "10% discount",
"RatePercent": -10,
"Amount": "-100.00"
},
{
"TxnLineID": "LI3-9876543210",
"ItemRef": {
"ListID": "900000-1234567890",
"FullName": "Subtotal"
},
"Desc": "Subtotal",
"Amount": "900.00"
}
]
}
```
# Jobs and customers
Source: https://docs.conductor.is/qbd-examples/jobs-and-customers
Understanding the relationship between customers and jobs in QuickBooks Desktop.
export const pluralObjectName_0 = "customers"
## Overview
In QuickBooks Desktop, both "customers" and "jobs" are represented as `Customer` objects. Jobs are considered a subset of customers and cannot be queried separately. This data model is a quirk of QuickBooks Desktop and is outside of Conductor's control.
## Differences between jobs and customers
A job in QuickBooks Desktop differs from a customer in the following ways:
1. **ParentRef**: A job has a `ParentRef` property that points to the parent customer.
2. **FullName**: A job's `FullName` property is the concatenation of the parent customer's `FullName` and the job's Name.
* Example: If the parent customer's `FullName` is `"Annie's Alligators"` and the job's Name is `"Swamp"`, the job's `FullName` will be `"Annie's Alligators:Swamp"`.
3. **Sublevel**: A job has a `Sublevel` property set to `1`, while the parent customer's `Sublevel` property is set to `0`.
## Querying customers and jobs
To fetch all customers and jobs for a given end-user, use the following query:
```ts Fetching all customers and jobs
const customersAndJobs = await conductor.qbd.customer.query("{{END_USER_ID}}");
```
If you're looking for a specific job in QuickBooks Desktop, you must query for
the customer and then filter the results to find the job.
To see all of the **request parameters and response fields** for
{pluralObjectName_0}, check out our client library's [amazing
autocomplete](/usage/autocomplete).
## Fetching objects related to customers' jobs
Some objects in QuickBooks Desktop, such as SalesOrders, are associated with a customer's job instead of directly with the customer. In these cases, querying using the `EntityFilter.ListID` parameter set to a customer's `ListID` will return no results.
To fetch objects related to a customer's jobs, use the `EntityFilter.ListIDWithChildren` parameter with the customer's `ListID`. This will return the objects corresponding to all of the customer's jobs. For example:
```ts Fetching SalesOrders for all jobs of a customer
const salesOrders = await conductor.qbd.salesOrder.query("{{END_USER_ID}}", {
EntityFilter: {
// The `ListID` of the customer whose jobs' SalesOrders you want to fetch.
ListIDWithChildren: "800000AB-1234567890",
},
});
```
By using the `ListIDWithChildren` parameter, you can effectively query for objects related to a customer's jobs without having to query for each job individually.
```json Example customer object from QBD
{
"ListID": "800000AB-1234567890",
"Name": "SUNNY GARDENS INC.",
"FullName": "SUNNY GARDENS INC.",
"CompanyName": "SUNNY GARDENS INC.",
"Phone": "555-987-6543",
"AltPhone": "800-246-1357",
"Fax": "555-123-4567",
"Email": "info@sunnygardens.com",
"IsActive": true,
"Balance": "5678.92",
"TotalBalance": "5678.92",
"TimeCreated": "2021-09-15T14:30:00-05:00",
"TimeModified": "2023-09-01T09:45:12-05:00",
"EditSequence": "1987654321",
"CustomerTypeRef": {
"ListID": "8000000F-1234567890",
"FullName": "Wholesale"
},
"PriceLevelRef": {
"ListID": "80000003-1234567890",
"FullName": "WHOLESALE PRICE LEVEL LIST"
},
"SalesTaxCodeRef": {
"ListID": "80000003-1234567890",
"FullName": "Taxable"
},
"TermsRef": {
"ListID": "80000007-1234567890",
"FullName": "Net 60"
},
"BillAddress": {
"Addr1": "SUNNY GARDENS INC.",
"Addr2": "4321 MAIN STREET",
"City": "SPRINGFIELD, IL 62701 US, IL 62",
"State": "IL 62701 US"
},
"BillAddressBlock": {
"Addr1": "SUNNY GARDENS INC.",
"Addr2": "4321 MAIN STREET",
"Addr3": "SPRINGFIELD, IL 62701 US, IL 62701"
},
"ShipAddress": {
"Addr1": "SUNNY GARDENS INC.",
"Addr2": "4321 MAIN STREET",
"City": "SPRINGFIELD",
"State": "IL",
"PostalCode": "62701",
"Country": "United States"
},
"ShipAddressBlock": {
"Addr1": "SUNNY GARDENS INC.",
"Addr2": "4321 MAIN STREET",
"Addr3": "SPRINGFIELD, IL 62701",
"Addr4": "United States"
},
"Sublevel": 0,
"JobStatus": "None",
"Notes": "John Smith - Owner\\nMary Smith - Manager"
}
```
```json Example "job" for the customer above
{
"ListID": "8000000D-1987654321",
"TimeCreated": "2022-03-01T10:15:00-05:00",
"TimeModified": "2023-09-01T14:30:00-05:00",
"EditSequence": 1987654322,
"Name": "Spring Planting",
// For jobs, `FullName` is the concatenation of the
// parent customer's `FullName` and the job's `Name`.
"FullName": "SUNNY GARDENS INC.:Spring Planting",
"IsActive": true,
// `ParentRef` only exists for jobs and points to
// the parent customer object.
"ParentRef": {
"ListID": "800000AB-1234567890",
"FullName": "SUNNY GARDENS INC."
},
"Sublevel": 1,
"Balance": 1234.56,
"TotalBalance": 1234.56,
"JobStatus": "In Progress",
"PreferredDeliveryMethod": "Email",
"StartDate": "2022-03-15",
"ProjectedEndDate": "2022-05-31",
"JobTypeRef": {
"ListID": "8000000G-1987654321",
"FullName": "Landscaping"
},
"JobDescription": "Annual spring planting and garden setup for Sunny Gardens Inc.",
"PrimaryContactRef": {
"ListID": "8000000H-1987654321",
"FullName": "Mary Smith"
}
}
```
# Refunds
Source: https://docs.conductor.is/qbd-examples/refunds
This guide covers how to implement refunds using Conductor's QuickBooks Desktop API. We'll cover two main scenarios:
1. Invoice-based refunds (full or partial)
2. Custom refunds (not linked to any invoice)
## Invoice-based refund
For invoice-based refunds, you will create a credit memo and then apply it to the relevant invoice using a receive payment transaction to reduce the outstanding balance.
### Step 1: Create the credit memo
First, create a credit memo for the customer for the amount you wish to refund. This credit memo can be for the full or partial amount of the invoice.
Here's an example of how to create a credit memo:
```typescript
const creditMemo = await conductor.qbd.creditMemo.add("{{END_USER_ID}}", {
CustomerRef: {
ListID: "customer_list_id", // Customer's ListID from the original invoice
},
TxnDate: "2024-10-23", // Current date
RefNumber: "REFUND-123", // Optional: Your reference number
Memo: "Refund for Invoice INV-001", // Add a memo for reference
CreditMemoLineAdd: [
{
ItemRef: {
ListID: "item_list_id", // Original item from the invoice
},
Desc: "Refund for Invoice #123",
Quantity: 1, // Quantity being refunded
Amount: "50.00", // Amount being refunded for the item
},
],
});
```
### Step 2: Apply the credit memo to the invoice
Next, apply the credit memo to the outstanding invoice using a receive payment request. This will reduce the balance of the invoice by the credit amount.
Here's an example of how to apply the credit:
```typescript
const receivePayment = await conductor.qbd.receivePayment.add(
"{{END_USER_ID}}",
{
CustomerRef: {
ListID: "customer_list_id", // Must match the customer from credit memo
},
TotalAmount: "0.00", // No new payment being received
Memo: "Applying credit memo to invoice",
AppliedToTxnAdd: {
TxnID: "original_invoice_txn_id", // Original invoice's TxnID
PaymentAmount: "0.00", // No payment being made
SetCredit: {
CreditTxnID: creditMemo.TxnID, // TxnID from the credit memo we just created
AppliedAmount: "50.00", // Amount of credit to apply
},
},
},
);
```
## Custom refund (not linked to any invoice)
For a custom refund not linked to any specific invoice, simply create a credit memo to record the amount owed to the customer.
Here's an example of how to create a custom credit memo:
```typescript
const standaloneCreditMemo = await conductor.qbd.creditMemo.add(
"{{END_USER_ID}}",
{
CustomerRef: {
ListID: "customer_list_id", // Required: Customer's ListID
},
TxnDate: "2024-10-23", // Current date
RefNumber: "REFUND-124", // Optional: Your reference number
Memo: "Goodwill refund",
CreditMemoLineAdd: [
{
ItemRef: {
ListID: "refund_item_list_id", // Use a specific item for refunds
},
Desc: "Customer satisfaction refund",
Amount: "75.00", // Refund amount
},
],
},
);
```
## Common scenarios
### Partial refund
Modify the `CreditMemoLineAdd.Amount` to match the partial refund amount:
```typescript
CreditMemoLineAdd: [
{
ItemRef: { ListID: "item_list_id" },
Desc: "Partial refund - 50%",
Amount: "25.00", // Half of the original amount
},
];
```
### Multiple item refund
Use multiple `CreditMemoLineAdd` entries:
```typescript
CreditMemoLineAdd: [
{
ItemRef: { ListID: "item1_list_id" },
Desc: "Refund - Item 1",
Amount: "30.00",
},
{
ItemRef: { ListID: "item2_list_id" },
Desc: "Refund - Item 2",
Amount: "20.00",
},
];
```
# Sales receipts
Source: https://docs.conductor.is/qbd-examples/sales-receipts
export const pluralObjectName_0 = "sales receipts"
A **sales receipt** in QuickBooks Desktop is a record of a sale to a customer, such as a payment by cash, check, or credit card. Each sales receipt has several line items, which are the products or services sold.
To see all of the **request parameters and response fields** for
{pluralObjectName_0}, check out our client library's [amazing
autocomplete](/usage/autocomplete).
## Fetching sales receipts
The following example fetches all sales receipts for the specified end-user, including the line items:
```ts Fetching all sales receipts with line items
const salesReceipts = await conductor.qbd.salesReceipt.query(
"{{END_USER_ID}}",
{ IncludeLineItems: true },
);
```
## Creating sales receipts
To create a sales receipt in QuickBooks Desktop from scratch, you either need the identifiers (e.g., `ListID`) of the required associated objects, or you must create the associated objects first.
The following example uses mock data to create a sales receipt in QuickBooks Desktop, which also requires creating a mock customer, account, and service-item using the `add()` method of each object. The `add()` method returns the created object, which contains the `ListID` identifier to associate the objects with each other.
```ts Creating a sales receipt
const END_USER_ID = "{{END_USER_ID}}";
// Use unique names for mock objects because QBD requires each to be unique.
const UNIQUE_SUFFIX = Math.random().toFixed(6);
const customer = await conductor.qbd.customer.add(END_USER_ID, {
Name: `Test Customer ${UNIQUE_SUFFIX}`,
});
// A sales receipt cannot be empty, so we must create an item to add to the
// sales receipt, and every item requires an account, which we create first.
const account = await conductor.qbd.account.add(END_USER_ID, {
Name: `Test Income Account ${UNIQUE_SUFFIX}`,
AccountType: "Income",
});
// Create a service-item for the sales receipt with the account we just created.
const serviceItem = await conductor.qbd.itemService.add(END_USER_ID, {
Name: `Construction Work ${UNIQUE_SUFFIX}`,
SalesOrPurchase: {
Price: "100.00",
AccountRef: {
ListID: account.ListID,
},
},
});
const salesReceipt = await conductor.qbd.salesReceipt.add(END_USER_ID, {
CustomerRef: {
ListID: customer.ListID,
},
SalesReceiptLineAdd: [
{
Quantity: 5,
ItemRef: {
ListID: serviceItem.ListID,
},
},
],
});
```
```json Example sales receipt object from QBD
{
"TxnID": "1234-5678901234",
"TxnNumber": 1000,
"TxnDate": "2024-05-01",
"RefNumber": "11",
"CustomerRef": {
"ListID": "1234567890",
"FullName": "John Doe"
},
"Subtotal": "1000.00",
"SalesTaxTotal": "80.00",
"TotalAmount": "1080.00",
"DepositToAccountRef": {
"ListID": "9876543210",
"FullName": "Checking Account"
},
"ClassRef": {
"ListID": "1122334455",
"FullName": "Online Sales"
},
"TemplateRef": {
"ListID": "5544332211",
"FullName": "Standard Sales Receipt"
},
"BillAddress": {
"Addr1": "123 Main St"
},
"BillAddressBlock": {
"Addr1": "123 Main St"
},
"ShipDate": "2024-05-02",
"DueDate": "2024-05-15",
"SalesTaxPercentage": 8.0,
"IsPending": false,
"IsToBeEmailed": true,
"IsToBePrinted": false,
"EditSequence": "1683057600",
"TimeCreated": "2024-05-01T09:30:00-04:00",
"TimeModified": "2024-05-01T09:45:00-04:00",
"SalesReceiptLineRet": {
"TxnLineID": "4E3-1703630162",
"ItemRef": {
"ListID": "80000035-1703630156",
"FullName": "Construction Work"
},
"Quantity": 5,
"Rate": 100,
"Amount": 500,
"SalesTaxCodeRef": {
"ListID": "80000002-1692738438",
"FullName": "Non"
}
}
}
```
# Node.js / TypeScript for QuickBooks Desktop
Source: https://docs.conductor.is/qbd/api
Execute real-time requests for *any* QuickBooks Desktop object type with fully-typed requests and responses.
## Accessing QuickBooks Desktop through Conductor
With Conductor, you can read, create, or update *any* QuickBooks Desktop object type. Every operation is available through a single, consistent interface vis `conductor.qbd.*`.
We recommend using Conductor's [amazing autocomplete](/usage/autocomplete) to
discover the available operations, parameters, and responses fields.
For example:
```ts Fetch all invoices with line items
const invoices = await conductor.qbd.invoice.query("{{END_USER_ID}}", {
IncludeLineItems: true,
});
```
```ts Create an invoice
const newInvoice = await conductor.qbd.invoice.add("{{END_USER_ID}}", {
CustomerRef: {
FullName: "Acme Inc.",
},
TxnDate: "2024-01-12",
Memo: "Customer invoice for Jan 1 - 7",
InvoiceLineAdd: [
{
Amount: "100.00",
ItemRef: {
FullName: "Consulting",
},
},
],
});
```
```ts Update an invoice
const updatedInvoice = await conductor.qbd.invoice.mod("{{END_USER_ID}}", {
TxnID: "1234-ABCD",
EditSequence: "1234-ABCD",
DueDate: "2024-01-19",
InvoiceLineMod: {
TxnLineID: "1234-ABCD",
ItemRef: {
FullName: "Consulting",
},
Amount: "200.00",
},
});
```
### Supported object types
Conductor supports the following QuickBooks Desktop object types and operations. Alternatively, see [QuickBooks Desktop's official API Reference](https://developer.intuit.com/app/developer/qbdesktop/docs/api-reference/qbdesktop) to explore the operations available for each object type.
| Object | Read | Create | Update |
| --------------------- | :--: | :----: | :----: |
| Account | ✔ | ✔ | ✔ |
| AgingReport | ✔ | | |
| Bill | ✔ | ✔ | ✔ |
| BillPaymentCheck | ✔ | ✔ | ✔ |
| BillPaymentCreditCard | ✔ | ✔ | |
| BillingRate | ✔ | ✔ | |
| BudgetSummaryReport | ✔ | | |
| BuildAssembly | ✔ | ✔ | ✔ |
| Charge | ✔ | ✔ | ✔ |
| Check | ✔ | ✔ | ✔ |
| Class | ✔ | ✔ | ✔ |
| Company | ✔ | | |
| CreditCardCharge | ✔ | ✔ | ✔ |
| CreditCardCredit | ✔ | ✔ | ✔ |
| CreditMemo | ✔ | ✔ | ✔ |
| Currency | ✔ | ✔ | ✔ |
| CustomDetailReport | ✔ | | |
| CustomSummaryReport | ✔ | | |
| Customer | ✔ | ✔ | ✔ |
| CustomerType | ✔ | ✔ | |
| DataExt | | ✔ | ✔ |
| DateDrivenTerms | ✔ | ✔ | |
| Deposit | ✔ | ✔ | ✔ |
| Employee | ✔ | ✔ | ✔ |
| Estimate | ✔ | ✔ | ✔ |
| GeneralDetailReport | ✔ | | |
| GeneralSummaryReport | ✔ | | |
| InventoryAdjustment | ✔ | ✔ | ✔ |
| InventorySite | ✔ | ✔ | ✔ |
| Invoice | ✔ | ✔ | ✔ |
| ItemDiscount | ✔ | ✔ | ✔ |
| ItemFixedAsset | ✔ | ✔ | ✔ |
| ItemGroup | ✔ | ✔ | ✔ |
| ItemInventory | ✔ | ✔ | ✔ |
| ItemInventoryAssembly | ✔ | ✔ | ✔ |
| ItemNonInventory | ✔ | ✔ | ✔ |
| ItemOtherCharge | ✔ | ✔ | ✔ |
| ItemPayment | ✔ | ✔ | ✔ |
| ItemReceipt | ✔ | ✔ | ✔ |
| ItemSalesTax | ✔ | ✔ | ✔ |
| ItemSalesTaxGroup | ✔ | ✔ | ✔ |
| ItemService | ✔ | ✔ | ✔ |
| ItemSites | ✔ | | |
| ItemSubtotal | ✔ | ✔ | ✔ |
| JobReport | ✔ | | |
| JobType | ✔ | ✔ | |
| JournalEntry | ✔ | ✔ | ✔ |
| Lead | ✔ | ✔ | ✔ |
| ListDeleted | ✔ | | |
| OtherName | ✔ | ✔ | ✔ |
| PaymentMethod | ✔ | ✔ | |
| PayrollDetailReport | ✔ | | |
| PayrollItemWage | ✔ | ✔ | |
| PayrollSummaryReport | ✔ | | |
| PriceLevel | ✔ | ✔ | ✔ |
| PurchaseOrder | ✔ | ✔ | ✔ |
| ReceivePayment | ✔ | ✔ | ✔ |
| SalesOrder | ✔ | ✔ | ✔ |
| SalesReceipt | ✔ | ✔ | ✔ |
| SalesRep | ✔ | ✔ | ✔ |
| SalesTaxCode | ✔ | ✔ | ✔ |
| SalesTaxPaymentCheck | ✔ | ✔ | ✔ |
| StandardTerms | ✔ | ✔ | |
| TimeReport | ✔ | | |
| TimeTracking | ✔ | ✔ | ✔ |
| Transaction | ✔ | | |
| Transfer | ✔ | ✔ | ✔ |
| TransferInventory | ✔ | ✔ | ✔ |
| TxnDeleted | ✔ | | |
| Vehicle | ✔ | ✔ | ✔ |
| VehicleMileage | ✔ | ✔ | |
| Vendor | ✔ | ✔ | ✔ |
| VendorCredit | ✔ | ✔ | ✔ |
| VendorType | ✔ | ✔ | |
| WorkersCompCode | ✔ | ✔ | ✔ |
## TypeScript for QuickBooks Desktop
In the Conductor Node.js library, every request parameter and response attribute is fully-typed with inline documentation and will autocomplete in your editor. This makes it easy to explore the API and write code that works the first time.
If you ever need to access the raw QuickBooks Desktop types, you can import them from `conductor-node` like so:
```ts
import { QbdTypes } from "conductor-node";
const accountAddInput: QbdTypes.AccountAdd = {
Name: "Test Account",
AccountType: "Bank",
OpenBalance: "100",
};
```
# Get a free QuickBooks Desktop developer license
Source: https://docs.conductor.is/qbd/dev-license
Obtain a free Not-For-Resale (NFR) license to use QuickBooks Desktop indefinitely for development and testing with Conductor. Takes 2 minutes.
export const Image = ({src, alt, width, align = "center", noShadow = false, noBorder = false, noZoom = false}) => ;
To develop and test integrations with Conductor, you need your own QuickBooks Desktop instance. If you don't have an existing instance, you can [install the QuickBooks Desktop free trial](/qbd/test-instance). The trial includes all features of the full version but expires after 30 days. To continue using QuickBooks Desktop for development beyond this period, you'll need a free Not-For-Resale (NFR) license. Follow these steps to obtain one:
If you haven't already, follow our guide for [installing the QuickBooks Desktop free trial](/qbd/test-instance).
[Sign up for an Intuit developer account](https://accounts.intuit.com/app/sign-in?start_screen_hint=SignUp) if you don't have one. This account is required to request the NFR license.
1. Go to [Intuit's developer support page](https://help.developer.intuit.com/s/contactsupport).
2. Choose the following options:
* **Product**: QuickBooks Desktop
* **Category**: NFR License
3. Click "Next" to proceed.

On the next page, specify:
* **Product Year**: 2024 (or the latest available)
* **Product Country**: US
* **Product Version**: QuickBooks Enterprise v24 (or the latest version)
Conductor works identically with all QuickBooks Desktop versions and editions. We recommend the Enterprise edition for development to avoid potential limitations in user count and dataset size.
* **Enable Advanced Inventory?** Yes (Allows testing with the full feature set)
After filling out these details, click "Create Support Ticket".

After you click "Create Support Ticket", Intuit will send you a confirmation email. Intuit will send you another email within 24-48 hours with your license key.
Once you have the license key:
1. Open your existing QuickBooks Desktop trial installation.
2. Go to Help > Manage My License > Change Product License.
3. Enter the NFR license key when prompted.
4. Follow any additional on-screen instructions to complete activation.
Your QuickBooks Desktop is now licensed for indefinite use in development and testing with Conductor.
# Mapping your app's objects to QuickBooks Desktop
Source: https://docs.conductor.is/qbd/mapping-objects
How to handle syncing your application's data objects with QuickBooks Desktop objects.
Most complex QuickBooks Desktop (QBD) object types, such as [invoices](/qbd-examples/invoices) and [sales receipts](/qbd-examples/sales-receipts), interact with various related objects. For instance, an invoice may contain multiple line items, with each item linked to a specific QBD inventory item via an ID. **When creating these objects in QBD, you must ensure that all related objects are correctly linked.**
For effective integration, depending on the data type of these related objects and you application requirements, you can either:
1. **Create new QBD objects** and store their IDs in your application's database for future reference.
2. **Map existing QBD objects to corresponding objects in your application** through manual configurations made by users within your application's UI. Consider the following example for inventory items:
1. Fetch all existing QBD inventory items using Conductor's API (e.g., `await conductor.qbd.itemInventory.query()`).
2. Display these QBD items alongside items from your application in the UI.
3. Users can then specify mappings, or opt to create new items in QBD.
4. Record the corresponding QBD item ID in your application's database (e.g., add a **`qbd_item_id`** column to the **`items`** table).
**Important**: The need to map or create objects may vary based on object type
(e.g., some users might prefer mapping existing QBD objects for certain types
while creating new ones for others). Regardless, it is crucial for your
application to store these QBD IDs in its database for all future
interactions, ensuring no duplicate objects are created.
# Create a QuickBooks Desktop test instance
Source: https://docs.conductor.is/qbd/test-instance
Create your own QuickBooks Desktop test instance with an AWS WorkSpace.
export const Image = ({src, alt, width, align = "center", noShadow = false, noBorder = false, noZoom = false}) => ;
To develop and test integrations with Conductor, you need your own QuickBooks Desktop instance to send and receive data. This guide shows you how to set up a QuickBooks Desktop test environment by creating a virtual Windows instance and installing the QuickBooks Desktop free trial. Once set up, you can connect to this QuickBooks Desktop test instance from your local development environment via Conductor.
**Also important**: This guide may be outdated as AWS WorkSpaces.
Alternatively, check out [this
guide](https://chatgpt.com/share/67813957-e52c-8003-8776-be82b725215f) or
asking an LLM (like ChatGPT) for different approaches to setting up a Windows
instance with QuickBooks Desktop installed.
## 1. Set up a virtual Windows environment
Create a new Amazon WorkSpace at [https://us-west-2.console.aws.amazon.com/workspaces/v2/workspaces](https://us-west-2.console.aws.amazon.com/workspaces/v2/workspaces).
 Either select the directory in the list or click `Create a new Directory` if there are none:
 Add yourself as a user with your email address:
 Select the bundle `Standard with Windows 10 (Server 2019 based) (PCoIP)`:
 Select `AlwaysOn`:
 Skip the Customization step, then review the final page and click the button `Create` in the bottom-right corner:
 After 20-30 minutes, look for an email from Amazon WorkSpaces with a link to set a password.
Download Amazon WorkSpaces on your local computer:
```sh
brew install amazon-workspaces
```
Open the WorkSpaces app, enter the registration key from the email, and sign in using the username and password you set via the reset link in the email. You must enter this password every time you open WorkSpaces, so best to save it to your local password manager.
After 20-30 minutes, look for an email from Amazon WorkSpaces with a link to set a password.
Download Amazon WorkSpaces on your local computer:
```sh
brew install amazon-workspaces
```
Open the WorkSpaces app, enter the registration key from the email, and sign in using the username and password you set via the reset link in the email. You must enter this password every time you open WorkSpaces, so best to save it to your local password manager.
 After it loads, you will see your new Windows desktop instance!
 ## 2. Disable IE Enhanced Security Configuration
By default, you will see the following warning whenever you open QuickBooks Desktop. If you do not resolve this issue, this warning will freeze QuickBooks Desktop whenever the QuickBooks Web Connector opens QuickBooks Desktop when it is closed.
To prevent this error, follow these steps:
Search for and open Server Manager:
## 2. Disable IE Enhanced Security Configuration
By default, you will see the following warning whenever you open QuickBooks Desktop. If you do not resolve this issue, this warning will freeze QuickBooks Desktop whenever the QuickBooks Web Connector opens QuickBooks Desktop when it is closed.
To prevent this error, follow these steps:
Search for and open Server Manager:

 Choose `Local Server` from the left navigation pane:
 For `IE Enhanced Security Configuration`, click the button that says `On`:
 For Administrators, select `Off`. For Users, select `Off`. Choose `OK`. Then
you are done!
For Administrators, select `Off`. For Users, select `Off`. Choose `OK`. Then
you are done!
 ## 3. Install QuickBooks Desktop
From the Windows instance, open Firefox and download the QuickBooks Desktop
Enterprise trial:
[https://quickbooks.intuit.com/learn-support/en-us/new-subscriptions/download-a-trial-of-quickbooks-desktop/00/185974](https://quickbooks.intuit.com/learn-support/en-us/new-subscriptions/download-a-trial-of-quickbooks-desktop/00/185974)
Navigate to the "Downloads" directory in the Windows File Explorer, and
launch the application named `QuickBooksEnterprise23Trial.exe`. Then, walk
through the installation.
## 3. Install QuickBooks Desktop
From the Windows instance, open Firefox and download the QuickBooks Desktop
Enterprise trial:
[https://quickbooks.intuit.com/learn-support/en-us/new-subscriptions/download-a-trial-of-quickbooks-desktop/00/185974](https://quickbooks.intuit.com/learn-support/en-us/new-subscriptions/download-a-trial-of-quickbooks-desktop/00/185974)
Navigate to the "Downloads" directory in the Windows File Explorer, and
launch the application named `QuickBooksEnterprise23Trial.exe`. Then, walk
through the installation.
 After that installation finishes, another installer should launch
automatically. Walk through that installer, too. This can take 20-30 minutes
to finish.
After that installation finishes, another installer should launch
automatically. Walk through that installer, too. This can take 20-30 minutes
to finish.

 Next, the following window will appear. Select the variant `QuickBooks
Desktop Enterprise General Business`:
Next, the following window will appear. Select the variant `QuickBooks
Desktop Enterprise General Business`:
 Click "I want to see a Sample company file", which will provide a mock
dataset for you to use with QuickBooks Desktop. If this option does not
work, which sometimes happens, then click "I'm ready to create my own
company file" to create a new, empty company file.
Click "I want to see a Sample company file", which will provide a mock
dataset for you to use with QuickBooks Desktop. If this option does not
work, which sometimes happens, then click "I'm ready to create my own
company file" to create a new, empty company file.
 If prompted, sign in to your Intuit developer account in QuickBooks Desktop.
If you do not have one, [you can create account
here](https://accounts.intuit.com/app/sign-in?start_screen_hint=SignUp).
If prompted, sign in to your Intuit developer account in QuickBooks Desktop.
If you do not have one, [you can create account
here](https://accounts.intuit.com/app/sign-in?start_screen_hint=SignUp).
 When you are done, you will see the QuickBooks Desktop interface:
 At some point, QuickBooks Desktop might ask you to create a password.
Conductor will not ask for this password; it is internal to QuickBooks
Desktop.
At some point, QuickBooks Desktop might ask you to create a password.
Conductor will not ask for this password; it is internal to QuickBooks
Desktop.
 The trial installation will work for 30 days, after which you will need a
developer (NFR) license, which you can [get for free by following our
guide](/qbd/dev-license). After completing that guide, you can continue to
use the trial version while you wait for your NFR license to arrive.
## 4. Connect Conductor to your QuickBooks Desktop instance
Now that you have your own QuickBooks Desktop test instance, you can return to the [Quickstart](/quickstart) guide to connect it to Conductor. Don't worry; this part is much easier.
# Quickstart
Source: https://docs.conductor.is/quickstart
Connect to QuickBooks Desktop via a modern API in 5 minutes.
export const Image = ({src, alt, width, align = "center", noShadow = false, noBorder = false, noZoom = false}) => ;
Welcome! 👋 Follow the instructions below to connect your QuickBooks Desktop instance and start working with your data in just a few minutes. You'll be able to fetch, create, and update any object type in real-time with our modern APIs and SDKs.
## Part 1: Set up your Conductor account
Sign up for a Conductor account [here](https://dashboard.conductor.is/sign-up) with your work email.
Create an organization in the Conductor dashboard. This should be the name of your company.
In the organization you created, let's select the **"testing"** project. An organization can have multiple projects, but we'll use this one for now.
## Part 2: Connect to QuickBooks Desktop
**Important**: A QuickBooks Desktop instance for testing is **required**. If
you do not have one, you can [create a free test
instance](/qbd/test-instance).
After selecting the **"testing"** project in the Conductor dashboard, click the **"Create end user"** button.
An end-user represents the user or organization within *your* application for whom we are connecting to their QuickBooks Desktop instance. Each end-user maps to a single QuickBooks Desktop company file because each company file represents an individual legal entity.
After creating an end-user in the dashboard, it will automatically create an auth session. Visit this URL in your browser on the same computer or instance as your QuickBooks Desktop installation. This authentication flow will guide you through connecting your QuickBooks Desktop instance to Conductor.
*Read every step carefully!*
In the Conductor dashboard, navigate to the **API Keys** tab and find your project's **Secret Key**. You'll need this in Step 6 to authenticate your requests.
Navigate to the **End Users** tab and find your end-user's **ID**. You'll need this in Step 6 to identify the end-user in your requests.
```sh Node.js Beta!
# 👋 Our Node Beta SDK is much better! However, a few rare QBD
# types are still in development - contact us to request support for
# specific types not listed on https://docs.conductor.is/qbd-api.
npm install conductor-node@beta
```
```sh Node.js legacy
npm install conductor-node
```
```sh Python
pip install conductor-py
```
```sh cURL
# Continue to the next step to access our REST API directly via `curl`.
```
Try fetching a list of QBD Customers:
```ts Node.js Beta!
import Conductor from "conductor-node";
const conductor = new Conductor({
apiKey: "{{YOUR_SECRET_KEY}}"
});
async function main() {
const invoices = await conductor.qbd.invoices.list({
conductorEndUserId: "{{YOUR_END_USER_ID}}",
limit: 10,
});
console.log(invoices.data);
}
main();
```
```ts Node.js legacy
import Conductor from "conductor-node";
const conductor = new Conductor("{{YOUR_SECRET_KEY}}");
async function main() {
const invoices = await conductor.qbd.invoice.query("{{YOUR_END_USER_ID}}", {
MaxReturned: 10,
});
console.log(invoices);
}
main();
```
```py Python
from conductor import Conductor
conductor = Conductor(api_key="{{YOUR_SECRET_KEY}}")
invoices = conductor.qbd.invoices.list(
conductor_end_user_id="{{YOUR_END_USER_ID}}",
)
print(invoices.data)
```
```sh cURL
curl --request GET \
--url 'https://api.conductor.is/v1/quickbooks-desktop/customers' \
--header 'Authorization: Bearer {{YOUR_SECRET_KEY}}' \
--header 'Conductor-End-User-Id: {{YOUR_END_USER_ID}}'
```
```json Example QBD response
{
"objectType": "list",
"url": "/v1/quickbooks-desktop/customers",
"data": [
{
"id": "80000001-1234567890",
"objectType": "qbd_customer",
"createdAt": "2021-10-01T17:34:56.000Z",
"name": "ABC Corporation",
"isActive": true,
// ...
}
// ...
],
// ...
}
```
# Security and data retention
Source: https://docs.conductor.is/security
Conductor's policies on security, data retention, and data processing.
## Temporary data storage
* **Conductor does not permanently retain your end-user data (such as QuickBooks Desktop data).**
* **For operational purposes, API request logs, which include end-user data, are temporarily stored securely in a SOC 2 compliant log manager for 14 days before permanent deletion.**
* The logs are encrypted at rest using AES-256 and in transit using HTTPS/TLS.
* The logs are stored in certified data centers located in Germany and Finland within the EU.
* Access to these logs is strictly limited to authorized Conductor engineers, who use them solely for debugging, customer support, and product improvement.
## Permanent data storage
* The only data Conductor stores permanently pertains to managing and authenticating your Conductor account, connections, end-users, API keys, and projects. This does not include any end-user data.
* This data is stored in a centralized SOC 2 compliant database hosted by AWS in the US West (Oregon) region. There is no physical or logical separation of customer data within the database.
* The database is encrypted at rest and requires SSL/TLS encryption for all connections.
* Access to the database is strictly limited to authorized Conductor engineers.
## API request security
* All API requests to Conductor are authenticated using an API key and restricted to HTTPS.
* Data in transit is encrypted, and requests are processed through our SOC 2 compliant backend hosted by AWS in the US West (Oregon) region.
## Security and compliance
* **SOC 2:** Conductor is actively working toward achieving its SOC 2 certification, implementing and monitoring the necessary measures to meet the Security, Availability, and Confidentiality Trust Service Criteria. We have engaged an independent AICPA-accredited auditor to formally assess and report on Conductor's controls.
* Conductor's [Trust Center](https://trust.conductor.is) monitors our progress toward SOC 2 compliance.
* Conductor's [Privacy Policy](https://conductor.is/privacy) outlines our data handling practices.
## Data subprocessors
Conductor subprocessors are third-party entities authorized to process data to support Conductor services in accordance with our service agreements. Conductor requires each subprocessor to meet specific contractual obligations to ensure they enforce security controls and comply with data protection regulations.
| **Subprocessor** | **Function** | **Location** |
| ---------------- | --------------------------------------------------------------------------------------------------------------------------------------------------------------------------------------------------------- | ------------------------------ |
| **Better Stack** | Logging manager for ingesting, parsing, and querying API request logs for debugging, offering customer support, and product improvement purposes. Retains end-user data for 14 days before deletion. | Germany, Finland |
| **Neon** | Postgres database hosting (using AWS underneath) for managing customer data, such as for authentication, connections, and account management. Does not store any end-user data. | Oregon - US West (AWS) |
| **Render** | Compute instance hosting (using AWS underneath) for running Conductor's core API services. Processes and transmits end-user data as needed to authenticate, process, and fulfill customers' API requests. | Oregon - US West (AWS) |
| **Sentry** | Application monitoring and error tracking. Captures diagnostic data and metadata around application errors and performance issues. May include limited customer data if present in error contexts. | Iowa, U.S.; Frankfurt, Germany |
| **Vercel** | Web app hosting for Conductor's web user interfaces. Does not directly process or store customer and end-user data. | N. California - US West (AWS) |
## Data processing
### Categories of personal data transferred
The specific categories of personal data processed will depend on what data the customer chooses to request from QuickBooks Desktop company files via Conductor's API. This could include data such as names, contact information, financial account details, transaction records, and accounting data related to the employees, contractors, customers, and vendors of the customer's end-user businesses.
### Sensitive data handling
Based on Conductor's recommended API configuration, the QuickBooks Desktop data accessible via Conductor's API typically would not include highly sensitive personal data, such as Social Security Numbers, credit card details, or bank account numbers. However, if explicitly requested by the customer via the Conductor API, some sensitive data transferred can include:
* Payroll and benefits information for employees and contractors, without direct identifiers such as Social Security Numbers.
* Confidential revenue, expense, and profitability data for end-users' businesses.
* Proprietary vendor and supplier details, contracts, and transaction terms.
Conductor applies the following safeguards to protect this sensitive data:
* **Strict purpose limitation:** Sensitive data is only used for the specific purposes of enabling end-user integrations (e.g., QuickBooks Desktop) via Conductor's API, and never for any other purposes.
* **Encryption:** All sensitive data is encrypted in transit (HTTPS/TLS) and at rest (AES-256) using industry-standard encryption protocols.
* **Onward transfer restrictions:** Conductor does not transfer any sensitive data to third parties or subprocessors without prior consent from the customer, and any approved transfers are governed by contracts ensuring the same level of data protection.
* **Retention limitations:** Conductor does not retain any end-user data on a permanent basis. For operational purposes, API request logs that include end-user data are temporarily stored securely in a log manager for 14 days before permanent deletion.
* **Access restrictions:** Access to sensitive customer and end-user data is restricted to only the necessary Conductor staff who have undergone specialized privacy and security training.
### Data transfer frequency
As the customer's end-users interact with the integration, data will be transferred via Conductor's API on a continuous basis, whenever the customer initiates pulling data from or pushing data to QuickBooks Desktop. The frequency and volume of these transfers will depend on how the customer designs the integration and how actively their users engage with the QuickBooks Desktop connected features.
# Connect your users via the auth flow
Source: https://docs.conductor.is/usage/auth-flow
Enable your users to securely connect their QuickBooks Desktop to your application.
The authentication flow in Conductor is a user interface walkthrough that allows your users to securely connect their QuickBooks Desktop installation to their Conductor account. For an example, check out this [demo of the auth flow](https://connect.conductor.is/qbd/demo).
There are two main approaches to integrating the auth flow with your application:
1. Integrate the auth flow with your backend to manage multiple users and connections.
2. Generate shareable auth links for getting started quickly or one-off connections.
## Integrate the auth flow with your backend
If you are building a multi-user service where each user needs to connect their QuickBooks Desktop account to your application, you'll want to integrate Conductor's QuickBooks Desktop auth flow into your backend.
Consider you have an end-user of your application who needs to connect their QuickBooks Desktop to your application. Begin by creating an end-user for that user and saving their `id` to your database. You will use this `id` to match your users to their corresponding QuickBooks Desktop connection in Conductor.
If your database has a `users` table, consider creating a column called `conductor_end_user_id`.
```ts Create an end-user
import Conductor from "conductor-node";
const conductor = new Conductor("{{YOUR_SECRET_KEY}}");
// Replace the placeholders with your actual data.
const endUser = await conductor.endUsers.create({
companyName: "{{END_USER_COMPANY_NAME}}",
sourceId: "{{UNIQUE_ID_FROM_YOUR_DB}}",
email: "{{END_USER_EMAIL}}",
});
// Save the end-user ID to your database.
await db.users.update({
conductorEndUserId: endUser.id,
});
```
The next step is to initiate an AuthSession for your user to connect their QuickBooks Desktop. However, what if they already has an active connection? Or, what if they previously started the auth flow but didn't complete it?
You must send any request and check the `error.code` to determine the
appropriate action. The key distinction in error handling is:
* `INTEGRATION_CONNECTION_NOT_SET_UP`: The user needs to complete the auth
flow.
* Other connection errors: The user needs to take a specific action (like
restarting QuickBooks) but does not need the auth flow.
Imagine your application has a web app where your users configure the integrations with their application. If you create a section for the QuickBooks Desktop integration, you can use the following approach to track whether an active connection already exists:
```ts Check the connection status
try {
// Ping to check the connection status.
await conductor.endUsers.ping("{{END_USER_ID}}", "quickbooks_desktop");
updateUI("QuickBooks Desktop is successfully connected!");
} catch (error) {
if (error instanceof ConductorIntegrationConnectionError) {
if (error.code === "INTEGRATION_CONNECTION_NOT_SET_UP") {
// This specific error code indicates the user needs to go through the auth
// flow. Either they never started it, or didn't complete it.
const authSession = await conductor.authSessions.create({
publishableKey: "{{YOUR_PUBLISHABLE_KEY}}",
endUserId: "{{END_USER_ID}}",
});
updateUI("Set up your QuickBooks Desktop connection: " + authSession.authFlowUrl);
} else {
// Display connection errors for your user to resolve.
updateUI("An error occurred: " + error.userFacingMessage);
}
} else {
throw error;
}
}
```
***Note:** Replace `updateUI()` with your actual code that updates your application's UI based on the status or errors received.*
## Create a shareable auth flow link
For a quick start, particularly useful for pilot deployments or small-scale operations, generate a secure, shareable link for the QuickBooks Desktop auth flow:
If you haven't already done so, create an end-user and save their `id`. You will use this `id` to authenticate future requests.
```ts Node.js
import Conductor from "conductor-node";
const conductor = new Conductor("{{YOUR_SECRET_KEY}}");
// Replace these placeholders with your own values.
const endUser = await conductor.endUsers.create({
companyName: "{{END_USER_COMPANY_NAME}}",
sourceId: "{{UNIQUE_ID_FROM_YOUR_DB}}",
email: "{{END_USER_EMAIL}}",
});
console.log("Save this end-user ID to auth future requests:", endUser.id);
```
```sh cURL
curl -X POST https://api.conductor.is/v1/end-users \
-H "Content-Type: application/json" \
-H "Authorization: Bearer {{YOUR_SECRET_KEY}}" \
-d '{
"companyName": "{{END_USER_COMPANY_NAME}}",
"sourceId": "{{UNIQUE_ID_FROM_YOUR_DB}}",
"email": "{{END_USER_EMAIL}}"
}'
```
Using the end-user's ID, create an auth session with an extended link expiry time if needed:
```ts Node.js
import Conductor from "conductor-node";
const conductor = new Conductor("{{YOUR_SECRET_KEY}}");
const authSession = await conductor.authSessions.create({
publishableKey: "{{YOUR_PUBLISHABLE_KEY}}",
endUserId: "{{END_USER_ID}}",
linkExpiryMins: 60 * 24, // 24 hours
});
console.log("Send this link to your customer to complete the auth flow:", authSession.authFlowUrl);
```
```sh cURL
curl -X POST https://api.conductor.is/v1/auth-sessions \
-H "Content-Type: application/json" \
-H "Authorization: Bearer {{YOUR_SECRET_KEY}}" \
-d '{
"publishableKey": "{{YOUR_PUBLISHABLE_KEY}}",
"endUserId": "{{END_USER_ID}}",
"linkExpiryMins": 1440
}'
```
Share the generated `authFlowUrl` with your end-user to direct them to the auth flow to connect their QuickBooks Desktop instance to your application.
The link will resemble this mock example:
```
https://connect.conductor.is/qbd/auth_sess_client_secret_1234567abcdefg?key={{YOUR_PUBLISHABLE_KEY}}
```
# Autocomplete
Source: https://docs.conductor.is/usage/autocomplete
Use Conductor's built-in autocomplete to discover all available APIs, requests parameters, and response fields.
We highly recommend using [Conductor's client library](https://github.com/conductor-is/quickbooks-desktop-api) because it has built-in autocomplete and documentation for every API, request parameter, and response field. This feature is especially helpful for working with the QuickBooks Desktop API.
The following examples show the autocomplete in action in VS Code, though this works in any modern editor.
#### QuickBooks Desktop object types
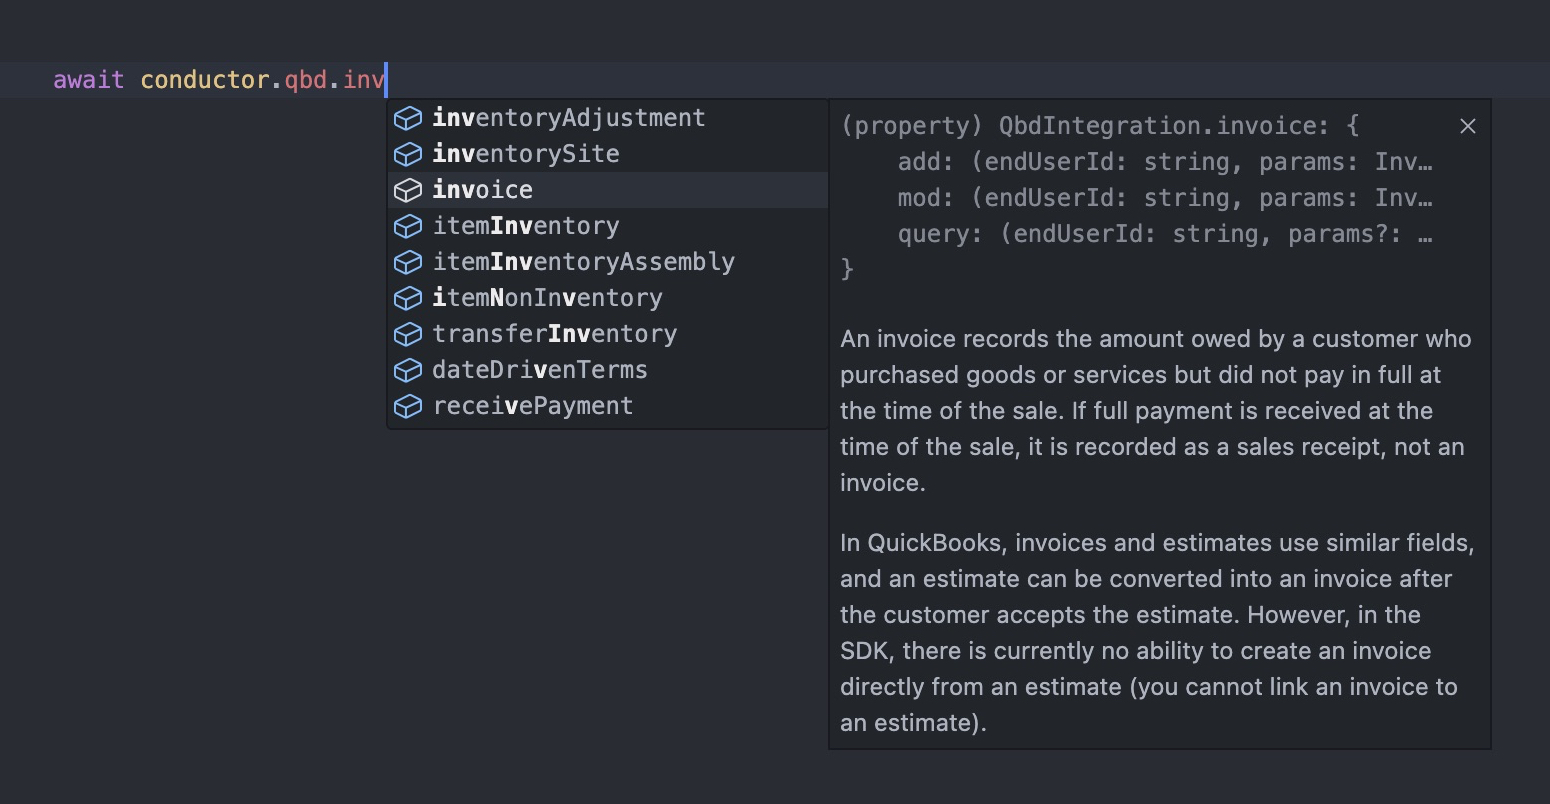
#### Request parameters
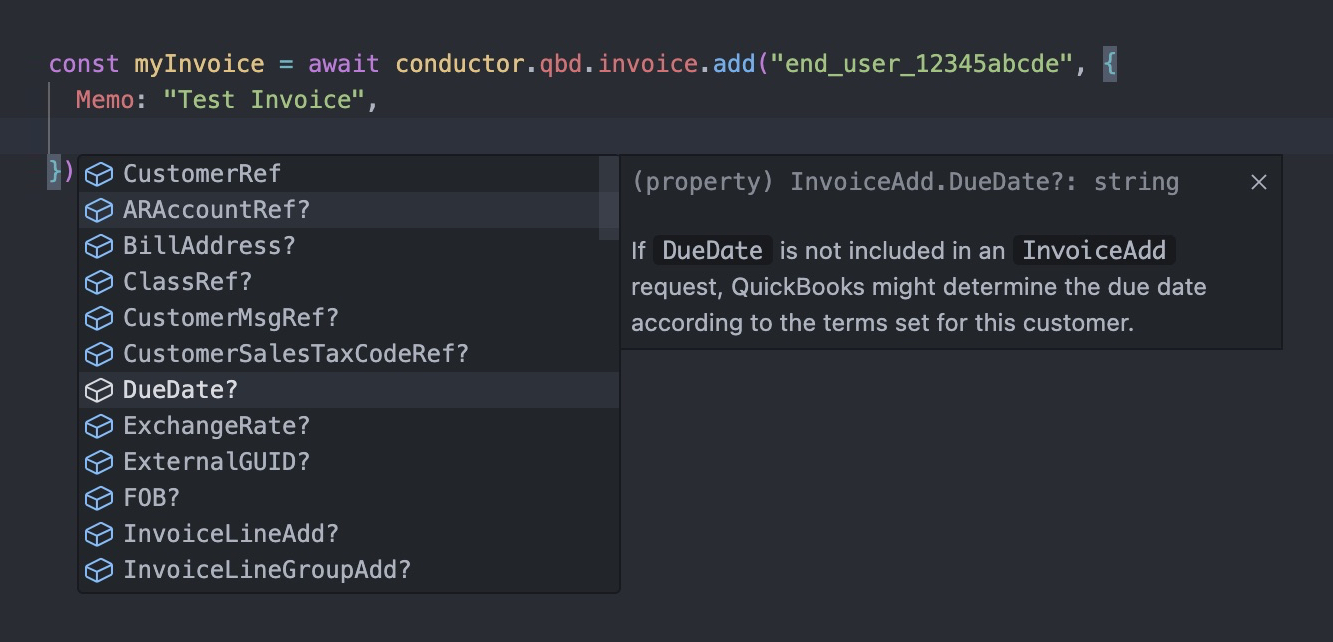
#### Response fields
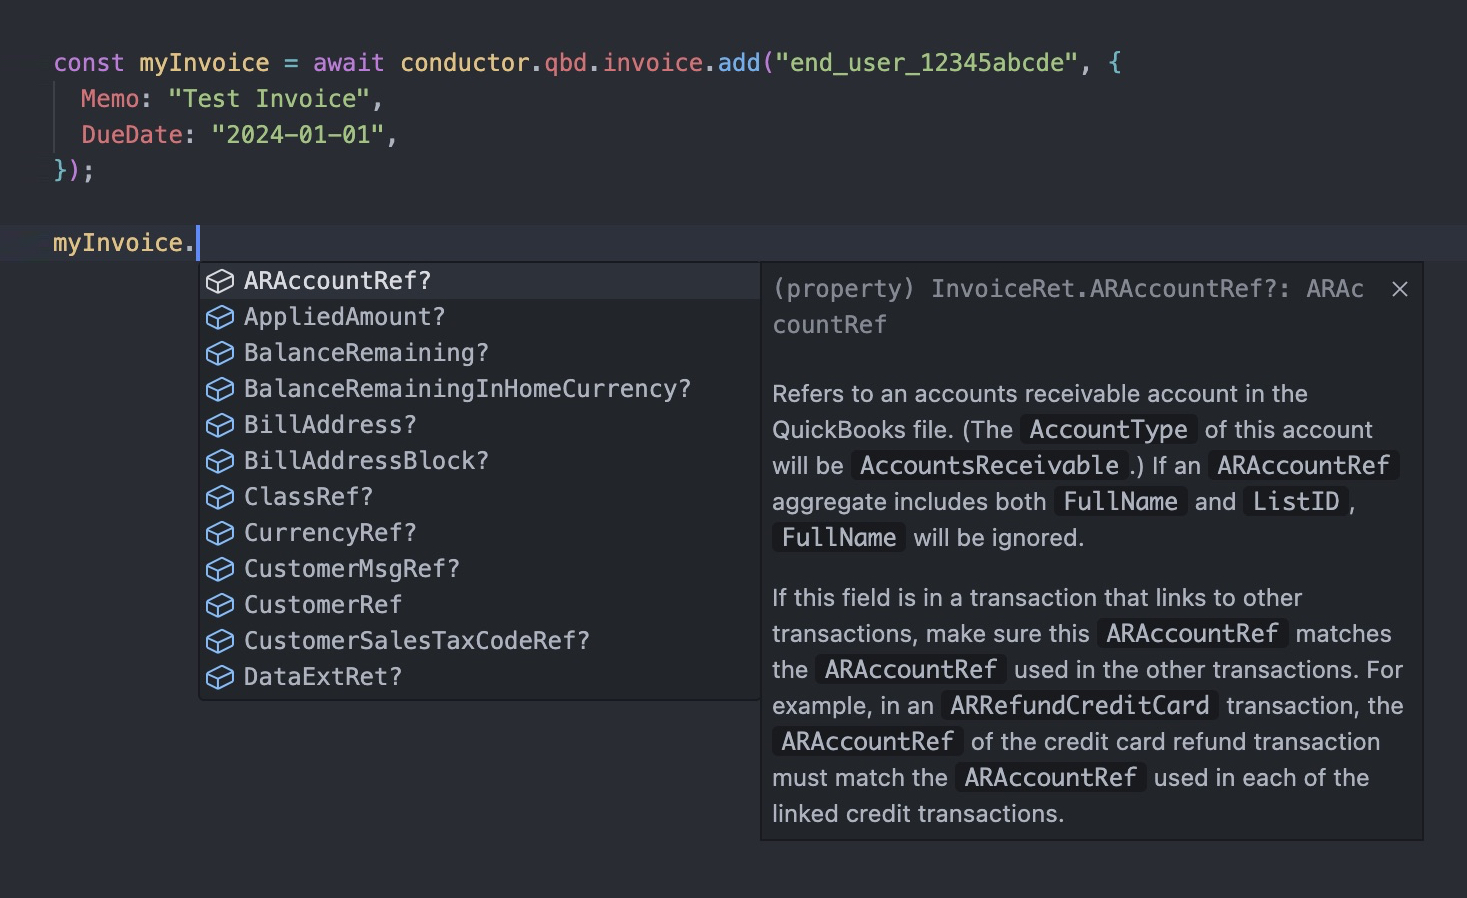
#### Enum values
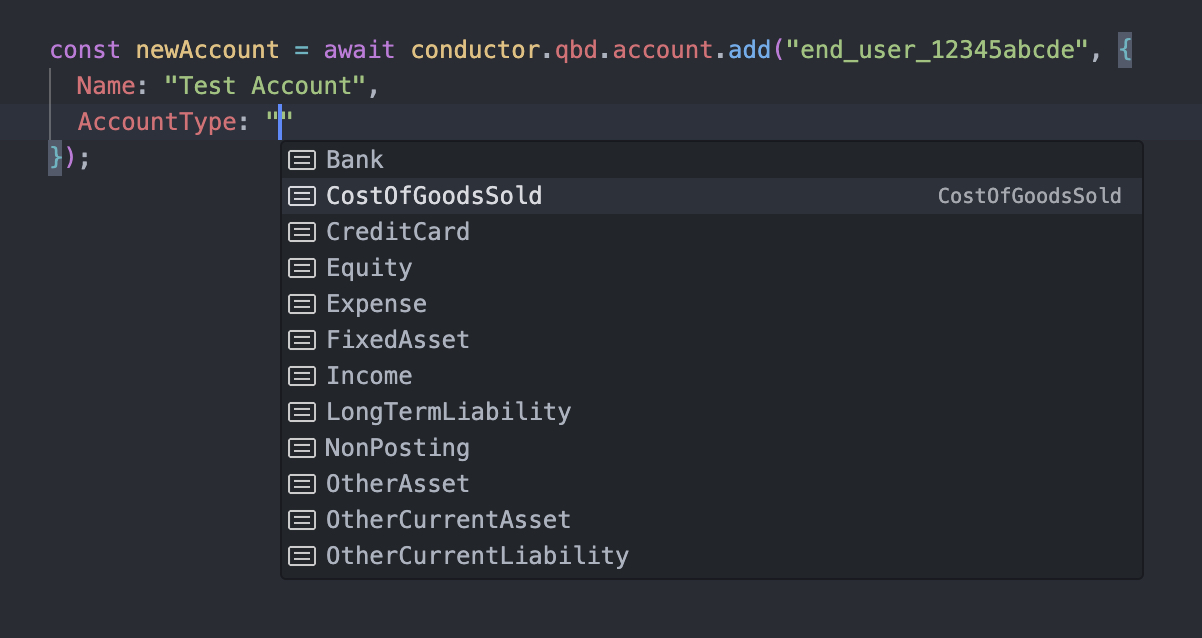
#### Inline documentation for request parameters
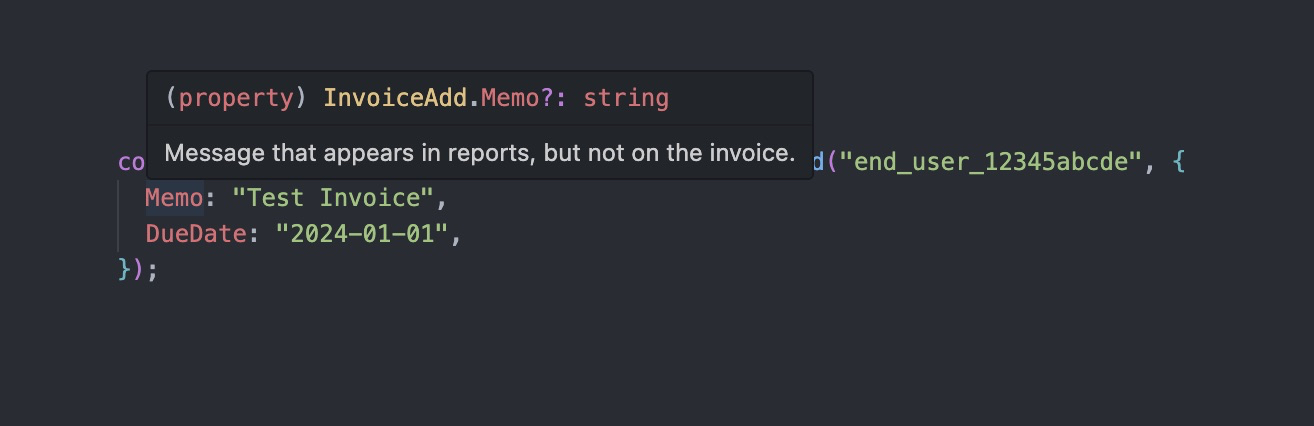
#### Inline documentation for response fields
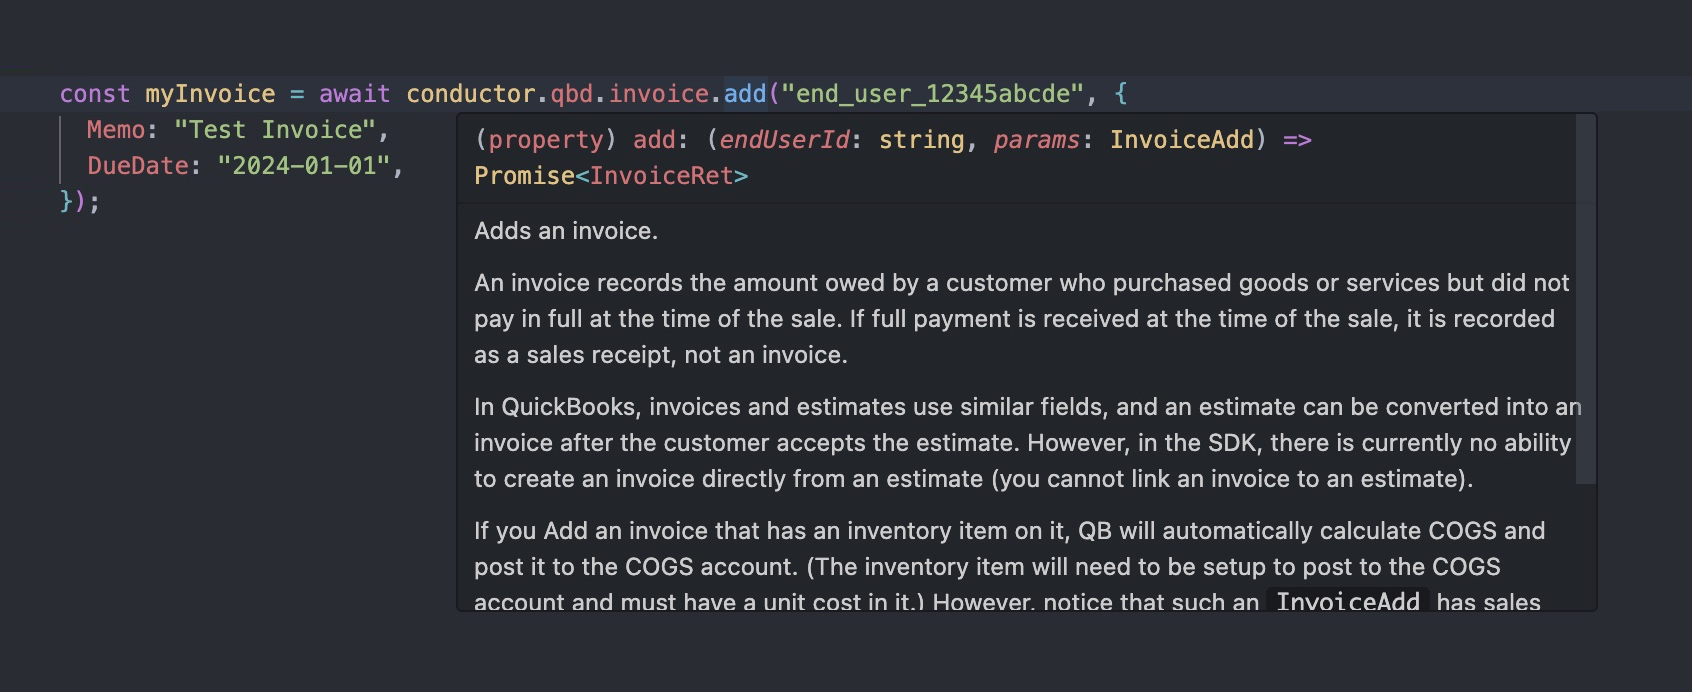
# Check an end-user's connection status
Source: https://docs.conductor.is/usage/connection-status
Sometimes, it is useful to check whether an end-user's connection is working. For example, you might want to display a "connection status" indicator in your app's UI.
To do this, you can use the [method `conductor.endUsers.ping()`](/apis/end-users/ping) to check whether the specified connection can connect and process requests end-to-end. If an error occurs, we strongly recommend displaying [the property `error.userFacingMessage`](/usage/error-handling#user-facing-error-messages) to your end-user in your app's UI because it contains instructions for how your end-user can resolve the error.
```ts Node.js
try {
await conductor.endUsers.ping(endUserId, "quickbooks_desktop");
} catch (error) {
if (error instanceof ConductorError) {
// Update your app's UI to display `error.userFacingMessage`, which explains
// that the connection is failing and how to resolve the error.
}
// ...
}
```
```sh cURL
curl -X GET https://api.conductor.is/v1/end-users/{{END_USER_ID}}/ping/quickbooks_desktop \
-H "Content-Type: application/json" \
-H "Authorization: Bearer {{YOUR_SECRET_KEY}}"
```
# Error handling
Source: https://docs.conductor.is/usage/error-handling
Catch and respond to connection errors, invalid requests, data problems, and more.
One of the most complicated aspects of QuickBooks Desktops is its error handling. QuickBooks's errors are often cryptic and unhelpful, and they can arise from several sources (e.g., Web Connector, QB request processor, QuickBooks Desktop itself), each using a different format and mechanism. Sometimes, their errors do not even describe what went wrong when they could! **Conductor unifies and simplifies these errors into a single, consistent error format and augments each with our own user-friendly language that describes how to resolve the issue.**
With Conductor, every error is an instance of [ConductorError](/apis/errors/object), each with plenty of useful information.
## Error types
Any error object you receive will be an instance of one of the following error types:
| Error Type | Description |
| ------------------------------------- | ---------------------------------------------------------------------------------------------------------------------------------------------------------------------------------------------------------------------------------------------------------------------------------------------------------------------------------------------------------------------------------------------------------------------------------------------------------------------------------------------------------------------------------------------------------------------------------------------------------------------------------------------------------------------------------------- |
| `ConductorIntegrationError` | Raised when the third-party integration encounters an error while processing the end-user's request. This often results from an issue with the request or data handling that requires your attention to resolve.
The trial installation will work for 30 days, after which you will need a
developer (NFR) license, which you can [get for free by following our
guide](/qbd/dev-license). After completing that guide, you can continue to
use the trial version while you wait for your NFR license to arrive.
## 4. Connect Conductor to your QuickBooks Desktop instance
Now that you have your own QuickBooks Desktop test instance, you can return to the [Quickstart](/quickstart) guide to connect it to Conductor. Don't worry; this part is much easier.
# Quickstart
Source: https://docs.conductor.is/quickstart
Connect to QuickBooks Desktop via a modern API in 5 minutes.
export const Image = ({src, alt, width, align = "center", noShadow = false, noBorder = false, noZoom = false}) => ;
Welcome! 👋 Follow the instructions below to connect your QuickBooks Desktop instance and start working with your data in just a few minutes. You'll be able to fetch, create, and update any object type in real-time with our modern APIs and SDKs.
## Part 1: Set up your Conductor account
Sign up for a Conductor account [here](https://dashboard.conductor.is/sign-up) with your work email.
Create an organization in the Conductor dashboard. This should be the name of your company.
In the organization you created, let's select the **"testing"** project. An organization can have multiple projects, but we'll use this one for now.
## Part 2: Connect to QuickBooks Desktop
**Important**: A QuickBooks Desktop instance for testing is **required**. If
you do not have one, you can [create a free test
instance](/qbd/test-instance).
After selecting the **"testing"** project in the Conductor dashboard, click the **"Create end user"** button.
An end-user represents the user or organization within *your* application for whom we are connecting to their QuickBooks Desktop instance. Each end-user maps to a single QuickBooks Desktop company file because each company file represents an individual legal entity.
After creating an end-user in the dashboard, it will automatically create an auth session. Visit this URL in your browser on the same computer or instance as your QuickBooks Desktop installation. This authentication flow will guide you through connecting your QuickBooks Desktop instance to Conductor.
*Read every step carefully!*
In the Conductor dashboard, navigate to the **API Keys** tab and find your project's **Secret Key**. You'll need this in Step 6 to authenticate your requests.
Navigate to the **End Users** tab and find your end-user's **ID**. You'll need this in Step 6 to identify the end-user in your requests.
```sh Node.js Beta!
# 👋 Our Node Beta SDK is much better! However, a few rare QBD
# types are still in development - contact us to request support for
# specific types not listed on https://docs.conductor.is/qbd-api.
npm install conductor-node@beta
```
```sh Node.js legacy
npm install conductor-node
```
```sh Python
pip install conductor-py
```
```sh cURL
# Continue to the next step to access our REST API directly via `curl`.
```
Try fetching a list of QBD Customers:
```ts Node.js Beta!
import Conductor from "conductor-node";
const conductor = new Conductor({
apiKey: "{{YOUR_SECRET_KEY}}"
});
async function main() {
const invoices = await conductor.qbd.invoices.list({
conductorEndUserId: "{{YOUR_END_USER_ID}}",
limit: 10,
});
console.log(invoices.data);
}
main();
```
```ts Node.js legacy
import Conductor from "conductor-node";
const conductor = new Conductor("{{YOUR_SECRET_KEY}}");
async function main() {
const invoices = await conductor.qbd.invoice.query("{{YOUR_END_USER_ID}}", {
MaxReturned: 10,
});
console.log(invoices);
}
main();
```
```py Python
from conductor import Conductor
conductor = Conductor(api_key="{{YOUR_SECRET_KEY}}")
invoices = conductor.qbd.invoices.list(
conductor_end_user_id="{{YOUR_END_USER_ID}}",
)
print(invoices.data)
```
```sh cURL
curl --request GET \
--url 'https://api.conductor.is/v1/quickbooks-desktop/customers' \
--header 'Authorization: Bearer {{YOUR_SECRET_KEY}}' \
--header 'Conductor-End-User-Id: {{YOUR_END_USER_ID}}'
```
```json Example QBD response
{
"objectType": "list",
"url": "/v1/quickbooks-desktop/customers",
"data": [
{
"id": "80000001-1234567890",
"objectType": "qbd_customer",
"createdAt": "2021-10-01T17:34:56.000Z",
"name": "ABC Corporation",
"isActive": true,
// ...
}
// ...
],
// ...
}
```
# Security and data retention
Source: https://docs.conductor.is/security
Conductor's policies on security, data retention, and data processing.
## Temporary data storage
* **Conductor does not permanently retain your end-user data (such as QuickBooks Desktop data).**
* **For operational purposes, API request logs, which include end-user data, are temporarily stored securely in a SOC 2 compliant log manager for 14 days before permanent deletion.**
* The logs are encrypted at rest using AES-256 and in transit using HTTPS/TLS.
* The logs are stored in certified data centers located in Germany and Finland within the EU.
* Access to these logs is strictly limited to authorized Conductor engineers, who use them solely for debugging, customer support, and product improvement.
## Permanent data storage
* The only data Conductor stores permanently pertains to managing and authenticating your Conductor account, connections, end-users, API keys, and projects. This does not include any end-user data.
* This data is stored in a centralized SOC 2 compliant database hosted by AWS in the US West (Oregon) region. There is no physical or logical separation of customer data within the database.
* The database is encrypted at rest and requires SSL/TLS encryption for all connections.
* Access to the database is strictly limited to authorized Conductor engineers.
## API request security
* All API requests to Conductor are authenticated using an API key and restricted to HTTPS.
* Data in transit is encrypted, and requests are processed through our SOC 2 compliant backend hosted by AWS in the US West (Oregon) region.
## Security and compliance
* **SOC 2:** Conductor is actively working toward achieving its SOC 2 certification, implementing and monitoring the necessary measures to meet the Security, Availability, and Confidentiality Trust Service Criteria. We have engaged an independent AICPA-accredited auditor to formally assess and report on Conductor's controls.
* Conductor's [Trust Center](https://trust.conductor.is) monitors our progress toward SOC 2 compliance.
* Conductor's [Privacy Policy](https://conductor.is/privacy) outlines our data handling practices.
## Data subprocessors
Conductor subprocessors are third-party entities authorized to process data to support Conductor services in accordance with our service agreements. Conductor requires each subprocessor to meet specific contractual obligations to ensure they enforce security controls and comply with data protection regulations.
| **Subprocessor** | **Function** | **Location** |
| ---------------- | --------------------------------------------------------------------------------------------------------------------------------------------------------------------------------------------------------- | ------------------------------ |
| **Better Stack** | Logging manager for ingesting, parsing, and querying API request logs for debugging, offering customer support, and product improvement purposes. Retains end-user data for 14 days before deletion. | Germany, Finland |
| **Neon** | Postgres database hosting (using AWS underneath) for managing customer data, such as for authentication, connections, and account management. Does not store any end-user data. | Oregon - US West (AWS) |
| **Render** | Compute instance hosting (using AWS underneath) for running Conductor's core API services. Processes and transmits end-user data as needed to authenticate, process, and fulfill customers' API requests. | Oregon - US West (AWS) |
| **Sentry** | Application monitoring and error tracking. Captures diagnostic data and metadata around application errors and performance issues. May include limited customer data if present in error contexts. | Iowa, U.S.; Frankfurt, Germany |
| **Vercel** | Web app hosting for Conductor's web user interfaces. Does not directly process or store customer and end-user data. | N. California - US West (AWS) |
## Data processing
### Categories of personal data transferred
The specific categories of personal data processed will depend on what data the customer chooses to request from QuickBooks Desktop company files via Conductor's API. This could include data such as names, contact information, financial account details, transaction records, and accounting data related to the employees, contractors, customers, and vendors of the customer's end-user businesses.
### Sensitive data handling
Based on Conductor's recommended API configuration, the QuickBooks Desktop data accessible via Conductor's API typically would not include highly sensitive personal data, such as Social Security Numbers, credit card details, or bank account numbers. However, if explicitly requested by the customer via the Conductor API, some sensitive data transferred can include:
* Payroll and benefits information for employees and contractors, without direct identifiers such as Social Security Numbers.
* Confidential revenue, expense, and profitability data for end-users' businesses.
* Proprietary vendor and supplier details, contracts, and transaction terms.
Conductor applies the following safeguards to protect this sensitive data:
* **Strict purpose limitation:** Sensitive data is only used for the specific purposes of enabling end-user integrations (e.g., QuickBooks Desktop) via Conductor's API, and never for any other purposes.
* **Encryption:** All sensitive data is encrypted in transit (HTTPS/TLS) and at rest (AES-256) using industry-standard encryption protocols.
* **Onward transfer restrictions:** Conductor does not transfer any sensitive data to third parties or subprocessors without prior consent from the customer, and any approved transfers are governed by contracts ensuring the same level of data protection.
* **Retention limitations:** Conductor does not retain any end-user data on a permanent basis. For operational purposes, API request logs that include end-user data are temporarily stored securely in a log manager for 14 days before permanent deletion.
* **Access restrictions:** Access to sensitive customer and end-user data is restricted to only the necessary Conductor staff who have undergone specialized privacy and security training.
### Data transfer frequency
As the customer's end-users interact with the integration, data will be transferred via Conductor's API on a continuous basis, whenever the customer initiates pulling data from or pushing data to QuickBooks Desktop. The frequency and volume of these transfers will depend on how the customer designs the integration and how actively their users engage with the QuickBooks Desktop connected features.
# Connect your users via the auth flow
Source: https://docs.conductor.is/usage/auth-flow
Enable your users to securely connect their QuickBooks Desktop to your application.
The authentication flow in Conductor is a user interface walkthrough that allows your users to securely connect their QuickBooks Desktop installation to their Conductor account. For an example, check out this [demo of the auth flow](https://connect.conductor.is/qbd/demo).
There are two main approaches to integrating the auth flow with your application:
1. Integrate the auth flow with your backend to manage multiple users and connections.
2. Generate shareable auth links for getting started quickly or one-off connections.
## Integrate the auth flow with your backend
If you are building a multi-user service where each user needs to connect their QuickBooks Desktop account to your application, you'll want to integrate Conductor's QuickBooks Desktop auth flow into your backend.
Consider you have an end-user of your application who needs to connect their QuickBooks Desktop to your application. Begin by creating an end-user for that user and saving their `id` to your database. You will use this `id` to match your users to their corresponding QuickBooks Desktop connection in Conductor.
If your database has a `users` table, consider creating a column called `conductor_end_user_id`.
```ts Create an end-user
import Conductor from "conductor-node";
const conductor = new Conductor("{{YOUR_SECRET_KEY}}");
// Replace the placeholders with your actual data.
const endUser = await conductor.endUsers.create({
companyName: "{{END_USER_COMPANY_NAME}}",
sourceId: "{{UNIQUE_ID_FROM_YOUR_DB}}",
email: "{{END_USER_EMAIL}}",
});
// Save the end-user ID to your database.
await db.users.update({
conductorEndUserId: endUser.id,
});
```
The next step is to initiate an AuthSession for your user to connect their QuickBooks Desktop. However, what if they already has an active connection? Or, what if they previously started the auth flow but didn't complete it?
You must send any request and check the `error.code` to determine the
appropriate action. The key distinction in error handling is:
* `INTEGRATION_CONNECTION_NOT_SET_UP`: The user needs to complete the auth
flow.
* Other connection errors: The user needs to take a specific action (like
restarting QuickBooks) but does not need the auth flow.
Imagine your application has a web app where your users configure the integrations with their application. If you create a section for the QuickBooks Desktop integration, you can use the following approach to track whether an active connection already exists:
```ts Check the connection status
try {
// Ping to check the connection status.
await conductor.endUsers.ping("{{END_USER_ID}}", "quickbooks_desktop");
updateUI("QuickBooks Desktop is successfully connected!");
} catch (error) {
if (error instanceof ConductorIntegrationConnectionError) {
if (error.code === "INTEGRATION_CONNECTION_NOT_SET_UP") {
// This specific error code indicates the user needs to go through the auth
// flow. Either they never started it, or didn't complete it.
const authSession = await conductor.authSessions.create({
publishableKey: "{{YOUR_PUBLISHABLE_KEY}}",
endUserId: "{{END_USER_ID}}",
});
updateUI("Set up your QuickBooks Desktop connection: " + authSession.authFlowUrl);
} else {
// Display connection errors for your user to resolve.
updateUI("An error occurred: " + error.userFacingMessage);
}
} else {
throw error;
}
}
```
***Note:** Replace `updateUI()` with your actual code that updates your application's UI based on the status or errors received.*
## Create a shareable auth flow link
For a quick start, particularly useful for pilot deployments or small-scale operations, generate a secure, shareable link for the QuickBooks Desktop auth flow:
If you haven't already done so, create an end-user and save their `id`. You will use this `id` to authenticate future requests.
```ts Node.js
import Conductor from "conductor-node";
const conductor = new Conductor("{{YOUR_SECRET_KEY}}");
// Replace these placeholders with your own values.
const endUser = await conductor.endUsers.create({
companyName: "{{END_USER_COMPANY_NAME}}",
sourceId: "{{UNIQUE_ID_FROM_YOUR_DB}}",
email: "{{END_USER_EMAIL}}",
});
console.log("Save this end-user ID to auth future requests:", endUser.id);
```
```sh cURL
curl -X POST https://api.conductor.is/v1/end-users \
-H "Content-Type: application/json" \
-H "Authorization: Bearer {{YOUR_SECRET_KEY}}" \
-d '{
"companyName": "{{END_USER_COMPANY_NAME}}",
"sourceId": "{{UNIQUE_ID_FROM_YOUR_DB}}",
"email": "{{END_USER_EMAIL}}"
}'
```
Using the end-user's ID, create an auth session with an extended link expiry time if needed:
```ts Node.js
import Conductor from "conductor-node";
const conductor = new Conductor("{{YOUR_SECRET_KEY}}");
const authSession = await conductor.authSessions.create({
publishableKey: "{{YOUR_PUBLISHABLE_KEY}}",
endUserId: "{{END_USER_ID}}",
linkExpiryMins: 60 * 24, // 24 hours
});
console.log("Send this link to your customer to complete the auth flow:", authSession.authFlowUrl);
```
```sh cURL
curl -X POST https://api.conductor.is/v1/auth-sessions \
-H "Content-Type: application/json" \
-H "Authorization: Bearer {{YOUR_SECRET_KEY}}" \
-d '{
"publishableKey": "{{YOUR_PUBLISHABLE_KEY}}",
"endUserId": "{{END_USER_ID}}",
"linkExpiryMins": 1440
}'
```
Share the generated `authFlowUrl` with your end-user to direct them to the auth flow to connect their QuickBooks Desktop instance to your application.
The link will resemble this mock example:
```
https://connect.conductor.is/qbd/auth_sess_client_secret_1234567abcdefg?key={{YOUR_PUBLISHABLE_KEY}}
```
# Autocomplete
Source: https://docs.conductor.is/usage/autocomplete
Use Conductor's built-in autocomplete to discover all available APIs, requests parameters, and response fields.
We highly recommend using [Conductor's client library](https://github.com/conductor-is/quickbooks-desktop-api) because it has built-in autocomplete and documentation for every API, request parameter, and response field. This feature is especially helpful for working with the QuickBooks Desktop API.
The following examples show the autocomplete in action in VS Code, though this works in any modern editor.
#### QuickBooks Desktop object types

#### Request parameters

#### Response fields

#### Enum values

#### Inline documentation for request parameters

#### Inline documentation for response fields

# Check an end-user's connection status
Source: https://docs.conductor.is/usage/connection-status
Sometimes, it is useful to check whether an end-user's connection is working. For example, you might want to display a "connection status" indicator in your app's UI.
To do this, you can use the [method `conductor.endUsers.ping()`](/apis/end-users/ping) to check whether the specified connection can connect and process requests end-to-end. If an error occurs, we strongly recommend displaying [the property `error.userFacingMessage`](/usage/error-handling#user-facing-error-messages) to your end-user in your app's UI because it contains instructions for how your end-user can resolve the error.
```ts Node.js
try {
await conductor.endUsers.ping(endUserId, "quickbooks_desktop");
} catch (error) {
if (error instanceof ConductorError) {
// Update your app's UI to display `error.userFacingMessage`, which explains
// that the connection is failing and how to resolve the error.
}
// ...
}
```
```sh cURL
curl -X GET https://api.conductor.is/v1/end-users/{{END_USER_ID}}/ping/quickbooks_desktop \
-H "Content-Type: application/json" \
-H "Authorization: Bearer {{YOUR_SECRET_KEY}}"
```
# Error handling
Source: https://docs.conductor.is/usage/error-handling
Catch and respond to connection errors, invalid requests, data problems, and more.
One of the most complicated aspects of QuickBooks Desktops is its error handling. QuickBooks's errors are often cryptic and unhelpful, and they can arise from several sources (e.g., Web Connector, QB request processor, QuickBooks Desktop itself), each using a different format and mechanism. Sometimes, their errors do not even describe what went wrong when they could! **Conductor unifies and simplifies these errors into a single, consistent error format and augments each with our own user-friendly language that describes how to resolve the issue.**
With Conductor, every error is an instance of [ConductorError](/apis/errors/object), each with plenty of useful information.
## Error types
Any error object you receive will be an instance of one of the following error types:
| Error Type | Description |
| ------------------------------------- | ---------------------------------------------------------------------------------------------------------------------------------------------------------------------------------------------------------------------------------------------------------------------------------------------------------------------------------------------------------------------------------------------------------------------------------------------------------------------------------------------------------------------------------------------------------------------------------------------------------------------------------------------------------------------------------------- |
| `ConductorIntegrationError` | Raised when the third-party integration encounters an error while processing the end-user's request. This often results from an issue with the request or data handling that requires your attention to resolve.
E.g., a `ListID` you provided was not found in QuickBooks Desktop, or an accounting value you supplied did not adhere to the integration's accounting rules.
Refer to `error.integrationCode` for the error code returned by the integration, if available. |
| `ConductorIntegrationConnectionError` | Raised when a connection error occurs with the third-party integration on the end-user's side. This typically indicates an issue with the end-user's connection or configuration, which they must resolve. In other words, you cannot take action to fix these errors.
E.g., the Web Connector failed to connect to QuickBooks Desktop on the end-user's computer.
Refer to `error.integrationCode` for the error code returned by the integration connector, if available.
❗ We recommend *not* triggering alerts for these errors because only the end-user can fix them. See [Global error handling](#global-error-handling) for an example of this. |
| `ConductorInvalidRequestError` | Raised when you make an API call with the wrong parameters, in the wrong state, or in an invalid way. |
| `ConductorAuthenticationError` | Raised when Conductor cannot authenticate you with the credentials you provided. E.g., an incorrect API key. |
| `ConductorPermissionError` | Raised when you attempt to access a resource that is not allowed. |
| `ConductorConnectionError` | Raised when there was a network problem between the client (on your server) and Conductor's servers. E.g., a downed network or a bad TLS certificate. |
| `ConductorInternalError` | Raised when something went wrong on Conductor's end. (These are rare.) |
## Common error codes
| Error Code | Description |
| ----------------------------------- | ---------------------------------------------------------------------------------------------------------------------------------------------------------------------------------------------------------------------------------------------------------------------------------------------------------------- |
| `INTEGRATION_CONNECTION_NOT_SET_UP` | Occurs when an API request is made for an end-user who has not completed the authentication flow. This typically happens when a user begins the QuickBooks Desktop setup process (creating an end-user) but doesn't finish configuring their company file connection before your app attempts to make API calls. |
| `INTEGRATION_CONNECTION_NOT_ACTIVE` | Indicates that the Web Connector connection is offline. This error occurs when Conductor hasn't received a heartbeat from Web Connector in over two minutes, suggesting the connector isn't running or is experiencing issues on the end-user's machine. |
| `QBD_CONNECTION_ERROR` | Raised when the Web Connector is online but cannot establish a connection with QuickBooks Desktop. Common causes include having the wrong company file open, QuickBooks Desktop not running, or insufficient permissions. |
| `QBD_REQUEST_ERROR` | Indicates a QuickBooks Desktop business logic error. These errors occur when a request violates QuickBooks' business rules - for example, attempting to create a bank account with a negative opening balance or using an invalid reference to another entity. |
| `QBD_REQUEST_TIMEOUT` | Occurs when QuickBooks Desktop successfully connects but fails to respond within the expected timeframe. This can happen in scenarios where QuickBooks needs to be launched and load a large company file, or when processing requests involving substantial amounts of data. |
These error codes are accessible via the `error.code` property of any
`ConductorError`. For integration-specific errors, you can also reference
`error.integrationCode` for the raw error code from QuickBooks Desktop.
## User-facing error messages
Every [ConductorError](/apis/errors/object) includes two error messages, and you should use both:
1. `error.message`: The technical error message that you should log for debugging.
2. `error.userFacingMessage`: The descriptive user-friendly error message explicitly written for the end-user that often contains instructions helping the end-user resolve the issue.
Your app's UI should display `error.userFacingMessage` to your end-users for
every `ConductorError` while logging the full `error` object for your
debugging purposes.
For example, see the `message` and `userFacingMessage` in the following QBD connection error:
```json Example ConductorError object
{
"error": {
// The developer-facing error message, which includes the QBD-provided
// error code and the QBD-provided error message.
"message": "QBD Connection Error (0x80040420): The QuickBooks user
has denied access.",
// The user-facing error message with instructions for the end-user to
// resolve the issue.
"userFacingMessage": "We could not connect to QuickBooks Desktop
because we must re-authorize our connection. To fix this, open
QuickBooks Desktop, log in as Admin, navigate to 'Edit >
Preferences > Integrated Applications', click 'Company Preferences',
select our app, click 'Properties...', ensure 'Allow this
application to log in automatically' is checked, then click 'OK'.
Then try again.",
"type": "INTEGRATION_CONNECTION_ERROR",
"code": "QBD_CONNECTION_ERROR",
"httpStatusCode": 502,
"integrationCode": "0x80040420",
"requestId": "req_1234567890"
}
}
```
## Specific error handling
If you need special handling for specific errors, you can wrap individual API calls, as shown below.
Using `async`/`await`:
```ts
try {
const newAccount = await conductor.qbd.account.add(endUserId, {
Name: "Test Account",
AccountType: "Bank",
OpenBalance: "100",
});
} catch (error) {
if (error instanceof ConductorError) {
// Check `error.code`, `error.integrationCode`, etc., for special handling.
} else {
// ...
}
}
```
Or in the form of a rejected promise:
```ts
conductor.qbd.account
.add(endUserId, {
Name: "Test Account",
AccountType: "Bank",
OpenBalance: "100",
})
.then((newAccount) => {
// ...
})
.catch((error) => {
if (error instanceof ConductorError) {
// Check `error.code`, `error.integrationCode`, etc., for special handling.
} else {
// ...
}
});
```
## Global error handling
It is unnecessary to wrap each API call individually, as demonstrated in the examples above. Instead, we suggest implementing a global error handler for your server, such as [`app.use((error, ...) => { ... })` in Express](https://expressjs.com/en/guide/error-handling.html#writing-error-handlers) or [`formatError` in Apollo Server](https://apollographql.com/docs/apollo-server/data/errors/#for-client-responses). Within this handler, perform the following actions:
1. For any `ConductorError` instance, display the `error.userFacingMessage` property to the end-user in your app's UI while logging the complete error object.
2. For all `ConductorError` instances, transmit the full error object to your error-tracking service (e.g., Sentry):
* Send a **warning** for instances of `ConductorIntegrationConnectionError`, which are not actionable by you and can only be resolved by the end-user; for example, failure to connect to QuickBooks Desktop on the end-user's computer.
* Send an **error** for all other `ConductorError` instances, such as an invalid API key.
For example, using an [Express error handler](https://expressjs.com/en/guide/error-handling.html#writing-error-handlers):
```ts
import * as Sentry from "@sentry/node";
import {
ConductorError,
ConductorIntegrationConnectionError,
} from "conductor-node";
app.use((error, req, res, next) => {
if (error instanceof ConductorError) {
Sentry.captureException(error, {
level:
error instanceof ConductorIntegrationConnectionError
? "warning"
: "error",
});
// Return a different error message for your end-user to see in your
// app's UI.
res.status(500).send({ error: { message: error.userFacingMessage } });
} else {
// ...
}
});
```
Or using [Apollo Server's error handler](https://apollographql.com/docs/apollo-server/data/errors/#for-client-responses):
```ts
import { ApolloServer } from "@apollo/server";
import { unwrapResolverError } from "@apollo/server/errors";
import * as Sentry from "@sentry/node";
import {
ConductorError,
ConductorIntegrationConnectionError,
} from "conductor-node";
const server = new ApolloServer({
// ...
formatError: (formattedError, error) => {
const origError = unwrapResolverError(error);
if (origError instanceof ConductorError) {
Sentry.captureException(origError, {
level:
origError instanceof ConductorIntegrationConnectionError
? "warning"
: "error",
});
return {
...formattedError,
// Return a different error message for your end-user to see in
// your app's UI.
message: origError.userFacingMessage,
};
}
// ...
return formattedError;
},
});
```
# API keys
Source: https://docs.conductor.is/usage/keys
Use API keys to authenticate API requests.
Conductor authenticates your API requests using your account's API keys. If a request does not include a valid key, Conductor returns an invalid request error.
## Secret and publishable keys
Every Conductor account has two API keys:
1. **Secret key:** Use this key to authenticate requests to Conductor's API from your server-side code. It is highly sensitive and should be deleted if leaked. Store this key securely in your server, such as in an environment variable or a credential management system. Do not store this key in Git, include it in client-side code, or expose it on a website.
2. **Publishable key:** Use this key when [creating an AuthSession](/apis/auth-sessions/create), which generates the unique [auth flow](/usage/auth-flow) URL for your end-user. Unlike the secret key, the publishable key can be safely shared, stored in Git, or included in client-side code.
# Terminology
Source: https://docs.conductor.is/usage/terminology
The key concepts you should know to use Conductor.
Familiarize yourself with the terms below that we use throughout the documentation and APIs.
| Term | Definition |
| ------------------------------------------ | ------------------------------------------------------------------------------------------------------------------------------------------------------------------------------------------------------------- |
| [end-user](/apis/end-users/object) | A user of *your* application for whom you will connect integrations through Conductor. Each end-user can represent an individual or an entire company/organization of multiple users within your application. |
| Integration | A third-party service you want to connect to your application. For example, QuickBooks Desktop. |
| [Auth session](/apis/auth-sessions/object) | An authentication session with a secure link to share with your end-user to connect their QuickBooks Desktop instance to your Conductor account. |
| [Authentication flow](/usage/auth-flow) | The UI walkthrough that guides your users through securely connecting their QuickBooks Desktop to your Conductor account. |